

I’m a sim racer and amateur racer with a passion for Motorsport, good racecraft and the technical and setup aspect of sim racing.
Trail braking is the single biggest step change I’ve found between “driving a lap” and “driving a fast lap”. It’s the technique that rewards brave, smooth pedal work with measurable lap time, and it’s the one I have to re-learn every time I’ve been away from the sim for a few weeks. Danny Lee put it perfectly in his video on the subject: “trail braking is to racing what ketchup is to a sausage sandwich – you can get by without it, but you’ll be missing something important”. After ten years of real-world racing and more iRacing laps than I can count, I’d go further and say you cannot really compete without it.
Quick Navigation
Jump directly to what you’re looking for:
What Trail Braking Is |
Why It Makes You Faster |
The Butter-On-Bread Pressure Model |
Pressure Split By Corner Type |
The Risk and How To Practise |
Equipment That Moves The Needle |
Common Mistakes |
When Trail Braking Isn’t The Answer |
Sources
What Trail Braking Is
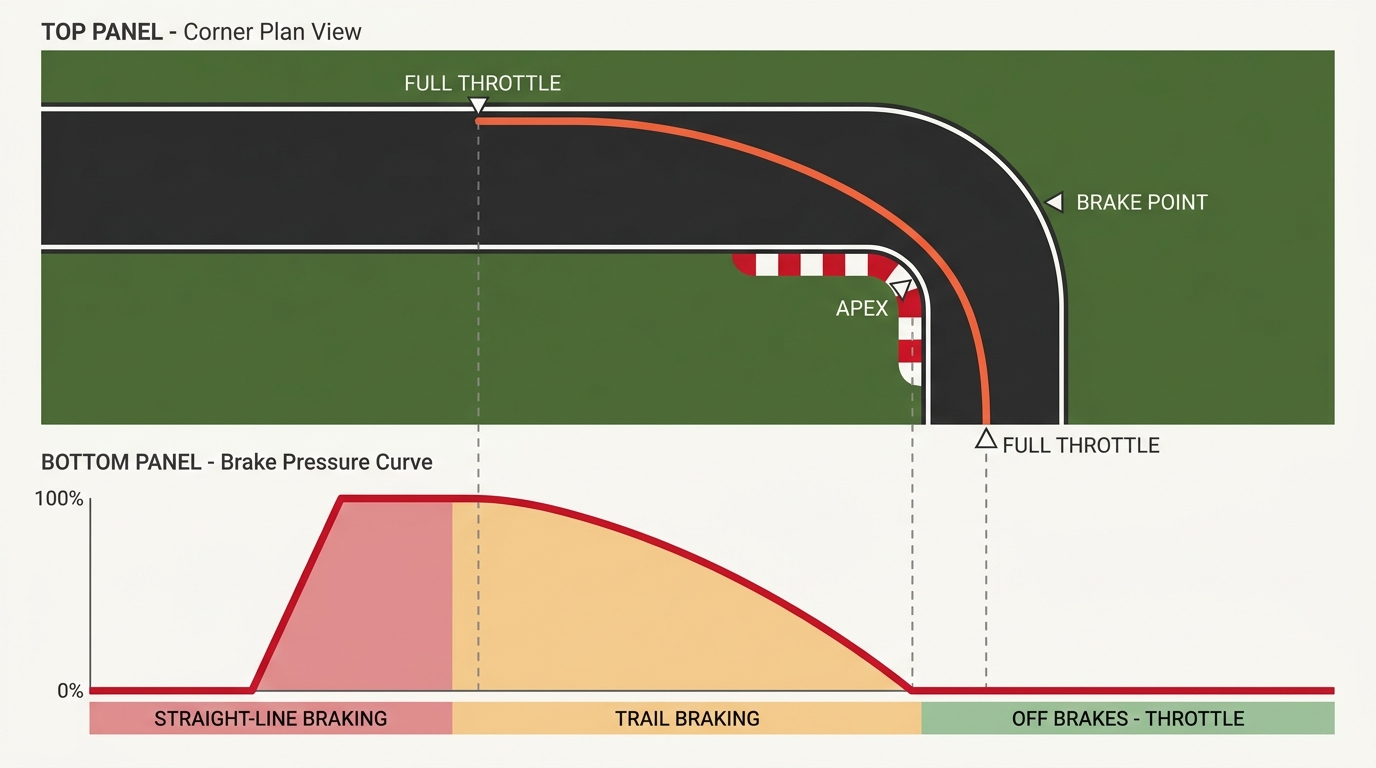
The simple version: you stay on the brake pedal a little way into the corner instead of releasing it all at once at turn-in. Not full braking – by the time you’re steering, pressure is already fading. You’re easing off the brakes as you ease in the steering, finally coming off the pedal somewhere around the apex.
That overlap – the bit where you’re still braking AND turning – is the whole thing. Most drivers coming up from road cars don’t do it. They brake in a straight line, come off the pedal, turn the wheel, hit the apex, go. Logical. Also slow. Your fastest lap has brake pressure trailing off smoothly as the steering input increases, the two inputs blending into each other rather than stacking one after the other.
Danny Lee’s best analogy for why this is faster isn’t mechanical – it’s a relay baton. Runners don’t come to a complete stop before handing over the baton – they run through the handoff, passing it while both are moving. Trail braking does the same with braking and turning. You don’t stop braking and then start turning. They overlap. That overlap is speed.
Why It Makes You Faster
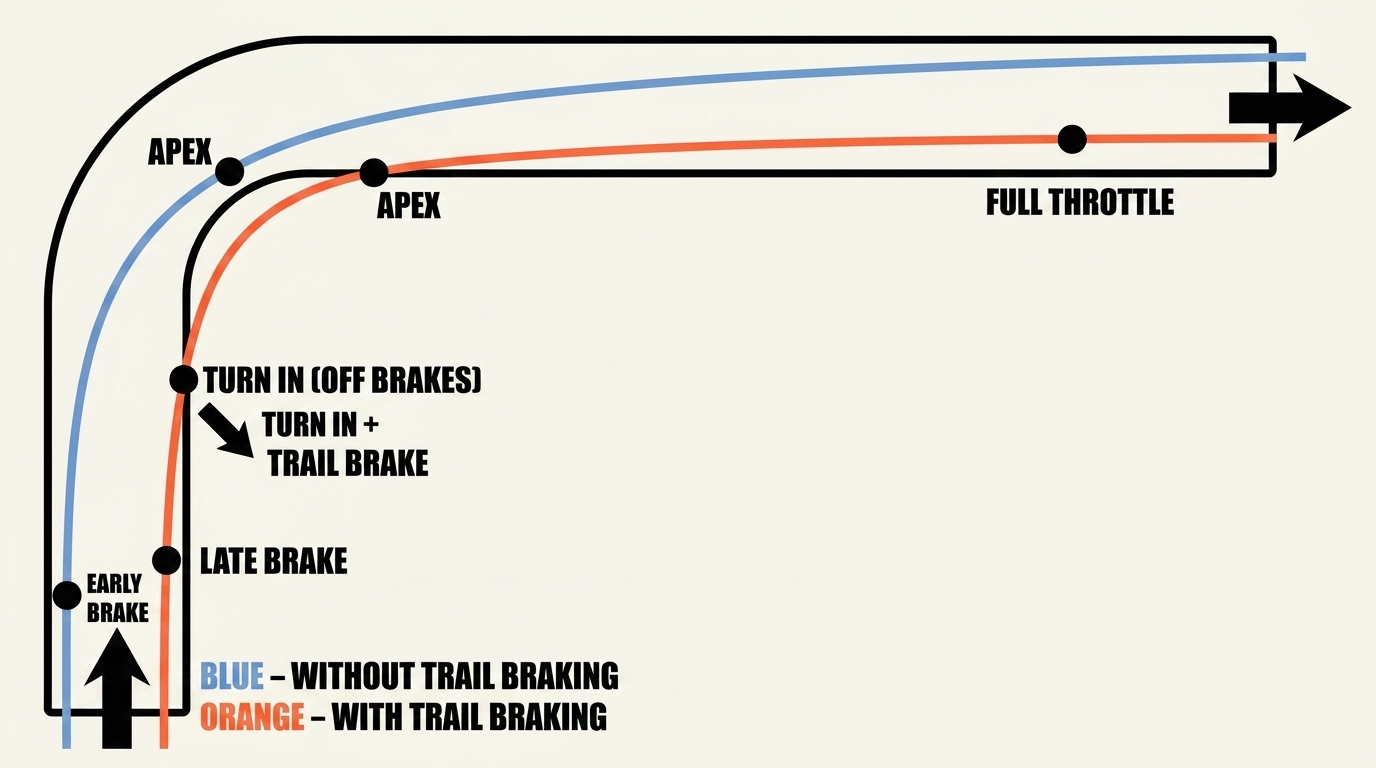
Two things happen at once when you trail brake. First, the car’s weight shifts forward onto the front tyres. Pressing them harder into the tarmac means more contact patch, more grip, and more cornering force available at the front. Second, the rear of the car gets lighter. Lighter rears slip a touch easier, which actually helps the car rotate – it’s less resistant to turning.

The payoff shows up as a faster entry speed. Because you’re still slowing down AS you’re turning, you can brake later in the first place. Later brake point, higher speed at turn-in, more speed carried to the apex. Do that on every corner of a lap and you’re several seconds quicker.
Danny shows this exact comparison at Summit Point turn one in the iRacing Ferrari fixed-setup series. Identical cars, identical setups, same corner. His telemetry versus a car one-and-a-half seconds a lap slower – the difference comes down to him still having measurable brake pressure as he turns in, where the slower car has let off completely. That gap compounds across every braking zone on a lap. Driving a proper racing line matters, but trail braking is the multiplier on top.
The Butter-On-Bread Pressure Model
The hardest part of trail braking is not the concept – it’s the pedal pressure. Danny’s analogy for this is the one I think about every time I’m practising: buttering bread with a knife. No pressure on the knife and the butter doesn’t spread. Too much pressure and you tear a hole in the bread. Gentle, sustained pressure spreads it perfectly.
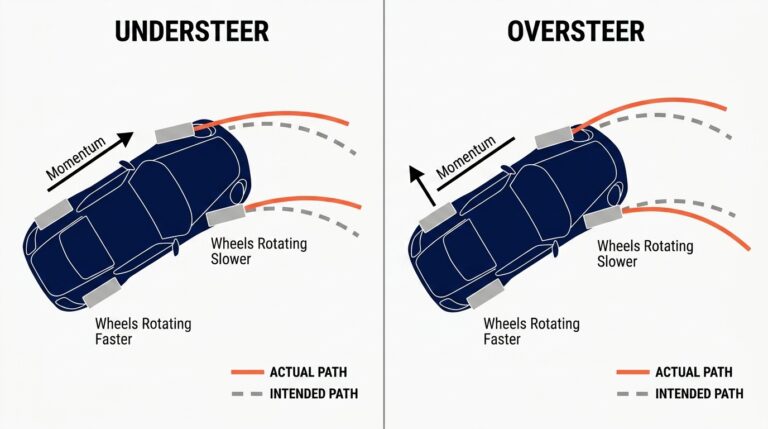
Trail braking feels identical. Come off the pedal entirely at turn-in and you’ve thrown away all that front-end grip – the nose pops up, the weight transfers back, you’ve got understeer for free. Stay on too hard and the front tyres are so busy slowing the car down that they’ve got nothing left for cornering – you either wash wide or the rear steps out because it’s unloaded.
Somewhere between those two failure modes is the window. It feels gentle. It feels like a slow release of pressure – not a switch. If you’re trail braking properly you can barely tell you’re still on the pedal, but the pedal is still telling the front tyres “stay loaded”.
Pressure Split By Corner Type
Not every corner wants the same split between straight-line braking and trail braking. The rough rule Danny uses – and it matches what I find on my own laps – is that the tighter the corner, the more of the braking happens in a straight line.
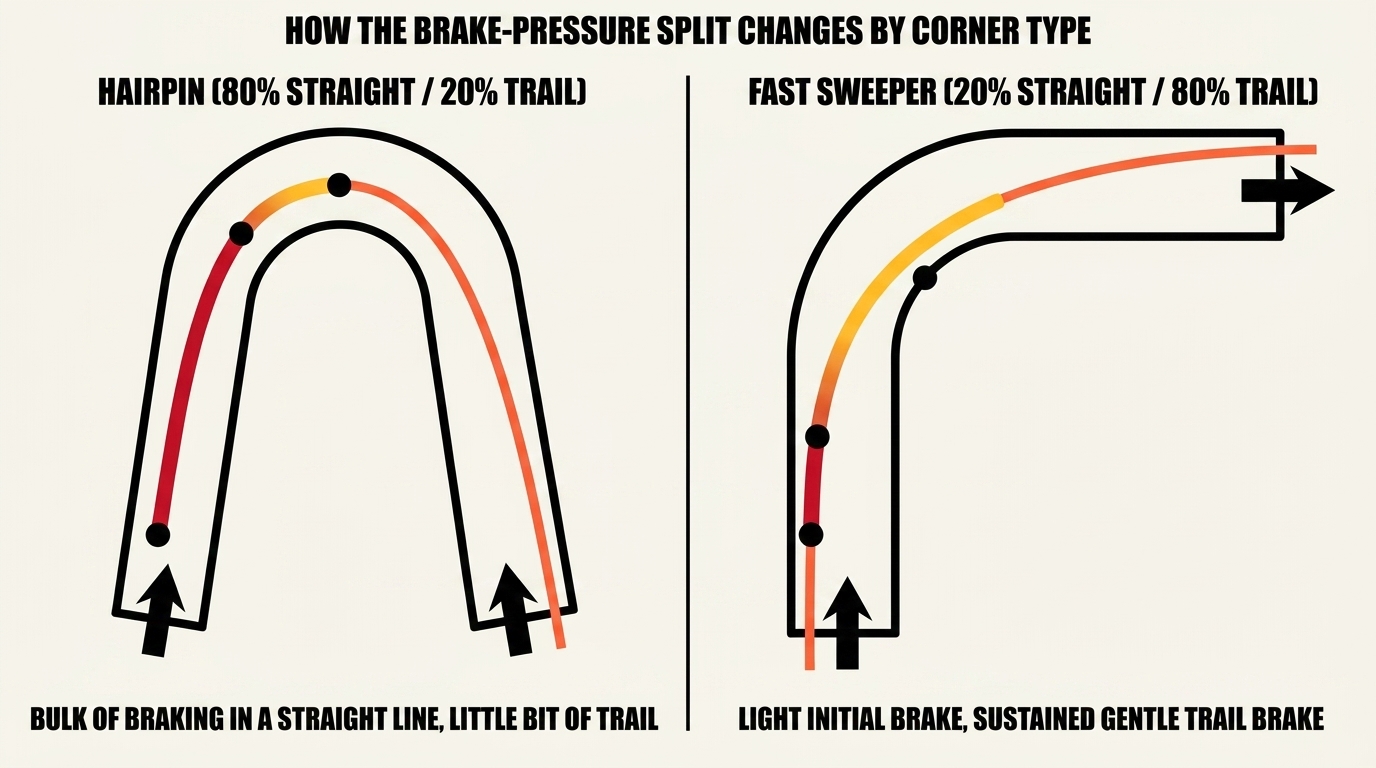
In a hairpin – think Nurburgring GP’s Mercedes Arena or Silverstone’s Loop – you’re doing roughly 80% of the braking in a straight line, then a short sharp trail in as you turn. The big speed change happens on the straight. The trail just loads the front as you commit.
Visit Our Sponsors
A fast sweeper flips it. Take Silverstone’s Copse. You barely brake at all before turning – a light initial stab, then a sustained gentle trail that bleeds speed off through the first half of the corner. Maybe 20% of the slowing happens in a straight line and the remaining 80% happens on the way to the apex. Threshold braking is the tool for the straight-line bit. Trail braking is what you layer on top.
The Risk and How To Practise
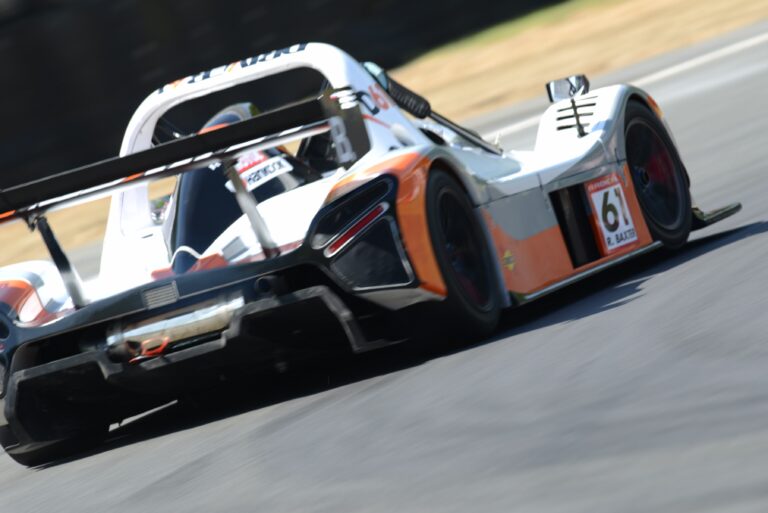
Trail braking is the technique that spins you. Because you’re lightening the rear while turning, if you get the pressure wrong or a bump kicks the car at the wrong moment, the rear end comes around. I’ve binned the Radical SR3 rsx at Brands Hatch’s Paddock Hill more times than I want to admit, every one of them because I was trying to carry a bit too much brake into the corner and lost the rear on entry.
That’s not a reason to stop – it’s part of the learning curve. The only way through is reps. Pick a corner you know well, in a car you’ve got a feel for. Spend half an hour doing nothing but entry braking into that corner, progressively adding a bit more trail each pass. You’re looking for the moment you feel the rear go light on turn-in. That’s the feedback you need. Back off the pressure slightly on the next lap and you’ll have found the window.
If you’re consistently spinning, your brake bias is probably too rearward – move it one or two clicks forward and try again. Trail braking with a rear-biased setup is punishment. The front needs to be doing the work when you’re loading it up on corner entry.
The sensation you’re chasing, in Danny’s words: “swooping wide and tightening into the turn, leaning the car over onto its door handles gently”. That’s it. If it feels like a graceful lean into the corner rather than a jerky transition, you’re there.
Equipment That Moves The Needle
Trail braking is one of the few sim techniques where kit genuinely moves the needle. The pedal specifically. A position-based pedal – the kind that shipped with most early consumer wheels – measures how far you’ve pushed the pedal down. That’s fine for full-brake or off-brake, but it’s terrible at fine-grained pressure modulation. The window you want to operate in for trail braking is tiny, and a position sensor simply cannot resolve it.
A load-cell pedal solves it. Load cells measure force, not travel, which is what your foot is really doing anyway. I moved to my Heusinkveld Sprints a few years back and trail braking went from a thing I was hoping to do to a thing I could feel. If you want to get faster, a proper load cell pedal set is the single highest-ROI upgrade in the entire hobby.
A direct drive wheel matters less for trail braking specifically, but it matters a lot for feeling the rear starting to go light as you load up the front. The force feedback cues that tell you “rear is about to slip” arrive earlier and clearer on a direct drive than on a belt-driven wheel. That’s the difference between catching a slide and inspecting the gravel trap.
Common Mistake when You’re Learning to Trail Brake
1. Stamping the pedal off at turn-in.
This is the most common failure. You’ve told yourself to trail brake, but your foot still treats the pedal like a switch. The transition from “brake” to “no brake” is abrupt, the nose pops up, all the front grip you’d just earned vanishes. Practice the release. It should take a full second or more on most corners.
2. Using too much pressure through the turn.
The front tyres are finite. If you’ve given them 70% of their grip for braking, they only have 30% left for cornering. Keep the trail-brake pressure low – the amount you’re on the pedal during the turn-in should be a fraction of what you applied in the straight-line zone.
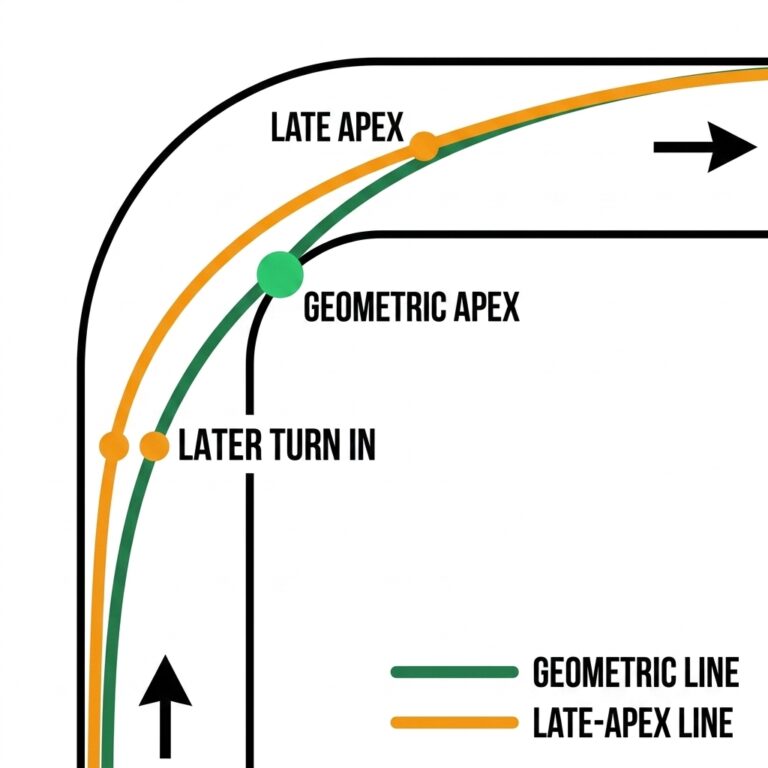
3. Trying to trail brake with a bad racing line.
Trail braking assumes a late-apex line. If you’re apexing too early, the geometry doesn’t work – you’ll be trailing brakes at a point where you should already be back on the throttle, and the car will be slow AND unstable. Nail the line first, then layer the braking technique on top.
4. Trail braking into every corner.
Some corners don’t need it. A flat-out fifth-gear sweep at Spa doesn’t want a brake pedal anywhere near it. Trail braking is a tool for corners where you’re slowing down – applying it indiscriminately just adds instability.
5. Looking at the pedal meter instead of feeling the car.
Telemetry and brake traces are useful AFTER the lap, not during. Mid-corner, your eyes should be on the apex and exit, and your feedback should be coming through the wheel and your ears. If you’re staring at a pressure bar you’re not driving the car.
The best drill for cementing trail braking – once you’ve got the pedal and the line – is to pick a corner, take ten laps at 85% pace focused purely on lengthening your trail. On lap one, release fully at turn-in. On lap two, a little bit of trail. Lap three, a bit more. Keep going until you feel the rear start to go. That’s the window. Now work inside it. For more on working a lap down, my guide to improving your iRacing lap times covers the broader process.
Sources & Further Reading
- Danny Lee: Trailbraking In Sim Racing – How Slowing Down the Right Way Makes You Faster – primary source for this article. The ketchup analogy alone is worth the watch.
- Driver61: Maximising the Braking Phase by Scott Mansell – the real-world driving-school perspective on the same technique, with excellent brake-pressure diagrams.
- Virtual Racing School: Mastering Trail Braking in iRacing – a structured 7-step process from VRS’s coaching team if you learn better with checklists.
- Related on SRC: threshold braking (for the straight-line phase), driving the best racing line, and how to learn a new track faster.
Related Posts
What Is Oversteer? The Sim Racer’s Plain-English Guide
Racing Line Explained: Late vs Geometric Apex (with diagrams)
What Is Understeer? The Sim Racer’s Plain-English Guide
Understeer vs Oversteer: What’s Actually Happening (and Why F1 Drivers Set Up for Each)
How to Learn a New Track Faster in Sim Racing
The Science of Tyre Warming in iRacing: Testing Shows Braking Beats Weaving
Topic: Sim Racing Guides