Sorting out your FOV (Field of View) settings in iRacing (or Assetto Corsa and Assetto Corsa Competizione ) is a thing a lot of drivers tend to ignore when they first get started.
Perhaps it’s because, as a beginner, sim racing field of view settings are an initially difficult topic to understand. It takes a bit of investment to learn but getting FOV right will improve your lap times. Potentially quite dramatically. In today’s article, we’re going to look at how to set your FOV correctly for a single-monitor or triple-monitor setup.

There’s a fair bit of work involved to get to a point where you’re changing your FOV and driver view settings for the better. Time spent doing the research, reading articles and watching YouTube videos is time lost to racing!
If you just want quick answers, use our jump links below. For the full detail about why FOV settings are so important in sim racing, read on!
How to setup and calculate your field of view settings in iRacing/Assetto Corsa and Assetto Corsa Competizione- Single Monitor
- Triple Monitors
- FOV for Curved Monitors
- Adjust camera controls
- Assetto Corsa Competizione FOV settings
- Assetto Corsa FOV settings
My guide aims to simplify the subject and provide you with a useful, step-by-step procedure to get your FOV sorted quickly.
What is FOV?
Field of view or FOV in iRacing is a measure of how much of the simulated racing environment (the track, other cars, the next corner) is displayed on your monitor. Your FOV settings dictate how the view into your sim racing environment is presented as a simulation of what you would see in everyday life.
A larger FOV gives you more information, a smaller FOV gives you less. And it makes a lot of difference. Check out this example of a driver’s eye view of a moving train. Nothing changes in this video (the speed of the train for example) except your FOV:
Look how much slower the lower FOV is! Clearly, then, FOV makes a huge difference to your perception of what’s happening. So it’s fair to assume it will make a huge difference to your driving.
Getting FOV right in the sim: what’s the benefit?
Imagine you’re driving your car in real life. You instinctively know how much to brake and how much to turn your steering wheel to get around a corner.
You naturally seem to be able to put the car anywhere on a bit of road thankfully, with no mistakes.
This is because your brain is used to processing the visual information from your eyes and it has learned (since you were a baby) how to send the correct information to get you to make a physical adjustment. It all just works thanks to millennia of evolution and years of training your own body to do useful things.
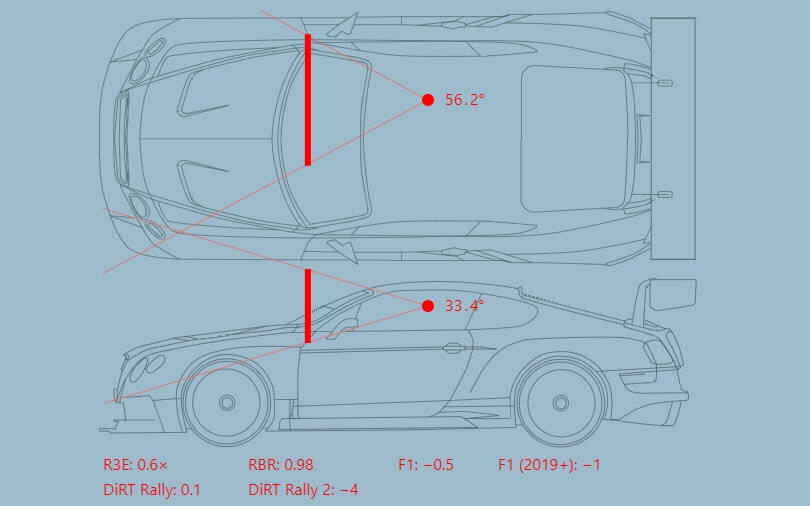
The sim racing environment isn’t natural.
You’re sat in front of a monitor projecting 2D images that represent a real-world situation. But, it’s a simulation!
If something about the simulation doesn’t quite make sense to your brain when you’re processing the visual data, you can’t respond with an accurate, physical reaction.
Therefore, bad FOV settings cause problems for your driving in the simulator.
The Mistake of Bad FOV Settings
While you might have problems with your wheel or pedal settings (and check out our guide to setting up iRacing properly if you’re not sure), drivers can experience frustration with their driving in a badly configured environment.
Entering a corner, you turn in. Suddenly your entry is too much or not enough, so you make a correction. This correction unsettles the car and keeps your attention on the entry and not the exit, which costs time at best and causes a spin at worst.
You find it very hard to drive consistently and feel like no matter what you do, you can’t drive as accurately as you know you should.
What happens if I get FOV right?
If you’ve never tackled your FOV setup, you’ve probably trained yourself to get used to a very large field of view. The correction might be initially uncomfortable but stick with it!
It will feel weird at first like you have your face up against the car windshield. All of this can be fixed with the right settings. But there is a benefit. A reduced Field Of View will help you become more aware of small changes in your car’s attitude and balance. You’ll realise you’re sensing smaller slip angles in your corner entries and exits, which will give you a much earlier warning of a slide and lots of adjustability in the steering. It’s also easier to judge corner entry, clipping the apex properly and having the car turned early enough to get a good exit.
Once you’ve used the FOV setup procedure below, the FOV will be reduced and you’ll feel like everything is moving more slowly.
How to adjust your FOV in iRacing
- Calculate the mathematical FOV with a calculator or iRacing’s own tool in Options
- Adjust settings in iRacing
- Go for a drive
- Adjust camera controls in replay mode
- Go for a drive and note how it feels
- Adjust horizon and driver height
- Test at a circuit you know well. Are you finding it easier to clip the apex and achieve good entry/exit cornering?
Calculate the mathematical FOV with a calculator
The FOV police might not like what I’m about to say. FOV is a mathematical calculation but in my humble opinion, the numerical calculation is at the very beginning of the process.
Getting comfortable with your visuals is based on a bit of data, a reasonable amount of understanding and a subjective approach to your own, personal comfort levels.
We’ll start with a calculator. I like this one very much by Markus Ewert. Enter your screen size, the distance to the screen from your eyes, whether you’re a single or triple monitor user and your aspect (“screen”) ratio:
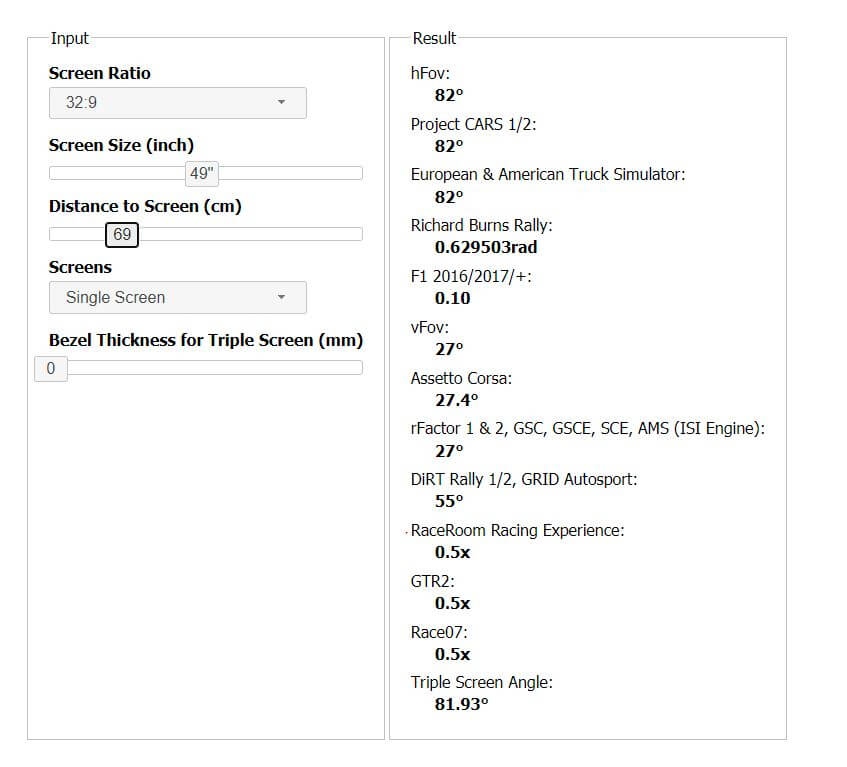
The real gotcha with FOV calculators is some don’t ask for your screen’s aspect ratio. This is a mistake.
Most monitors have an aspect ratio of 16:9 but my Samsung G9 has a ratio of 32:9 – the results are quite different!
Take note of the recommended FOV setting and, if you’re using triple screens, adjust your screen angle appropriately. Then, head to iRacing.
Adjust settings in iRacing
If you’re reasonably new to iRacing, it is just worth following our setup guide before you get started with the FOV settings. If you’re a VR user, try reviewing this guide too.
Start a test session in iRacing and head to the options screen:
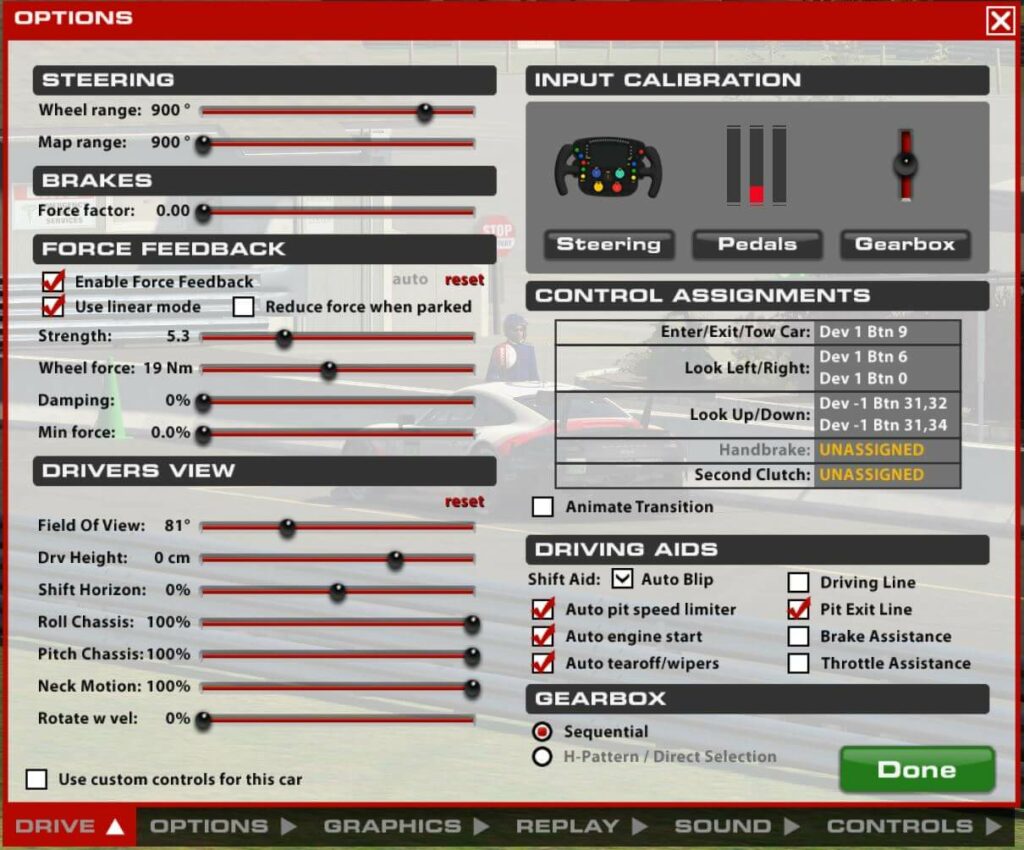
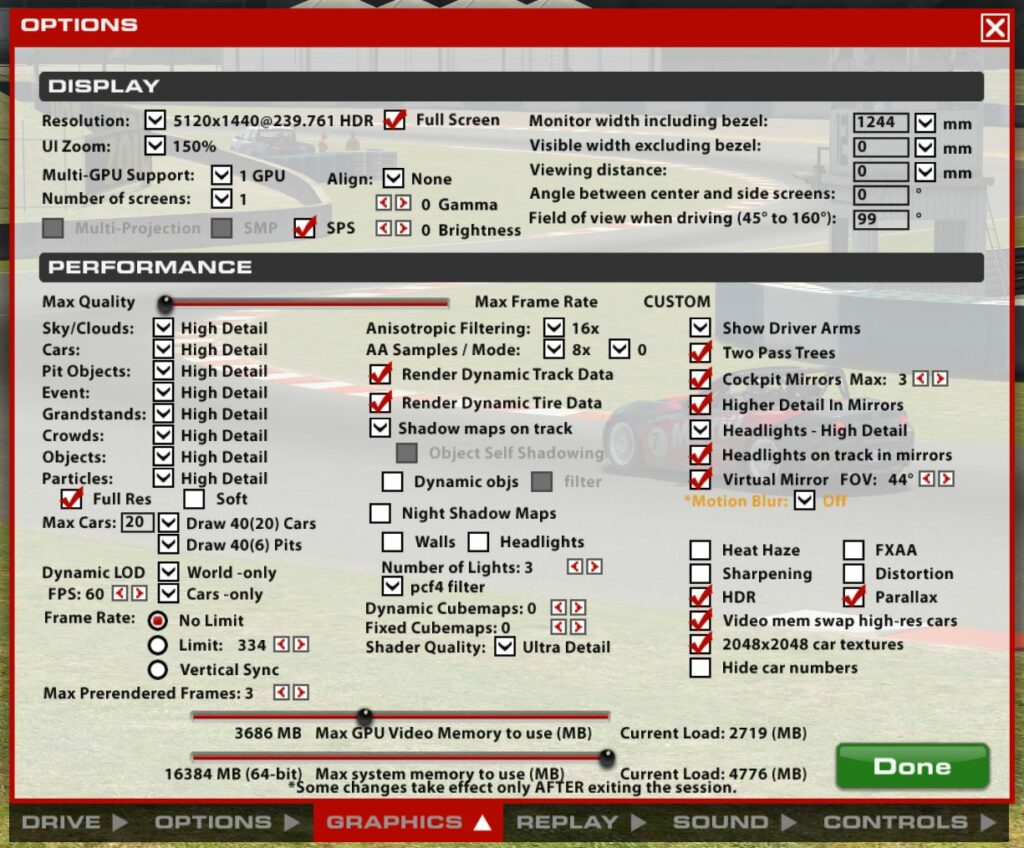
If you’re a single-screen user, you can enter the new FOV in the “Driver’s View” section. If you’re a triple-screen user, you’ll need to enter the screen angle in the Graphics tab.
How to calculate the correct FOV and angle for Triple Screens
All sim racing games including iRacing give you a FOV calculator in the options screen, so you don’t really have to use a separate calculator if you don’t want to.
If you’ve followed our guide to setting up triple monitors in iRacing, you’ll have correctly set up your rendererDX11Monitor.ini file to include the full height and width resolutions of your triples like so:
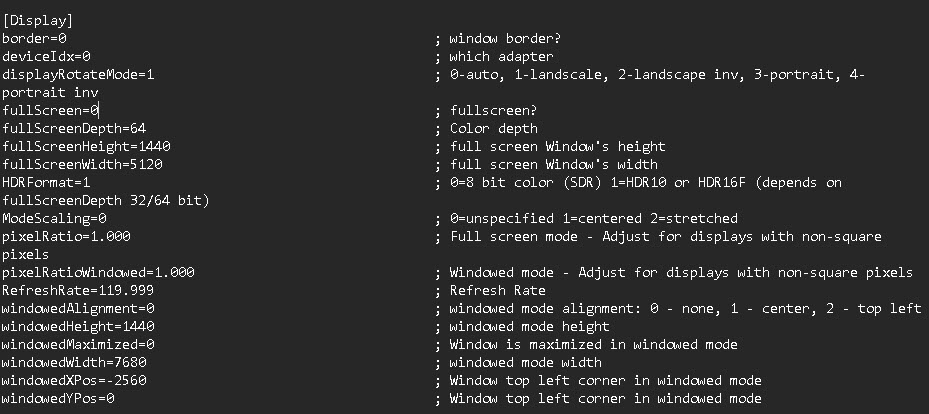
Next, you need to update the settings in iRacing options > Display to get the correct measurements for the best FOV and critically, the angle of your monitors:
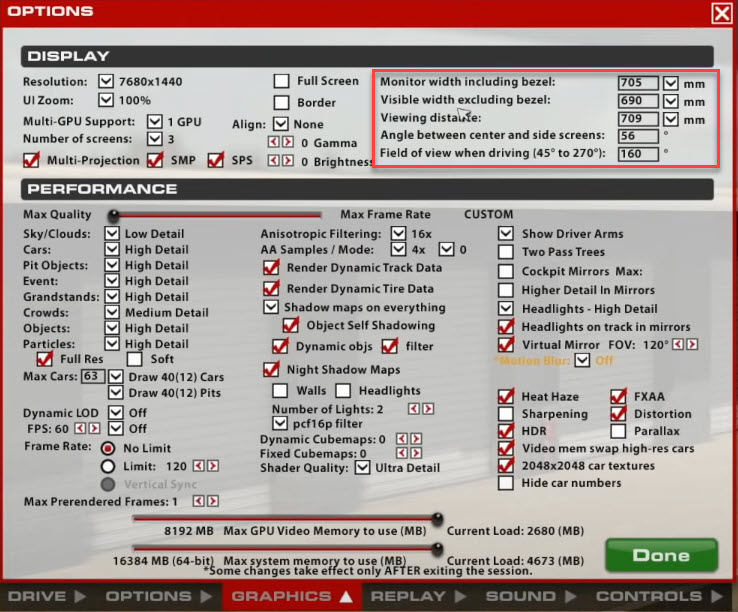
First, collect some measurements:
- Monitor width including bezel
- Visible width excluding bezel
- Viewing distance
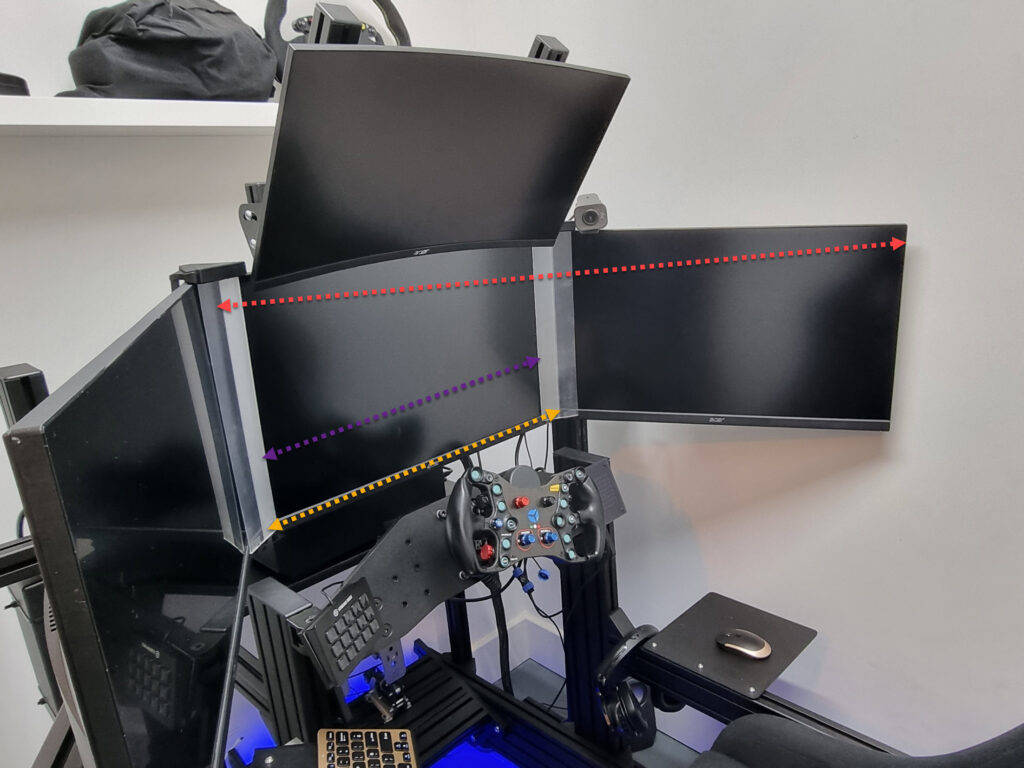
My monitor width including bezel width is about 710mm (highlighted in yellow). This makes the visible width excluding the bezel at approximately 690mm (highlighted in purple). Next, measure the distance between two screens at approximately 1200mm (highlighted in red). Finally, measure your eye distance from the centre screen (viewing distance), which is approximately 709mm.
Enter your monitor width including the bezel, visible width excluding the bezel and viewing distance into the iRacing options.
Finally, we need to work out the correct angle for your triples. This is very easy with a triangle calculator that does the trigonometry for you!
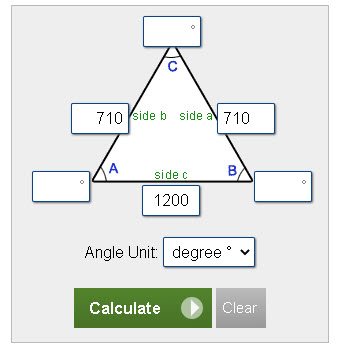
Enter your monitor width including bezel width in “side a” and “side b” and enter the distance between two screens in the “side c” field
Then, calculate:

Finally, take the angle (C) and subtract 180 from the answer, so a triple monitor angle of 64.6° – round this up or down if you wish, it doesn’t have to be perfect! Enter 65° in the “Angle between centre and side screens” field in settings. And that’s it, your triples should be ready to go!
How to set FOV for Curved Monitors
If you’ve got a curved centre monitor or a triple monitor setup, you might feel the need to ask how FOV is configured when the monitors are curved.
Firstly, don’t use the curved monitor calculator in iRacing. I see a lot of folks complaining about the numbers it produces
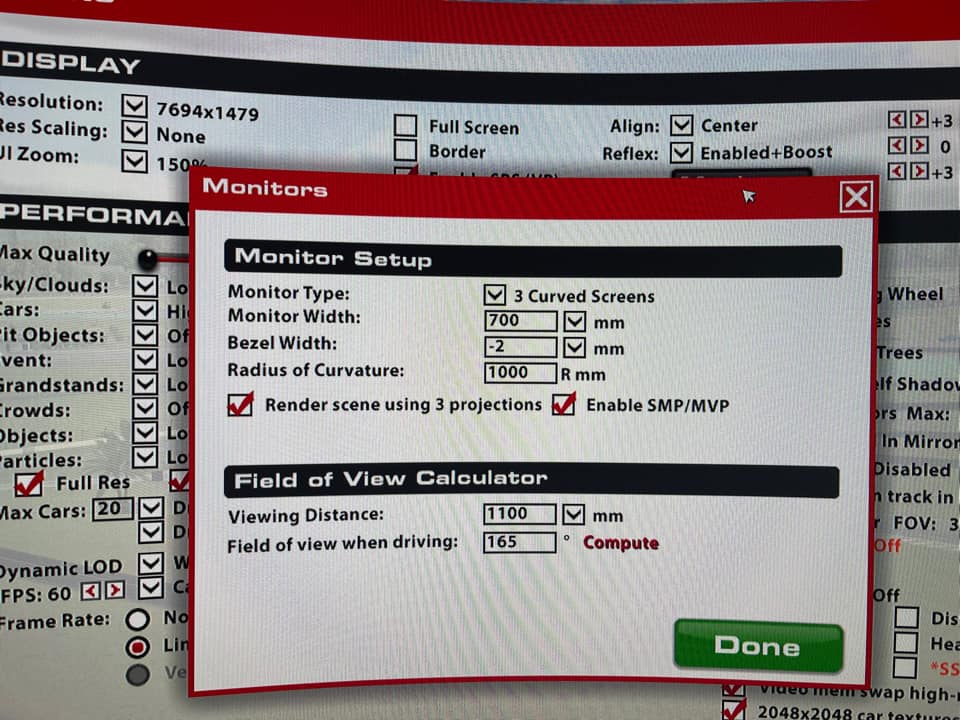
The trick is to measure your curved monitors from edge to edge in a straight line as if they were flat. Set the iRacing FOV calculator as flat and enter the correct measurements, as we’ve already explained above.
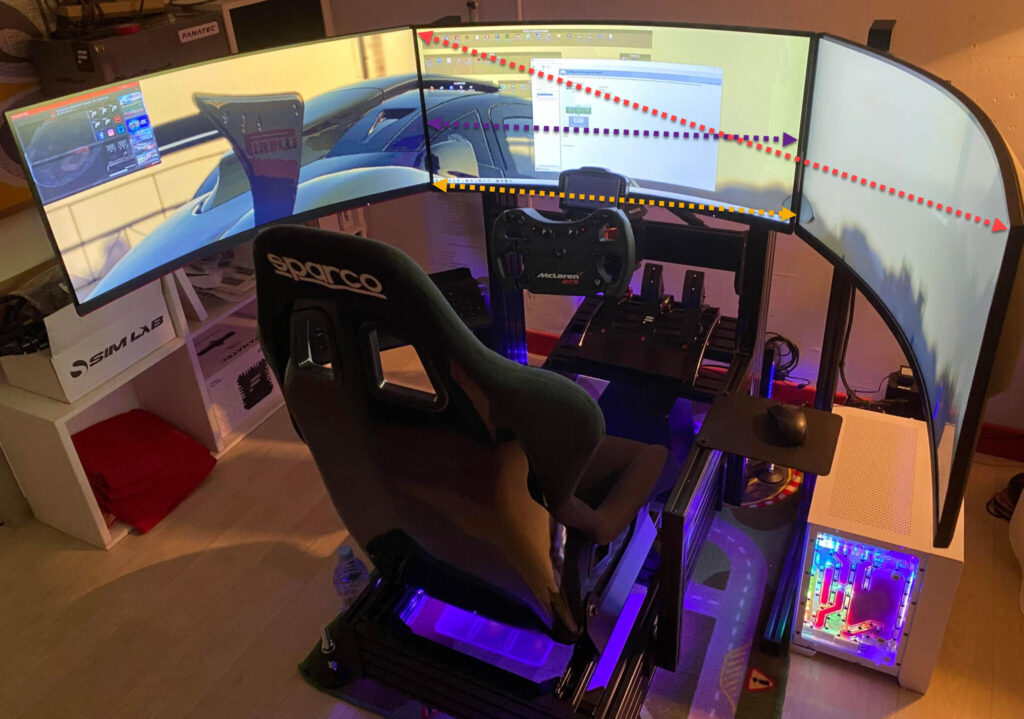
You may need to set a negative number on the bezel size in the iRacing FOV calculator to get each edge to align in the simulation.
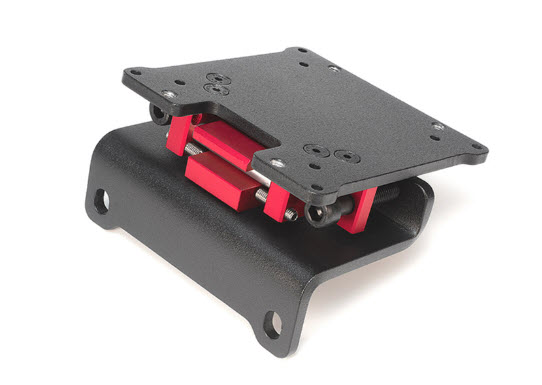
Getting the exact settings right can be a little fiddly, especially with the bezel corrections. We recommend the Sim Lab Vario Vesa mount so that you can make small adjustments easily:
Go for a drive
Time to take the car out for a few laps. The best advice I can give you at this stage is to go to a circuit like Okayama, where accuracy is everything. It also helps to know the circuit and car very well.
Do enough laps for a useful replay, then return to the pits and get out of your car into replay mode. The view might seem very, very different. Pay very close attention to how easy it seems to be able to clip an apex accurately, and how the car communicates movement, slides and slip angle.

Don’t worry about pumping in your fastest lap, yet. Once you’re done, return to the pits.
Adjust camera controls
iRacing’s replay feature has adjustable camera position settings. When you adjust the onboard camera it also changes your view, without modifying your FOV setting.
Get out of the car and in replay mode, set the camera to “cockpit”
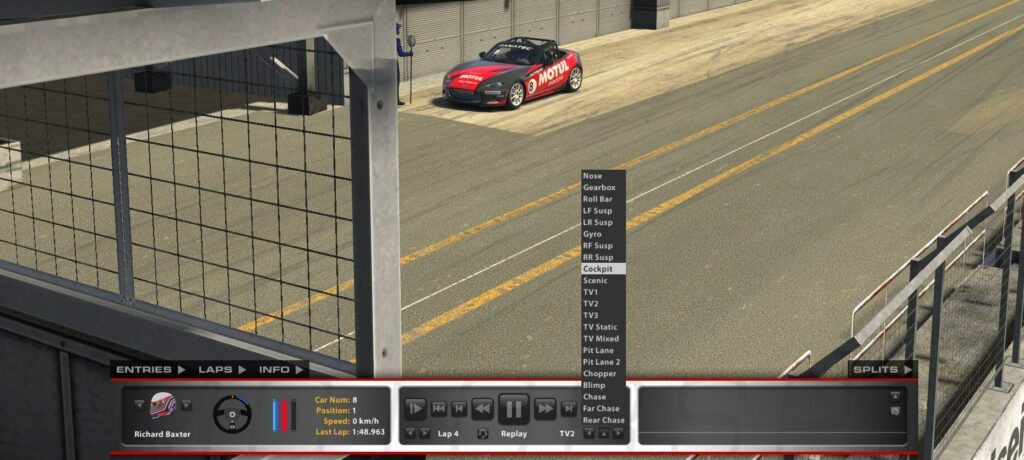
Now open your camera controls. The default keyboard shortcut is CTRL-F12 but mine was mapped to CTRL-C – so check your default key mapping if you get stuck.
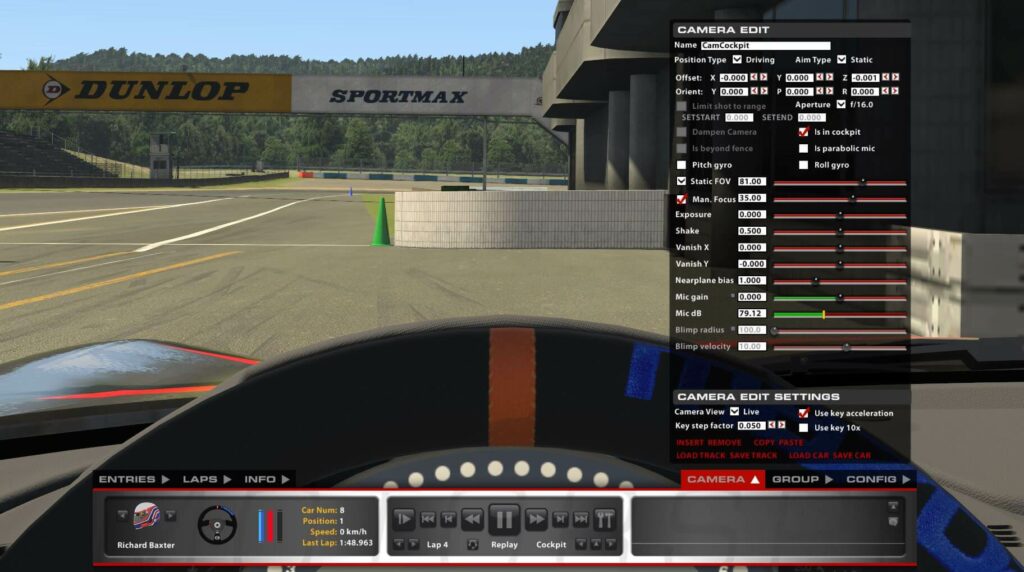
The important settings are at the top: “Offset: X” moves the camera backwards and forwards and “Z” moves the camera up and down.
I like my camera quite far back – here are the results of that:

At this point, it really pays to go for another test drive. You need to be mindful of what the car is doing and whether you feel your inputs culminate in the outcome you expect. Are you hooking up on the kerbs nicely?
Go for a drive and note how it feels. You might (for instance) feel like the driver position is too low. Small adjustments at this stage are subjective. Get comfortable! Here is roughly where I end up:

Adjust horizon and driver height
Something that a lot of drivers don’t know is that driver height and horizon settings can also make a huge difference to your iRacing experience. Get in the car and use the left-right navigation on the OSD standing screen:
You’ll find graphics adjustments with options for “shift horizon” and driver height are available. These are entirely subjective settings but set up correctly, give a more natural feel when you’re looking into a corner from a long distance.

Take a look at this brief but very useful video from Sim racing SK:
By this stage, you should be feeling very natural in the car and adjusting quickly to the new settings. I’m a big fan of DaveySkills (David Kelly) who produces excellent circuit guides for the Mazda MX5.
I thought I might compare his FOV to mine, just to make sure I’m not going mad!
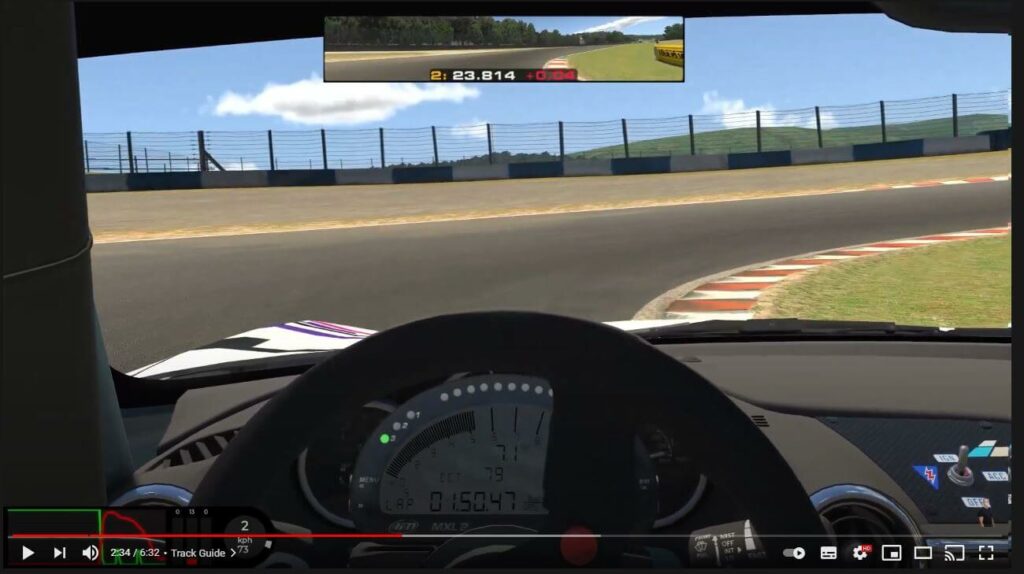
That looks about the same as mine, happily!
Finally, a quick check of the Porsche 911 RSR revealed the correct FOV but I needed to adjust the driver height and mirror pitch in the graphics adjustments:

How to change Assetto Corsa Competizione FOV settings
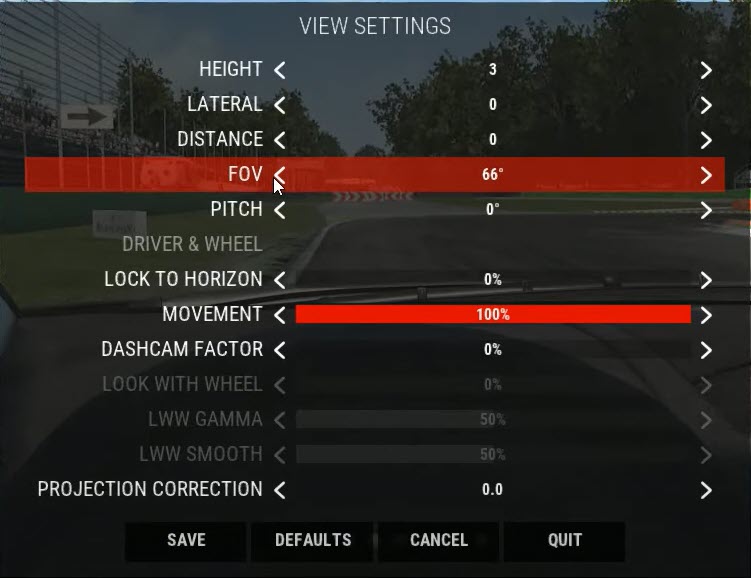
If you’ve skipped to this section before reading how to calculate and take the correct measurements for your FOV settings, then start again and return here with your notes! Once you have your measurements and a FOV calculation, pause in-game and select “View Settings” from the pause menu:
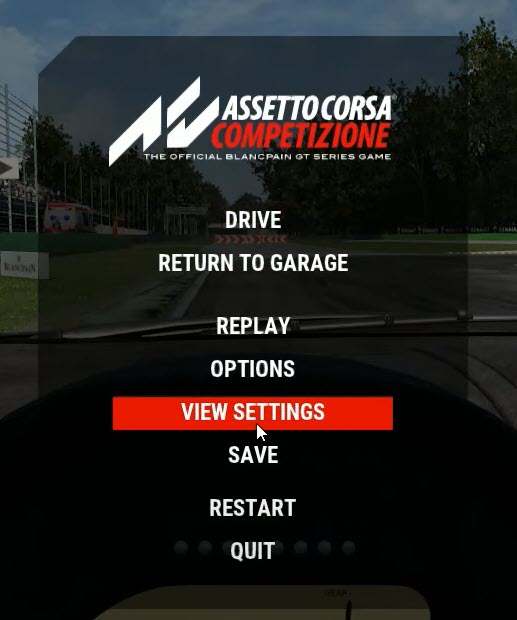
Clicking “View Settings” takes you to this menu, where FOV is the 4th option available:
How to change Assetto Corsa FOV settings
Adjusting FOV in Assetto Corsa is slightly different to the Assetto Corsa Competizione platform.
In Assetto Corsa, once the session has started and you’re in-game, you usually see your car in the first or third-person view. So firstly, set the camera to the cockpit view by pressing the F1 button until the right camera view comes up.
Next, there’s an in-game app that allows you to change your cockpit camera position. This app also changes FOV.
Just move your mouse cursor to the right of the screen and the app list will appear. If you’re a single-screen user, just look for the app that is called “Onboard” (with a helmet icon), and then you can adjust your cockpit positioning and FOV.
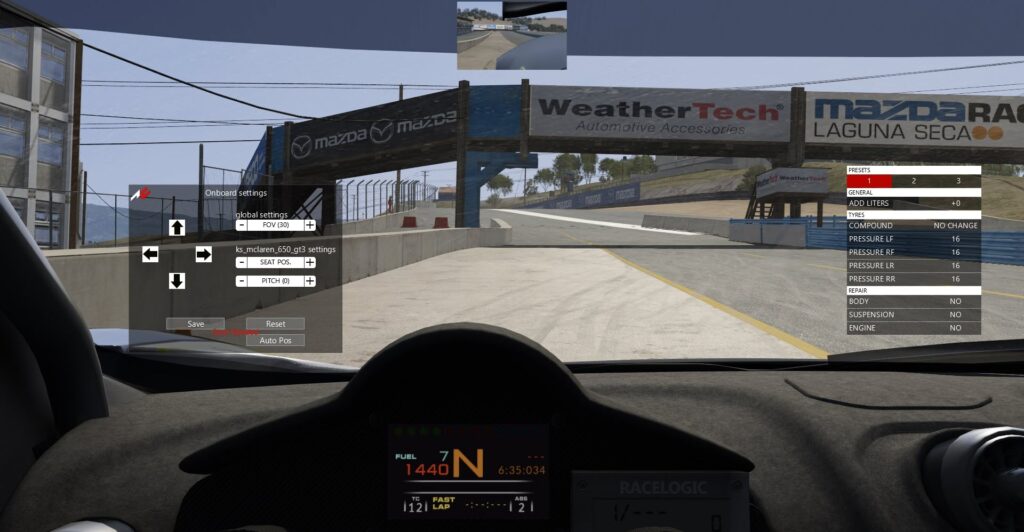
If you’re using triples, you’ll need the triple monitor app (right-hand menu – a logo with three monitors):
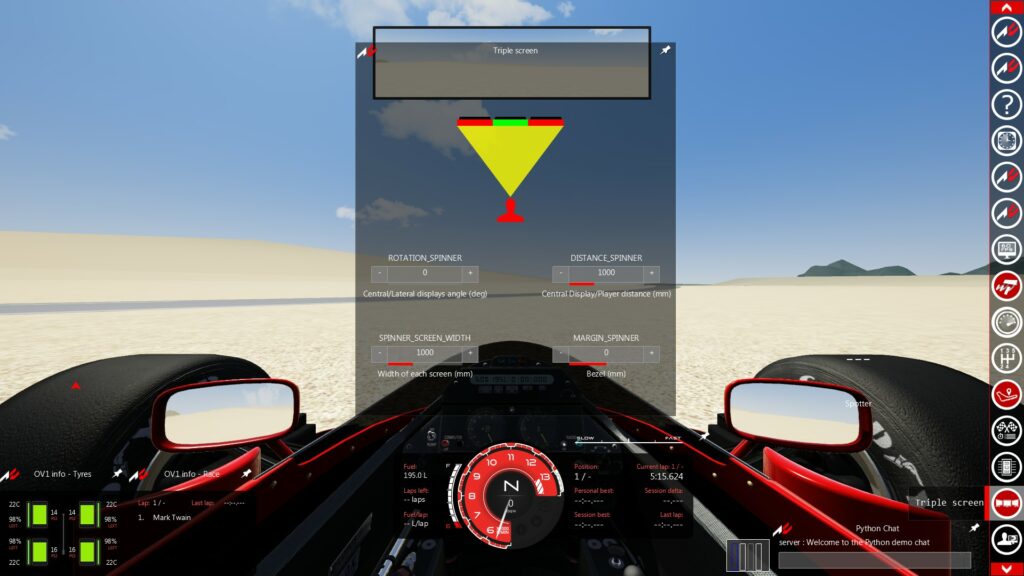
In the triple-screen app, the measurement requirements should seem very familiar except for the “MARGIN_SPINNER” setting, which allows you to compensate for bezel alignment.
That’s about it for now, hopefully, you’ll find this guide useful and, if you have any questions just drop me a line.
Related Articles
Topic: iRacing
3 thoughts on “FOV: How to Setup and Calculate Your Field of View Settings in iRacing and Assetto Corsa”
Comments are closed.


Thank you for this great guide. I was wondering though if screen size is the standard diagonal measurement?
Cheers,
Yes screen size is from corner to corner of the actual screen not the bezel. Some calculators ask for a separate bezel measurement, so be sure you’re measuring the right thing.
Hi, from my experience the FOV calculators out there are quiet good, but especially for the 49“ Samsung G9 or all other 49“ curved screens they are not the way to go. With the 1800r it‘s not the big difference, but when you come to the 1000r the FOV should be calculated as it is a triple screen setup and as well put these information into iRacing that you are using 3 screens with an angle between them. The FOV is changing a bit by this calculation and the other thing is that the dashboard of the car is looking not right. More as ist would go to much to the front when you look on the right side.