So many sim racers spend ages getting their rig setup just right, only to completely neglect the look, and frame rate (FPS) performance of the graphics in-game. This is understandable as many of the performance and effects settings in NVIDIA’s Control Panel, iRacing Graphics Control panel and GeForce Experience aren’t fully understood and can take time to perfect.
In this guide, I’m going to cover iRacing graphics tweaks for your simulator with an emphasis on improving the performance of your GPU and the overall look of the iRacing environment. Today, we’re going to be learning about NVIDIA’s control panel settings and, the image enhancements possible with the Game Filter settings in NVIDIA GeForce Experience.
Quick links: iRacing Graphics Settings- iRacing System Requirements
- NVIDIA Control Panel
- iRacing Graphics Control Panel
- GeForce Game Filter
- Triple Setup Without Nvidia Control Panel
Before you get started, make sure you have the latest version of your GPU driver and GeForce Experience installed.
iRacing System Requirements
There are so many budget gaming PC options out there and the good news is that iRacing for the most part isn’t all that taxing on a sim racing PC setup compared to titles such as Assetto Corsa Competizione or rFactor2.
With that said, my opinion on a minimum (Intel / NVIDIA) sim racing PC setup is as follows:
The specification of the machine I run these settings on is an Intel i9-10850K CPU @ 3.60GHz with an RTX 4090 GPU installed. I’ve run very similar settings for the previous GPUs I’ve owned (and still do) 2080’s, 3070’s, 3080’s and 3090’s and now 40xx series Graphics Cards. All of the FPS values can be found in my article comparing the performance of various GPUs in iRacing. Any GPU from an RTX 2080 ti or higher performs really well in iRacing.
For us, a reasonable, minimum sim racing PC specification looks like this:
- Intel i9-9900K CPU (or higher)
- NVIDIA 3070 GPU (or higher)
- 32gb RAM
- 1TB M.2 SATA or NVME SSD
This PC setup is approaching quite a low price as it’s considered lower than mid-range – but the truth is, iRacing doesn’t require anything like the processing power of some of its competitor’s versions. You can choose more or less anything from our monitors guide (I use a Samsung G9, but 27″ or 32″ triples are also pretty usual these days).
Let’s get started with the settings inside Windows before delving into iRacing itself.
NVIDIA Control Panel
NVIDIA’s Control Panel is a software application for Windows that allows users to adjust settings for their NVIDIA GPU and drivers. The control panel provides access to features such as 3D settings, display settings, and video post-processing. The control panel can be used to optimize performance and customize the visual experience for games and other graphics-intensive applications. It also allows users to configure multiple monitors and adjust resolution and refresh rates.
Adjust image settings with preview
Firstly, head to the first option on the left-hand side in the dialogue below: “Adjust image settings with preview”.
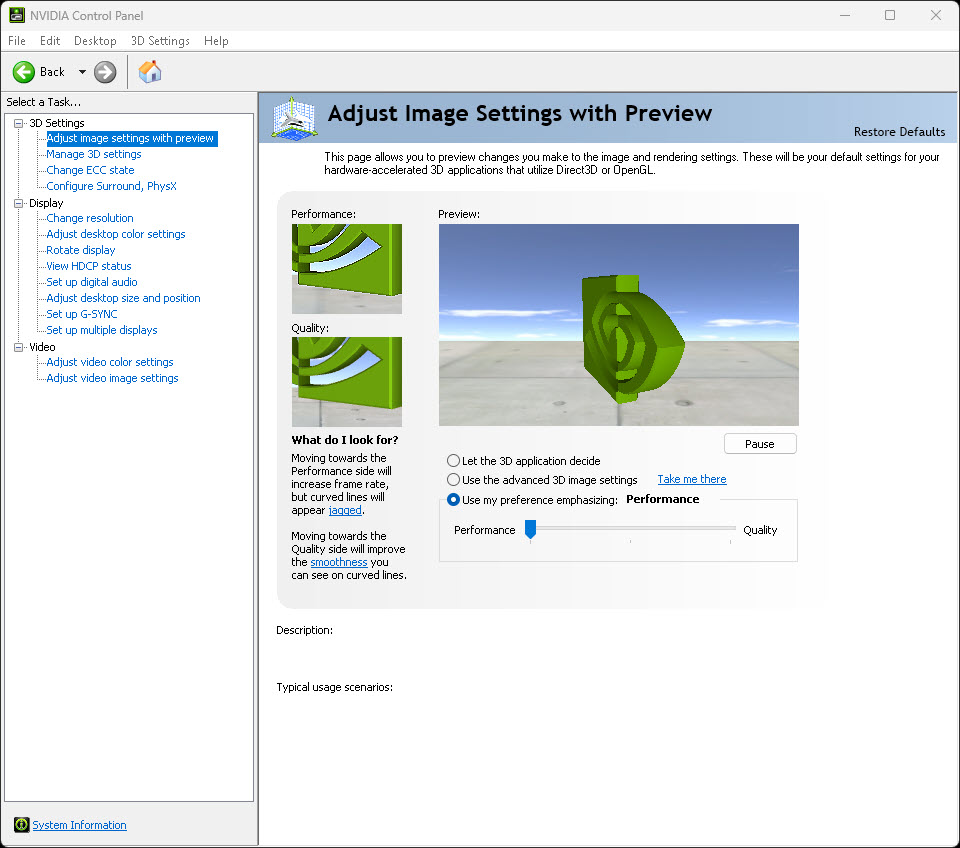
You’ll see from the screenshot above that I’ve already selected the Performance preference. When you select any of these options, the control panel will populate the 3D settings based on your overall preferences. At a basic level, this is probably enough but if you’d like to drill down and further optimize your settings, read on.
Manage 3D settings
The Manage 3D settings dialogue controls the individual graphics settings for your NVIDIA GPU. Most of the default settings pre-populate but some settings can be turned off as they’re irrelevant to iRacing:
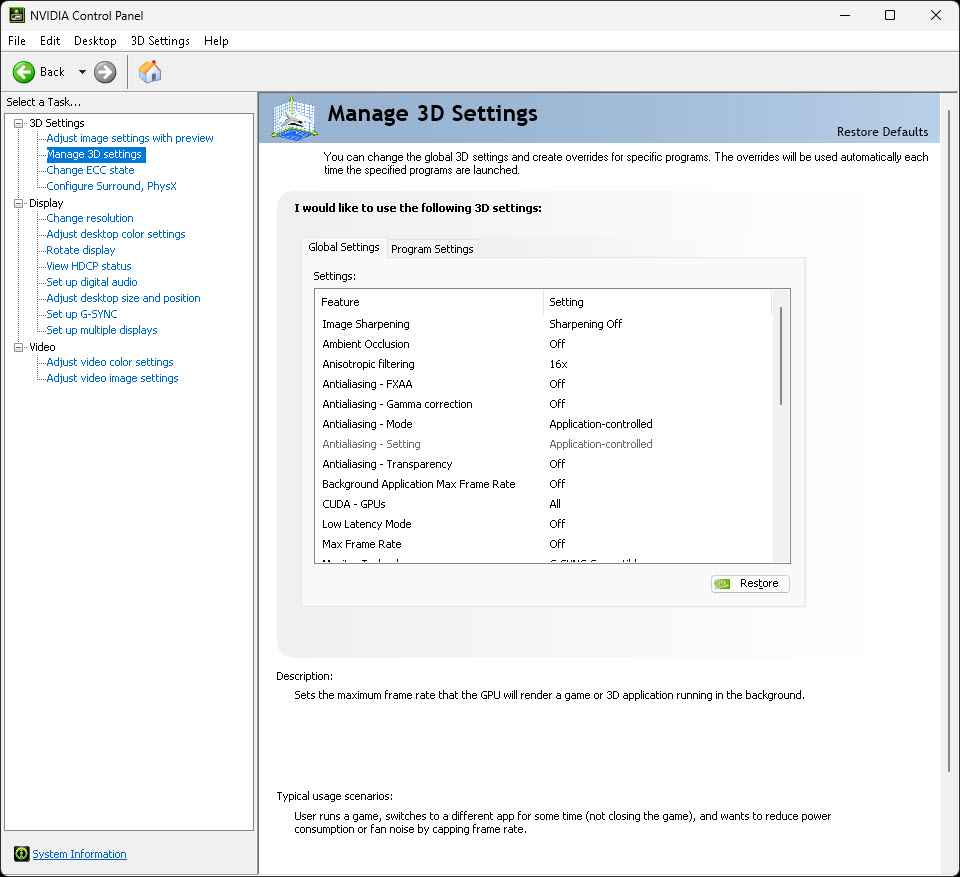
Here are the settings, one by one, with an explanation of what they do and the setting I recommend.
Image Sharpening: Off
This feature sharpens the image rendered. But with in-game anti-aliasing and of course, anti-aliasing running in the software driver itself, I don’t see why this needs to be active.
Ambient Occlusion: Off
This is a feature that adds a soft shadow effect to objects in the 3D-rendered environment. But it isn’t compatible with DX11 and DX12 games, so leaving it turned off for iRacing makes sense.
Anisotropic filtering: On
This is a significant contributor to the visual quality of the game environment, with little additional workload for your GPU. Having Anisotropic filtering set to on improves the game detail (textures) so for example, track details (undulations, rubber marks, and so on) are drastically enhanced.
Antialiasing (FXAA): Off
Anti-aliasing FXAA (Fast Approximate Anti-Aliasing) is a feature in the NVIDIA Control Panel that is used to smooth out jagged edges in 3D graphics. It works by applying a filter to the image to blend the colours of the pixels near the edge of an object, which can make the edges appear smoother.
FXAA is a post-processing technique, which means that it is applied to the final image after it has been rendered. This can make it less demanding on the graphics card than traditional anti-aliasing methods such as MSAA (Multisample Anti-Aliasing) or SSAA (Super Sampling Anti-Aliasing).
iRacing offers FXAA from its own graphics control panel. By keeping this setting off, you can avoid any potential conflict between the GPU drivers and the iRacing rendering engine.
Anti-aliasing – Gamma Correction: Off
The “Anti-aliasing – Gamma Correction” setting in the NVIDIA Control Panel is a feature that is used in conjunction with anti-aliasing techniques such as MSAA (Multisample Anti-Aliasing) and SSAA (Super Sampling Anti-Aliasing) to correct for the effect that anti-aliasing has on the brightness and colour of the image.
Anti-aliasing techniques work by blending the colours of the pixels near the edge of an object, which can cause the image to appear darker and less vibrant. Gamma correction is used to adjust the brightness and colour of the image to compensate for this effect.
When the “Anti-aliasing – Gamma Correction” setting is enabled in the NVIDIA Control Panel, it will apply a correction to the brightness and colour of the image to make it appear more like it would without anti-aliasing, especially around the edges of the object.
It’s worth noting that, this setting is enabled by default in the NVIDIA Control Panel but iRacing has built-in gamma correction, too.
Antialiasing – Mode: Application Controlled
This allows the GPU to relinquish control of Antialiasing to iRacing (iRacing has FXAA). By setting this to application controlled, “Antialiasing – Setting” becomes greyed out.
Antialiasing – Transparency: Off
The “Anti-aliasing – Transparency” setting in the NVIDIA Control Panel is a feature that is used to improve the quality of transparent textures in 3D graphics. It works by applying anti-aliasing techniques to the edges of transparent textures, which can make them appear smoother and more detailed.
Transparent textures, such as leaves on trees or chain-link fences, are often jagged and pixelated due to the nature of how they are rendered. This setting applies a form of anti-aliasing called Transparency Multisampling (TMAA) which helps to smooth out these textures.
Users can enable the “Anti-aliasing – Transparency” setting in the NVIDIA Control Panel by going to the 3D settings, selecting “Manage 3D settings” and then selecting “Anti-aliasing – Transparency” from the list of options.
It’s worth noting that, this setting can be demanding on the graphics card, and it’s not necessary to use it because it’s handled via iRacing’s graphics engine.
Background Application Max Frame Rate: Off
The “Background Application Max Frame Rate” setting in the NVIDIA Control Panel is a feature that allows you to limit the frame rate of background applications. This can be useful in cases where you have a background application that is using a lot of resources and causing your system to slow down. Applications running in the background might include RacelabApps, Simhub and so on.
When you set a limit on the frame rate of a background application, it can help to reduce the demand on your system and improve performance. The setting can be found in the NVIDIA Control Panel under the “Manage 3D settings” section.
You can set a specific frame rate for a background application, or you can choose to limit the frame rate to a certain percentage of the maximum frame rate. For example, if you set the limit to 50%, a background application that would normally run at 60 frames per second would be limited to 30 frames per second.
It’s worth noting that, this setting can be useful in situations where you want to prioritize the performance of the foreground application, but it can also affect the performance of the background application. It’s best to test and find the optimal frame rate limit that you are comfortable with.
Low Latency Mode: Off
Low latency mode is intended to prevent bottlenecking, by limiting the number of frames the CPU prepares before sending the data to the GPU. It’s best to leave this off and let iRacing control this area of rendering with the pre-rendered frames setting.
Max Frame Rate: Off
This setting will limit the maximum frame rate output produced by the GPU driver. This setting should be left off, as it’s set in-game.
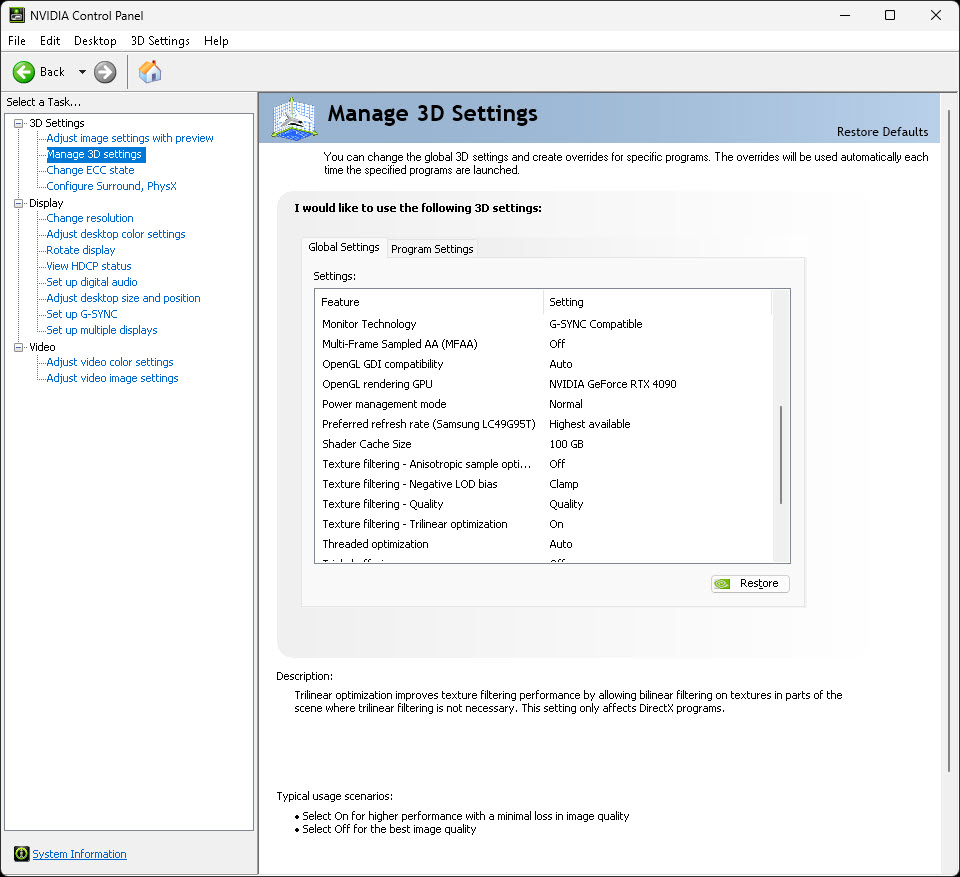
Monitor Technology: G-SYNC Compatible
This setting depends on the type of monitor you have. My Samsung G9 is g-sync compatible. But for non-G-Sync monitors, “Fixed Refresh” might be a wiser choice. In any case, this is auto-detected, so leave the setting on whatever NVIDIA control panel chose for you.
Multi-Frame Sampled AA (MFAA): Off
Multi-Frame Sampled AA (MFAA) is an anti-aliasing technique in the NVIDIA Control Panel that improves the quality of 3D graphics by smoothing out jagged edges. It is similar to MSAA (Multisample Anti-Aliasing), but it is designed to use less memory and be less demanding on the graphics card.
MFAA works by applying multiple samples to each pixel, but unlike MSAA, it samples different locations for each frame. This technique can provide similar visual quality to MSAA while using less memory and having less performance impact. For most reasonably powered GPUs there’s no real benefit to enabling this setting, and anti-aliasing is being handled by iRacing.
OpenGL rendering GPU: NVIDIA GeForce 4090
OpenGL is a browser 3D rendering technology that isn’t applicable in iRacing. However, it’s wise to leave this setting to your GPU so that the control panel doesn’t need to be running an auto-detect algorithm for OpenGL.
Power Management Mode: Normal
Modern GPUs can use a lot of power if you let them, with no real discernable improvement in performance. Quite the opposite in some cases as GPUs can slow down when overheating. More power can potentially mean a lower FPS. Set this to normal and let the GPU decide how much power it needs for the task at hand.
Preferred Refresh Rate: Highest Available
It’s OK to set the refresh rate to the highest available, as the GPU naturally dictates this depending on load!
Shader Cache Size: 100gb
How much space do you want to dedicate in disk space to cache rendered objects in the game environment? For sim racing PCs that have very fast NVME or M.2 SATA drives installed, this is a performance-enhancing setting as the PC will cache any objects that are regularly rendered in-game.
Texture filtering – Anisotropic sample optimization: Off
The “Texture filtering – Anisotropic sample optimization” setting in the NVIDIA Control Panel is a feature that is used to improve the performance of anisotropic filtering. Anisotropic filtering is a technique that improves the quality of textures in 3D graphics by increasing the level of detail of textures that are viewed at an angle, rather than straight on.
Anisotropic sample optimization works by reducing the number of texture samples that are taken when anisotropic filtering is applied. This can help to improve performance by reducing the demand on the graphics card. However, anisotropic filtering is a critical component of the potential visual quality in iRacing and this setting can potentially decrease the output quality of that function.
Texture filtering – Negative LOD bias: Clamp
Negative LOD (Level of Detail) bias, also known as “Texture LOD Bias” in the NVIDIA Control Panel, is a feature that allows you to adjust the quality of textures in 3D graphics. Level of detail (LOD) is a technique used in 3D graphics to simplify the rendering of objects as they move farther away from the camera.
When you set a negative LOD bias, it will cause textures to be displayed at a higher level of detail than they would be by default. This can make textures look sharper and more detailed, especially when the camera is far away from the object or when the object is on a slope.
This is a function handled in iRacing so it’s best to clamp this setting and let iRacing decide the optimum settings.
Texture filtering – quality: Quality
This setting allows you to decide if you would prefer performance, quality, or a balance between the two. Quality is the best setting for iRacing, with “performance” and “high performance” adding no additional frame rate in iRacing.
Texture filtering – Trilinear optimization: On
“Texture filtering – Trilinear optimization” in the NVIDIA Control Panel is a feature that is used to improve the performance of trilinear filtering. Trilinear filtering is a technique used in 3D graphics to smooth textures by blending between multiple levels of detail (LOD) as the camera moves closer to or farther away from an object.
Trilinear optimization works by reducing the number of texture samples that are taken when trilinear filtering is applied, without affecting the visual quality of the textures. This can help to improve performance by reducing the demand on the graphics card.
Users can enable “Texture filtering – Trilinear optimization” in the NVIDIA Control Panel by going to the 3D settings, selecting “Manage 3D settings” and then selecting “Texture filtering – Trilinear optimization” from the list of options.
Threaded optimization: Auto
Modern PC CPUs have multiple cores which enables them to compute over many threads. Threaded optimization allows the GPU to benefit from this feature.
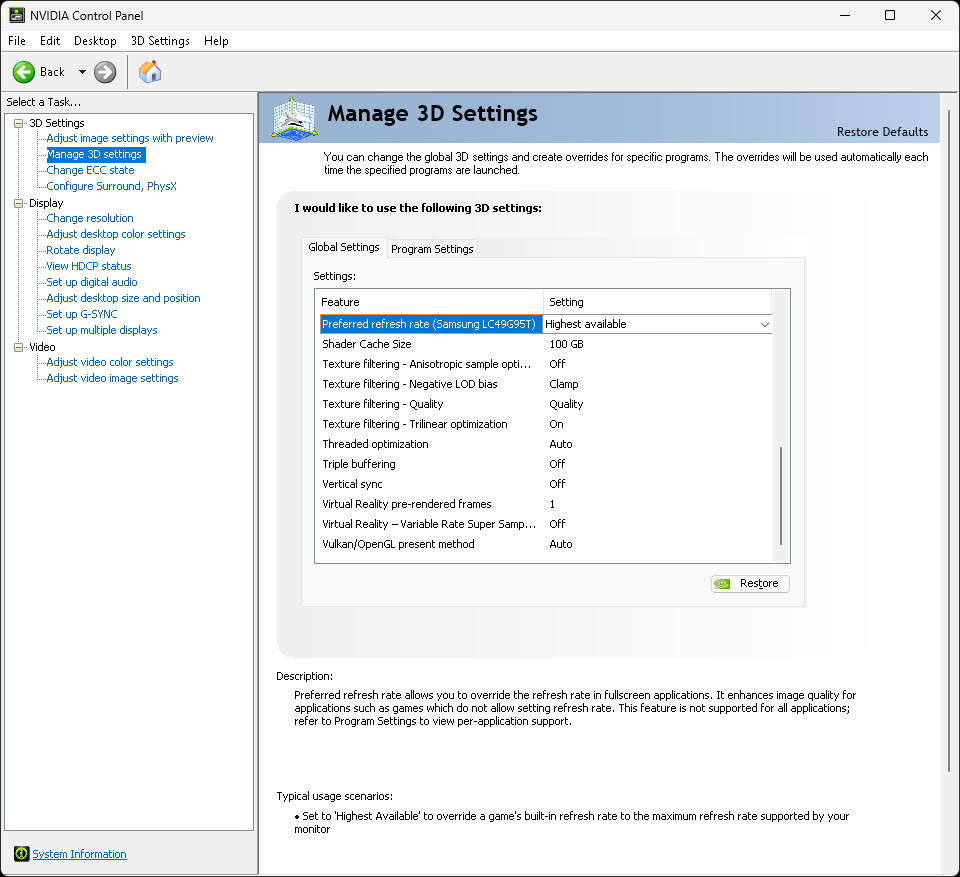
Triple buffering: Off
Triple buffering is another Open GL feature and is not relevant to most gaming applications and certainly of no use in iRacing.
Vertical Sync: Off
Vertical Sync (V-Sync) is a feature in the NVIDIA Control Panel that helps to synchronize the frame rate of a game with the refresh rate of your monitor. The refresh rate of a monitor is the number of times per second that the screen is redrawn. When V-Sync is enabled, the graphics card will only render as many frames per second (FPS) as the monitor can display.
This can help to eliminate screen tearing, which is a visual artifact that occurs when the graphics card renders a new frame while the monitor is in the middle of a refresh cycle. This can make the image appear to be torn or separated. Enabling V-Sync can also prevent over-driving your monitor, which can cause image ghosting or other artifacts.
If you have a G-Sync enabled monitor, set this to off. If you have a fixed rate refresh monitor, set this to “use 3D application setting”.
VR pre-rendered frames: 1
This article is intended for monitor users. For more information about VR headset graphics settings, see my post here. I’d be playing with them a lot trying to achieve the outcome that GeForce Experience nailed within minutes!
iRacing Graphics Control Panel Settings
Before I get started I like to run the Graphics Configuration Wizard via the UI. The Graphics Wizard automatically configures your graphics settings to what I would say is a very comfortable minimum-performance setup.
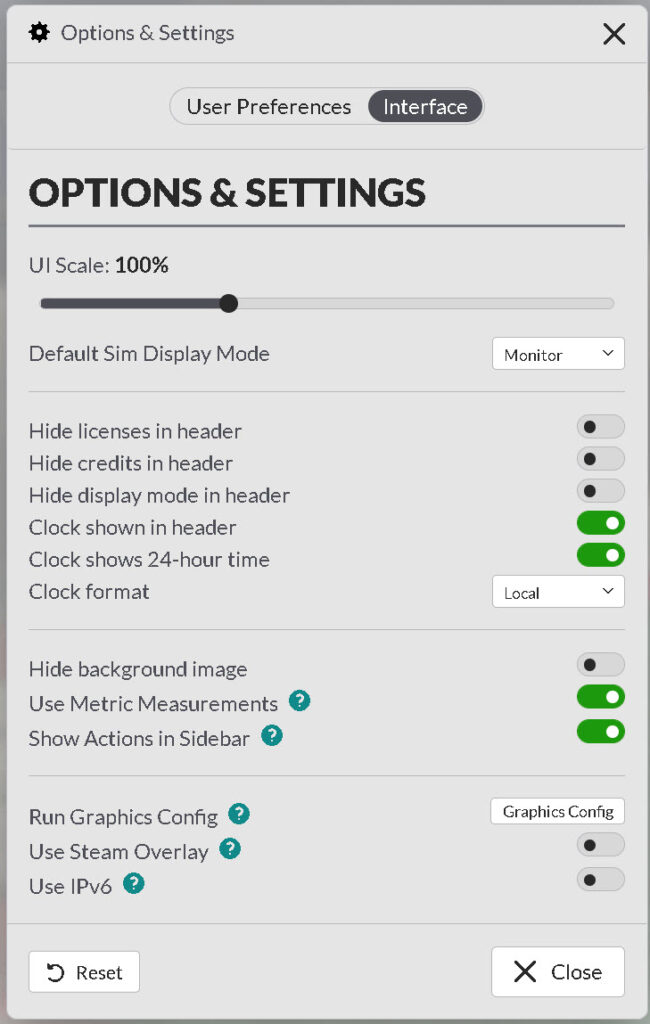
While these settings are considered the “recommended” settings, you can easily gain improve the quality of the rendering without harming your FPS. Bear in mind that if you have triples setup via your “rendererDX11Monitor.ini” file, you’ll need to copy this and restore the settings for your triples.
Here’s the iRacing graphics control panel, with my settings:
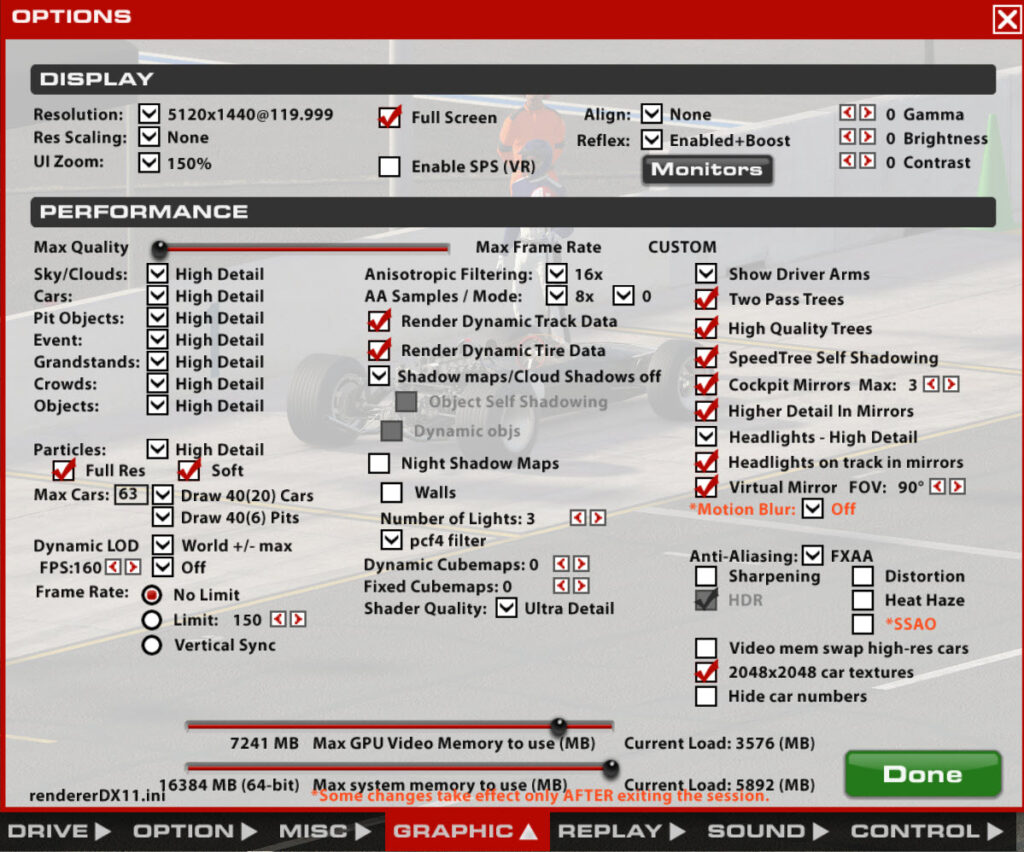
There’s going to be a bit of detail in the next section; so, be warned! We’ll start with the description of the setting, what it does and how much it’s likely to impact your FPS. I will show you what my settings are with a Zotac RTX 4090 and a Samsung G9. Frankly, though I think these settings are a good basis for most setups as my approach is to remove anything that is very heavy on the GPU but doesn’t deliver much in terms of improvement. Further settings that offer no meaningful improvement can badly impact your FPS!
The Display Section

Resolution: Match to your monitor’s resolution and refresh rate
Matches the resolution and refresh rate of the game output to your display. The graphics settings wizard (via the UI) will configure this for you.
Res Scaling: None
The Resolution Scaling feature in iRacing allows the game to be rendered at a lower resolution, which reduces the processing requirements on the computer. This lower resolution image is then scaled up to match the output resolution of the monitor, resulting in a lower quality image but less strain on the graphics card.
UI Zoom: 100-150%
The UI Zoom drop-down menu allows the user to select a zoom percentage for the user interface dialogues that appear in game. I have mine set to 150%.
Full Screen: Checked
When you enable the Full Screen mode in iRacing, the simulation will run on the entire screen, covering all other windows. If you uncheck the Full Screen checkbox, the simulation will run in a window when you restart the software. As you may know, ALT+ENTER switches back to windowed mode, and to return to full screen, click anywhere in the simulation window and press ALT+ENTER again.
Enable SPS: (VR only)
The “Enable SPS (VR)” setting in iRacing controls whether the game uses the Simulated Perspective Scaling (SPS) feature for virtual reality (VR) displays. When the setting is enabled, it will simulate the perspective from the driver’s seat, giving you a more realistic view of the environment and potentially making the game more immersive. The SPS feature uses the VR headset’s sensors to adjust the field of view and the perspective of the game’s graphics based on the player’s head movement, making the game look and feel more like you are actually sitting in the car.
When the setting is disabled, the game will be displayed in a traditional 2D format, ignoring the VR headset’s sensors and not providing the immersive perspective that SPS does.
If you’re not a VR headset user, leave this setting off.
Align: none
The “Align” setting in iRacing controls the initial window mode alignment of the graphics output. I always have mine set to “none”, although I did come across this Redditor who had problems with aligning the screen from the driver’s perspective. Their camera control didn’t help, although the align setting seemed to resolve the issue.
Reflex: Enabled+Boost
Recently, iRacing added support for a new feature from Nvidia drivers called Reflex. This feature aims to improve latency in compatible graphics cards and devices, and you can read more about it on the NVIDIA website. Reflex has been available in all NVIDIA driver updates since January 2022, and supports all 20, 30, and 40 series NVIDIA GPUs.
The NVIDIA Reflex feature in iRacing, when enabled in the graphics options, aims to reduce latency when the simulator is GPU-bound by enabling low latency mode in the device driver. Additionally, when used in conjunction with “boost mode”, it also keeps the GPU clock speed higher when the simulator is CPU-bound, which can provide some additional benefits. However, it is important to note that when the simulator is CPU-bound, enabling NVIDIA Reflex will not have a significant impact.
Gamma: 0 / Brightness: 0 / Contrast: 0
Gamma correction is used to adjust the brightness and color of the image to compensate for any particular features of the monitor you’re using. At the time of making the control panel screenshot, my gamma setting was +2 although I currently have it set to 0. If you’re using GeForce experience or ReShade, it’s best to let those applications handle Gamma, Brightness and Contrast.
The Performance Section
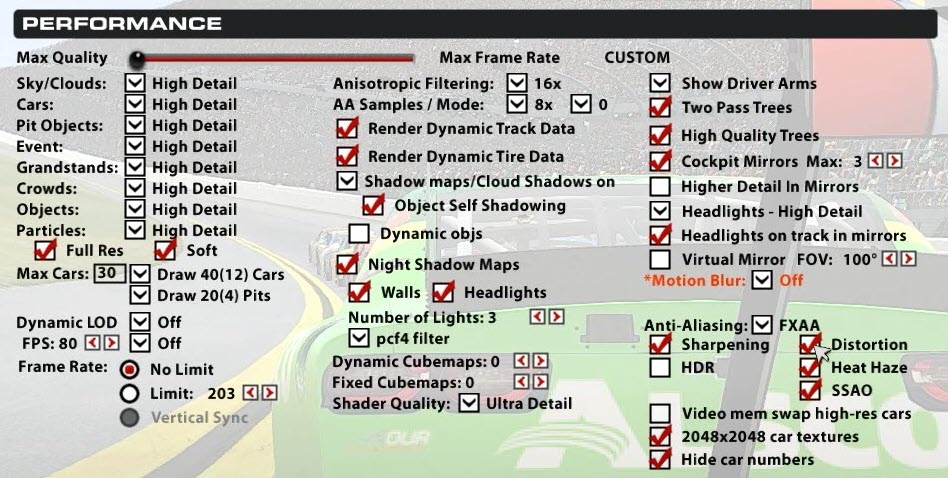
Firstly there’s a slider – slide that all the way over to “Max Quality” which activates the custom settings. The custom settings give you control over the detail level for individual objects and effects in the iRacing environment.
My settings are as follows:
Sky/Clouds: High Detail
Cars: High Detail
Pit Objects: High Detail
Event: High Detail
Grandstands: High Detail
Crowds: High Detail
Objects: High Detail
Particles: High Detail
Full Res: On
Soft: On
Max Cars: 63 (set to 63 because of RaceLabApps)
Dynamic LOD: World +/- max
“LOD” is the level of detail. If you limit it, iRacing will automatically lower the detail on the game so the game doesn’t go below X certain amount of FPS under heavy load. This is valuable during a race should you prefer temporary loss of detail instead of stuttering! LOD works both ways, it will also increase the graphics settings if your machine is rendering above the FPS you selected.
Frame Rate: No limit
Anisotropic Filtering: 16x / AA Samples Mode: 8x
Anisotropic filtering is active in NVIDIA control panel and needs to be active in iRacing too. I haven’t set this to less than 16x since before I owned an RTX 2080 ti. Any of the 30 series NVIDIA GPUs should easily be able to handle Anisotropic Filtering set to 16x and AA Samples / Mode: set to 8x
Render Dynamic Track Data: On
Render Dynamic Tire Data: On
Shadow settings
Shadow settings can dynamically add shadowing as the car moves around the circuit (hence the term “dynamic”). The compute time required to calculate the following features is huge. Even if you have a very powerful CPU and GPU combination, the shadow settings are an FPS killer.
On that note:
Shadow Maps/Cloud Shadows: Off
Object Self-Shadowing: Off
Dynamic Objs: Off
Night Shadow Maps: Off
Walls: Off
Number of Lights: 3
Dynamic Cubemaps: 0
Fixed Cubemaps: 0
Shader Quality: Ultra Detail
Show Driver Arms: Yes
Two Pass Trees: On
High-Quality Trees: On
Cockpit Mirrors Max: 3
Higher Detail in Mirrors: Yes
Headlights: High Detail
Headlights on track in Mirrors: On
Virtual Mirror: On
*Motion Blur: Off
Anti-Aliasing: FXAA
Always use FXAA anti-aliasing, despite some that say that SMAA offers better performance, I don’t find that to be true. FXAA does a really good job of maintaining the clarity of the image while smoothing out the jagged lines.
Sharpening: Off
Distortion: Off
HDR: n/a
Heat Haze: Off
SSAO: Off
Video mem swap high-res cars: Off
2048×2048 car textures: On
Hide car numbers: Off
GeForce Game Filter Settings for iRacing
NVIDIA filters in the GeForce Experience application are a set of post-processing effects that can be applied to games and other graphics-intensive applications to improve the visual quality of the image. These filters are designed to work with NVIDIA graphics cards and can be used to enhance the image in various ways.
These filters can be accessed in the GeForce Experience application by keying “ALT+Z” – this will bring up the options menu from which you can choose “Game Filter” on the left-hand side of the screen.
How to improve the graphics in iRacing with NVIDIA filters
Firstly, you’ll need to make a small update to iRacing’s core.ini file.
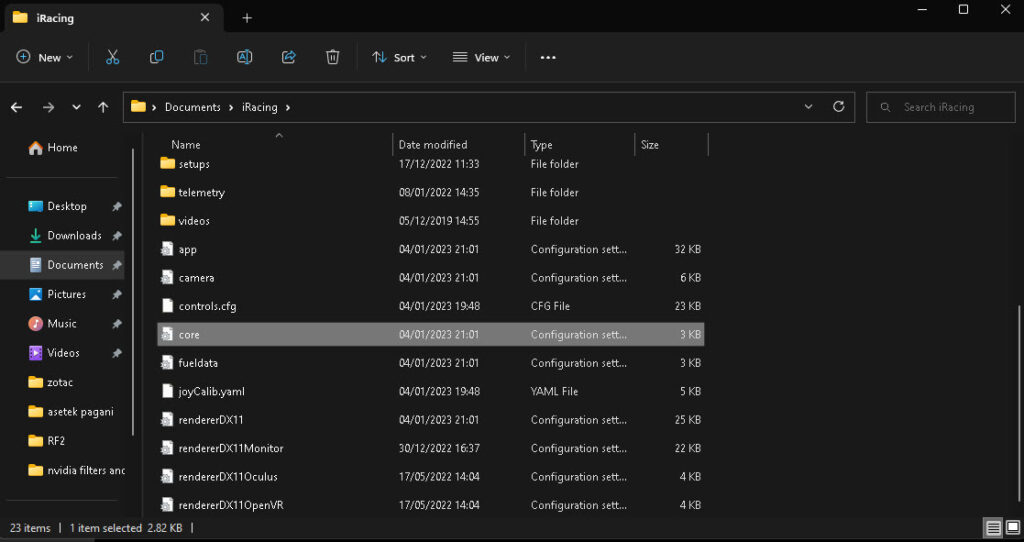
Here’s the location on my machine: C:\Users\Richard\Documents\iRacing
Make sure iRacing isn’t running. Open the file and find the connect_sockets parameter. Change it to: connect_sockets=1
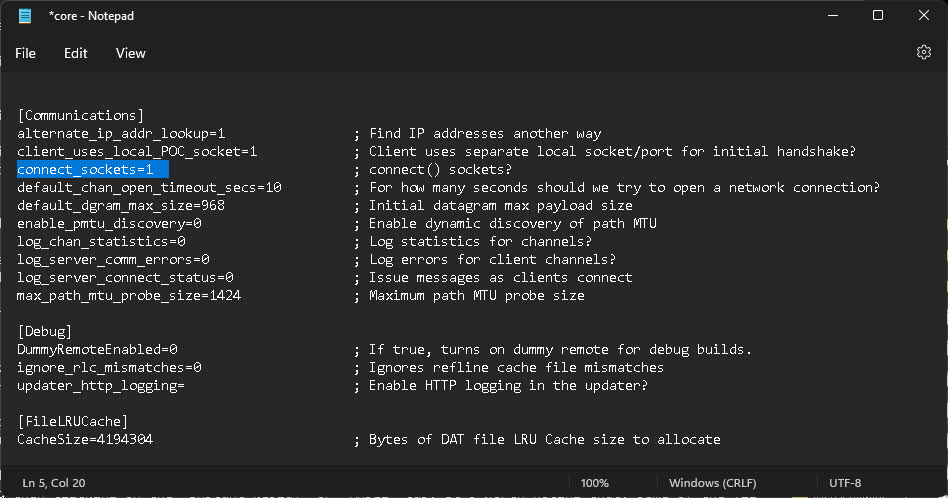
Save the file with the new change applied. If you get the “supported game is required to use this feature” error make sure you’re not running any unwanted apps like Chrome and, for me restarting my gaming PC after updating core.ini fixed this error.
Open a test session in iRacing session and press Alt+Z to open the GeForce Experience overlay dialogue. Then select the option for “Game Filter” on the left.
We will be adding “color” and “brightness/contrast” filters. I’ve taken a photo of how this looks with my phone so please excuse the image quality:
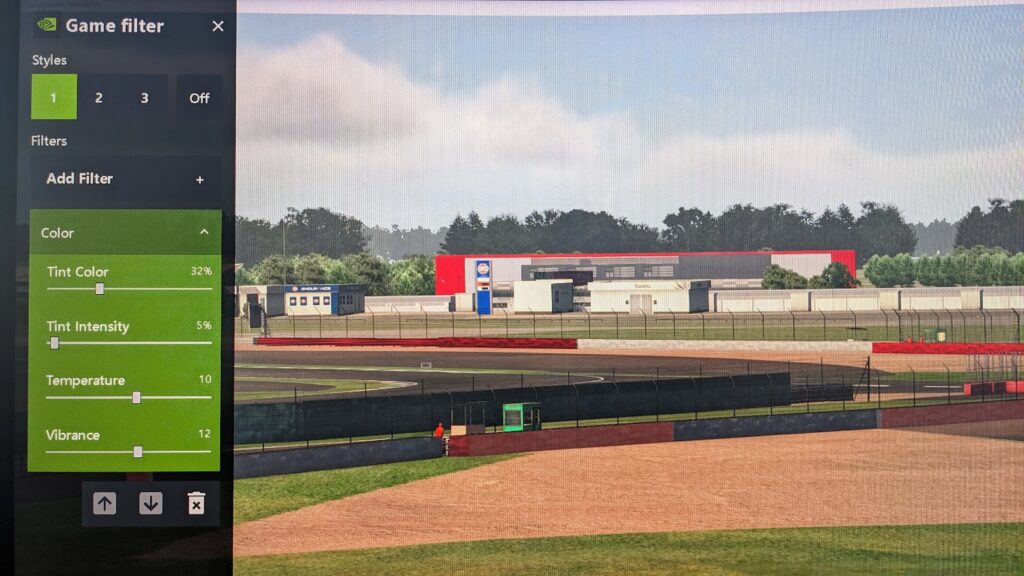
Here are the game filter settings I found drastically improved the look of my iRacing graphics on a Samsung G9 monitor:
My “color” filter settings:
Tint Colour: 0%
Tint Intensity: 0%
Temperature: -18
Vibrance: 0
My “Brightness/Contrast” settings:
Exposure: 10%
Contrast: 0%
Highlights: -100%
Shadows: 40%
Gamma: -18%
You’ll have to play with these settings to optimize them for your setup. Something that really helped my progress was doing a full reset of all of my monitor’s onboard settings – via iRacing > Settings.
Hopefully, If you’ve followed this iRacing graphics guide you’ll have an improved framerate and a nicer-looking image. Have fun!
Related articles:
The iRacing Career Guide: From Rookie to GT3
Console Sim Racing: The Complete Beginner’s Guide
Le Mans Ultimate: How to Drive the LMGT3 and Hypercar
mBooster Review: Moza’s New Active Pedal
Is Moza about to Completely Disrupt the Sim Racing Pedal game?
Mustang GT3 Sim Racing Wheel from VPG – Close Look
Topic: iRacing
