
I’m a sim racer and amateur racer with a passion for Motorsport, good racecraft and the technical and setup aspect of sim racing.
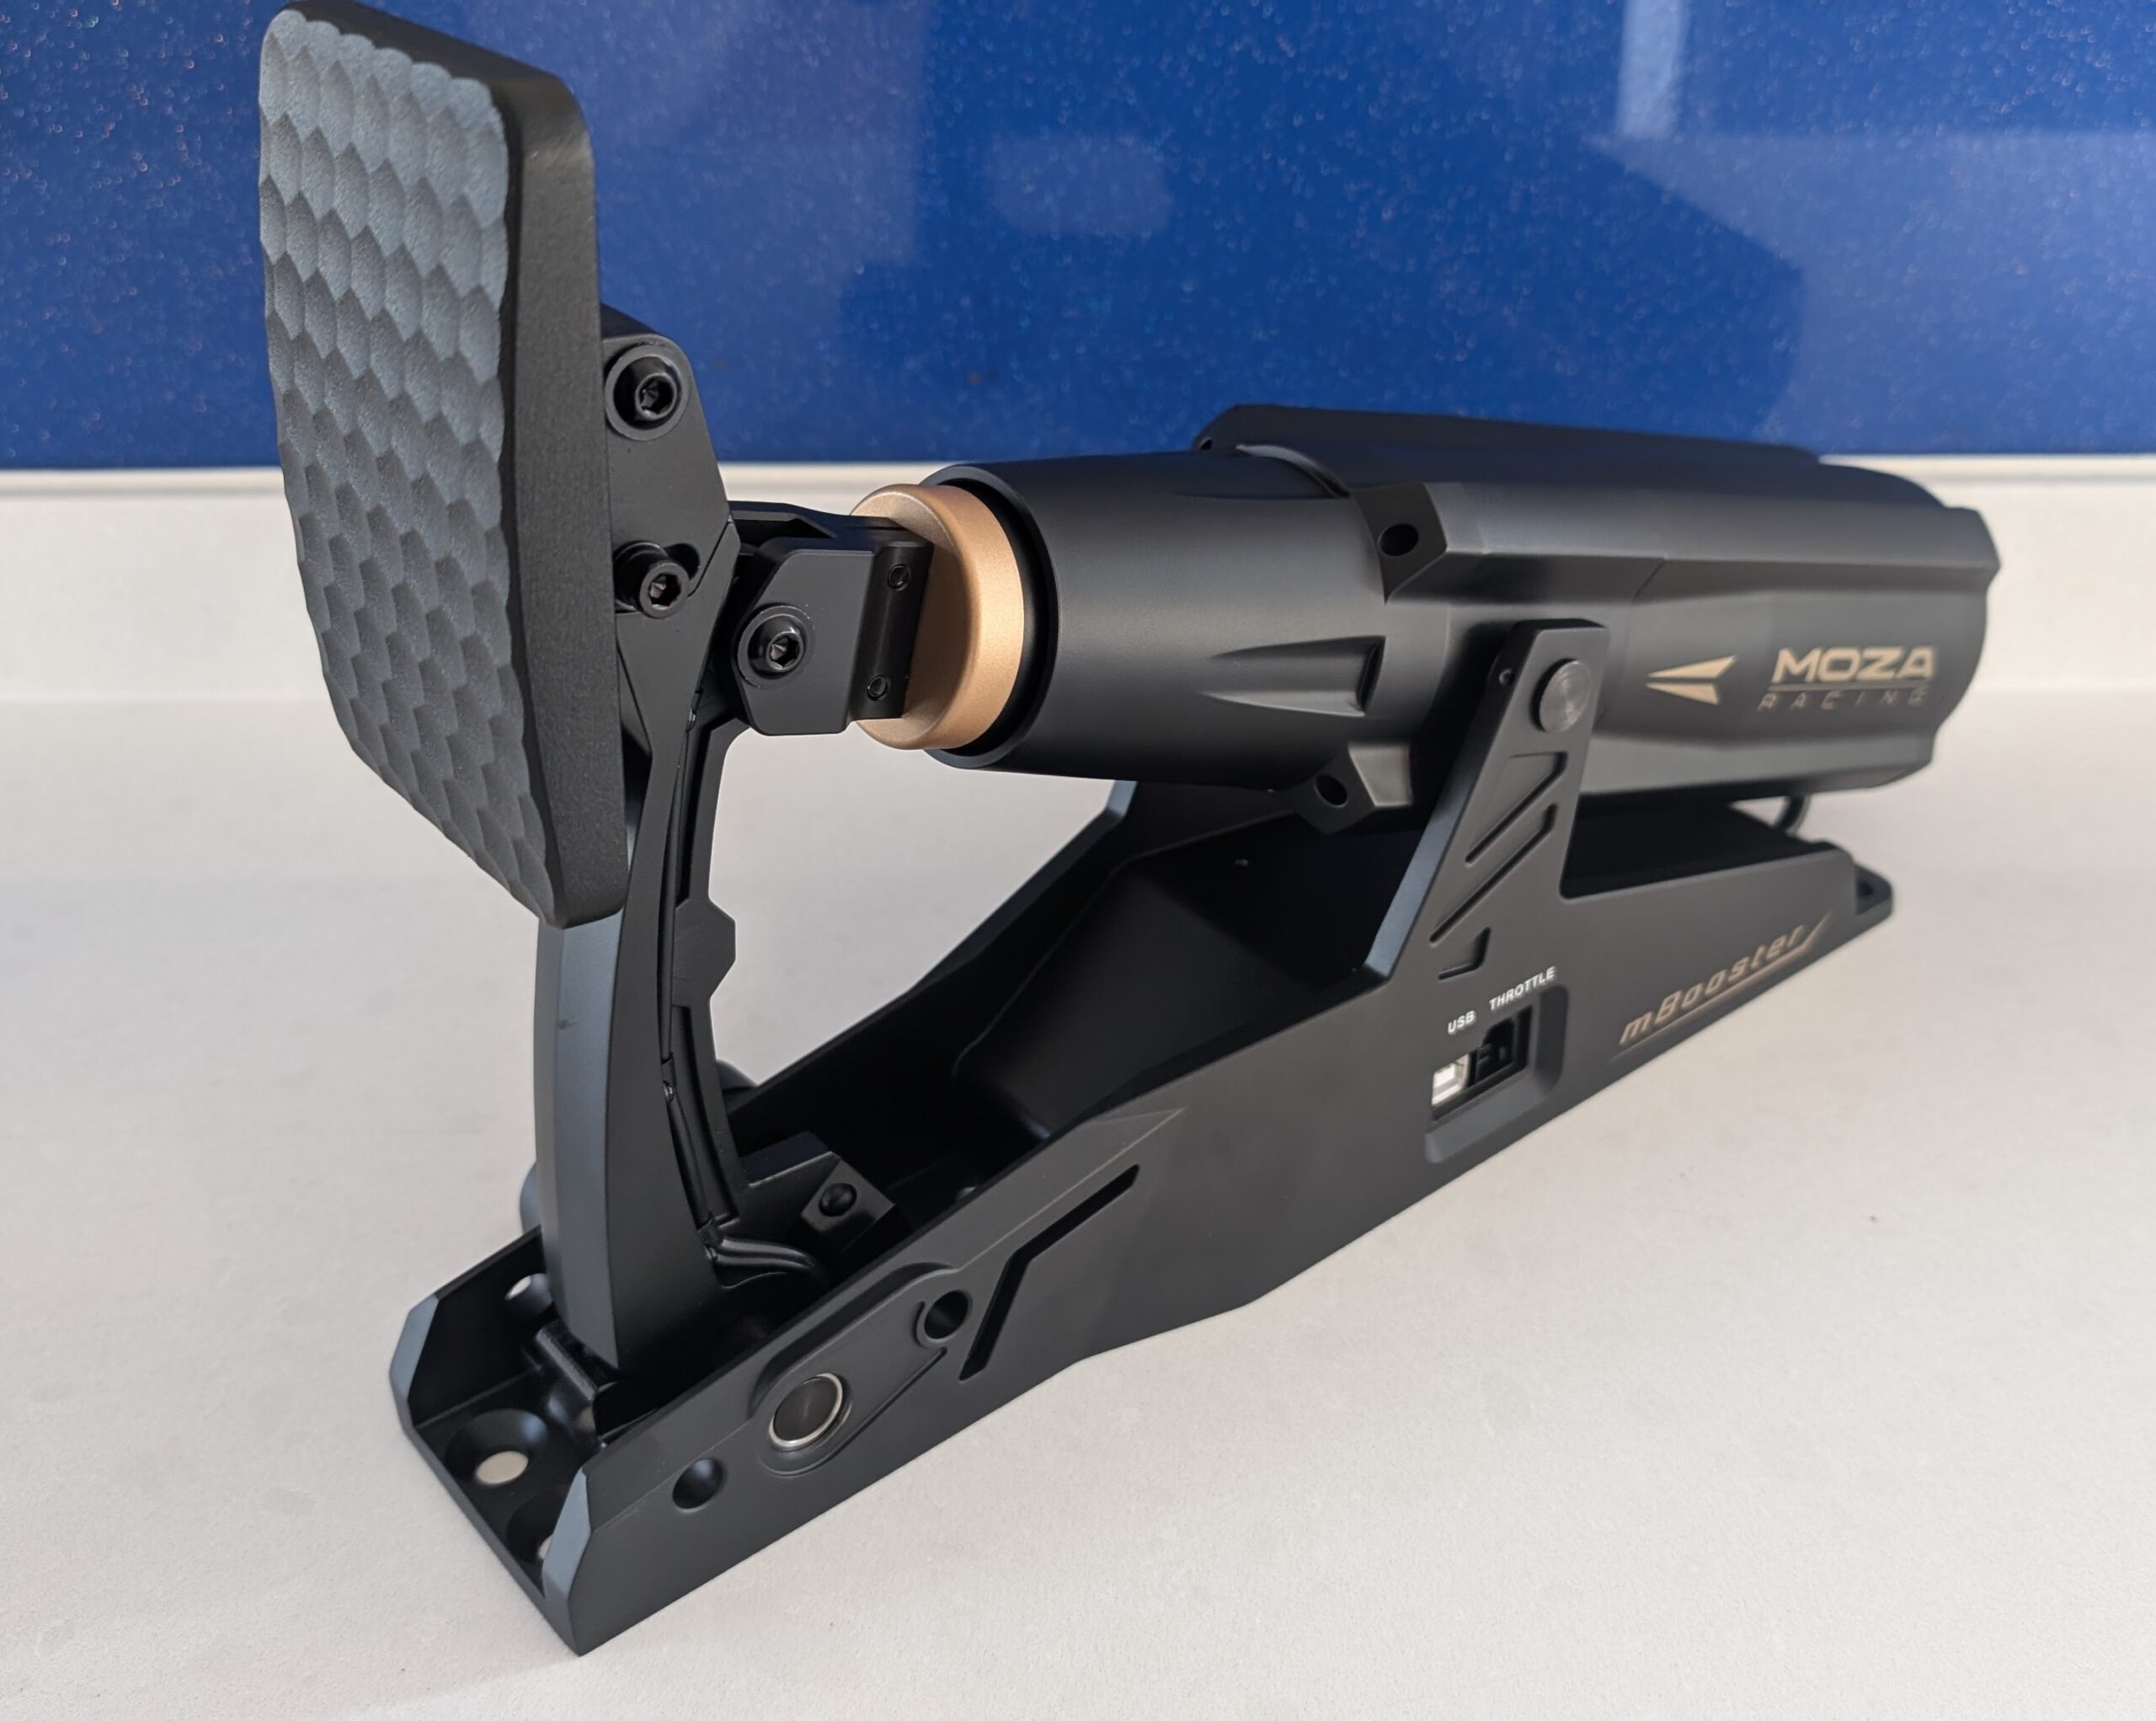
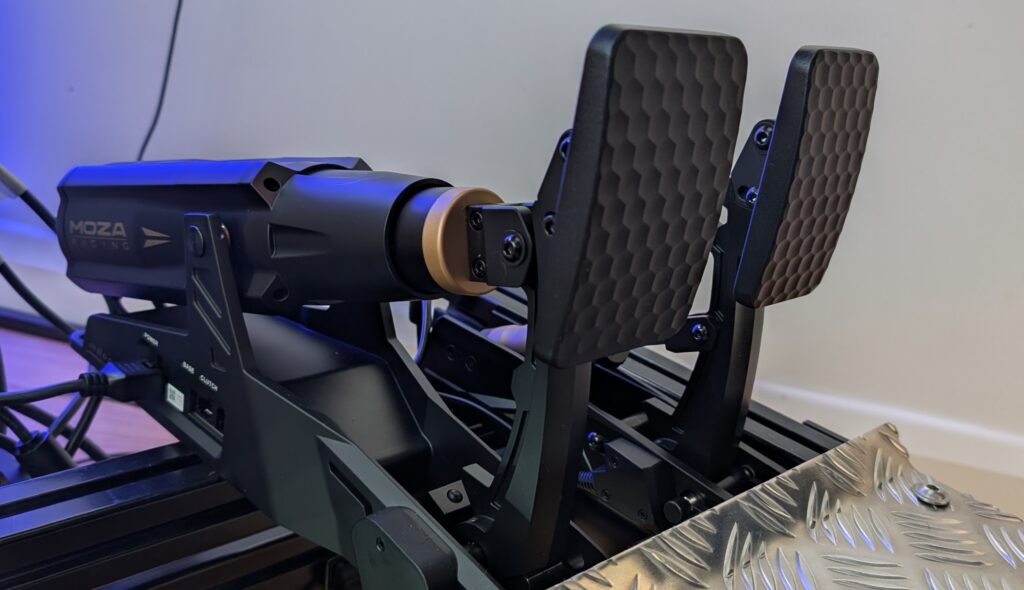
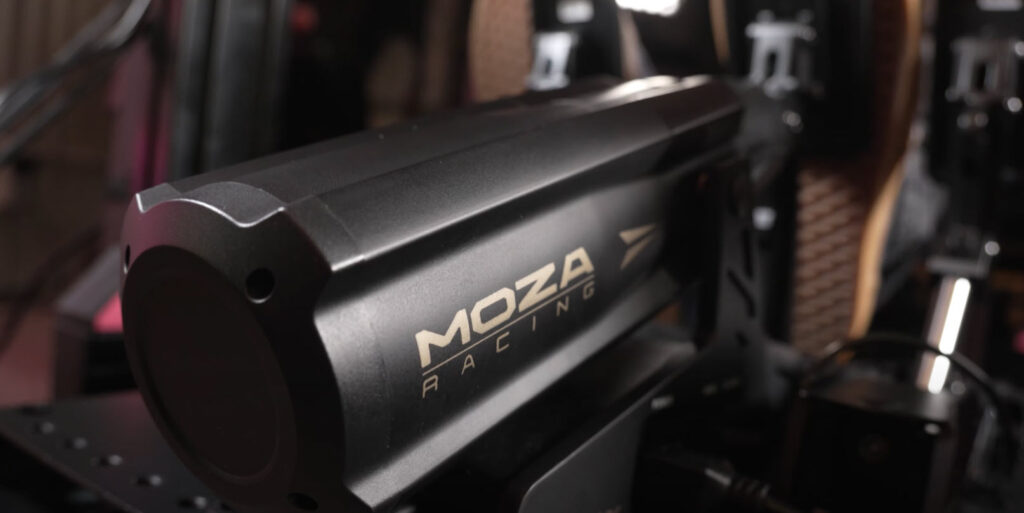
Image: Moza’s new mBooster brake pedal
“Active”, or haptic pedals, are a direction of travel for the sim racing industry that is finally gaining real momentum. While Simucube pioneered this technology with their ActivePedal, the substantial price tag (£1,471-£3,072) has kept this innovation beyond reach for many enthusiasts.
MOZA Racing’s entry into this space with the mBooster (£799-£999) dramatically changes the accessibility equation.
The mBooster uses a motor-driven system (we’ll get on to the technical details in a moment) rather than traditional springs or elastomers, allowing for software-based adjustable pedal feel and dynamic feedback effects, all in real-time.
With Pit House (the Moza controller software), you can switch between setups for different car classes without touching a single hex key or spare elastomer. I truly appreciate that particular feature as it’s always so cumbersome having to make your own pedal adjustments.
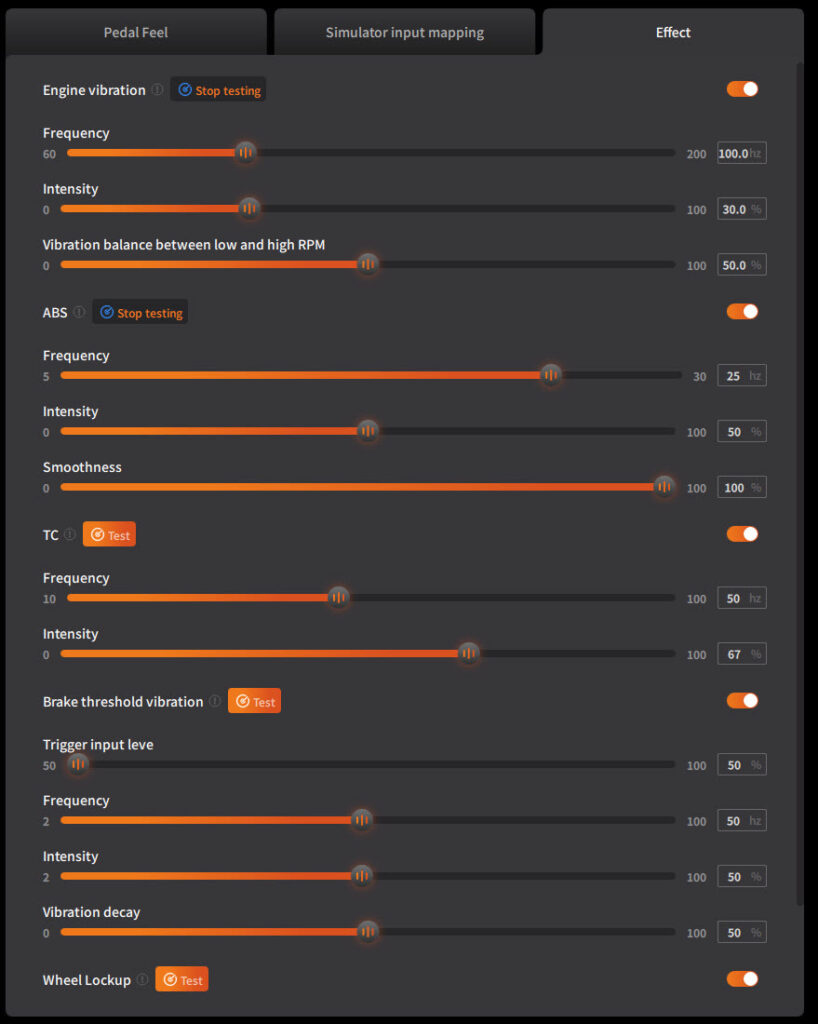
The effect outputs are visible below: engine vibration while also experiencing ABS and TC pulsation, and most importantly (to me) brake threshold and wheel lock sensations.
In the past, I’ve written extensively about the effects that rumble motors can provide. While we’re several years further along than hobbyist haptics or Simucube Activepedal copies, I think it’s important to acknowledge that most manufacturers have had the opportunity to develop active pedals for a long time, yet only Simucube and Moza seem to have fully embraced the idea. Let’s not forget that the Conspit CPP Lites had haptics on all three pedals, and that was two years ago, almost.
As active pedals become more mainstream, the question isn’t just whether the mBooster works, but how it compares to the premium-priced Simucube offering and traditional (passive?) load cell pedals.
I think that for most sim racing setups in the future, the optimum setup for most sim racers will be at least an active brake mixed with their favourite throttle or a completely active, single manufacturer setup.
So, does this new middle-ground pricing option deliver enough of the premium experience to justify its price? Will sim racers embrace an active brake pedal as the de facto setup choice? Let’s find out.
Mounting and Installation
The mBooster’s capabilities come with mounting considerations that shouldn’t be underestimated. At 382.5mm long and with considerable weight, this pedal requires proper installation to deliver its full 200Kg* potential.
* As you might see from the screenshots I’m using roughly 34Kg to “maximum” load – I drive historic cars in real life and 200Kg would probably put the pedal box through the floor! If I was driving a Formula Car (or, when I drove the Radical SR3) I think my max brake pressure was about 85Kg. In real life it’s measured in Bar so it’s hard to precisely calculate a comparison.
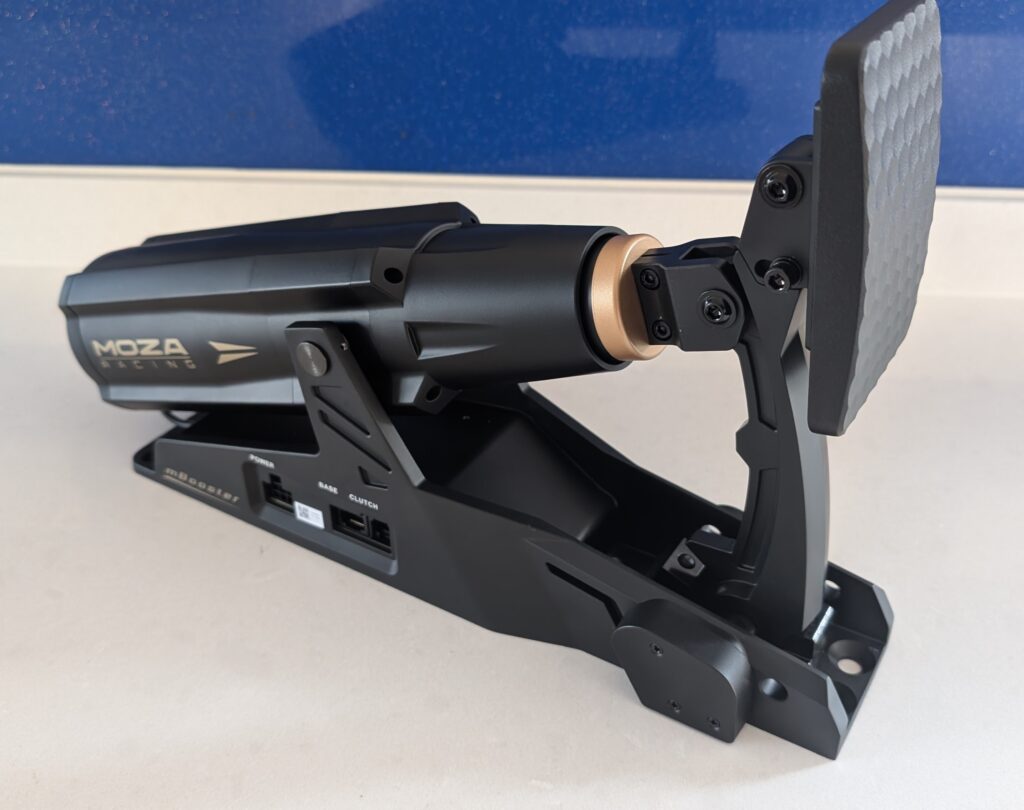
CRP2 Compatibility
MOZA has designed the mBooster to integrate seamlessly with their CRP2 pedal set. The mBooster replaces the brake pedal while maintaining communication with the throttle and clutch through direct connections on the unit itself. This eliminates the need for the CRP2 controller box when upgrading. I especially like the feel of the CRP2 throttle (it’s a really good deal – check out the review), so the pairing works well.
My only bother about the CRP2 throttle is I broke the RJ11 clip from the plug – it’s a tiny bit fragile, so take care when disconnecting your pedals!
The CRP2 base plate includes pre-drilled mounting holes for the mBooster, but due to the pedal’s length, the optional Extended Plate (£39) is strongly recommended. Without this extension, you’ll only be able to secure the front mounting points, resulting in unwanted movement under heavy braking.
Mounting Challenges
Because of the length of the mBooster, you’ll probably encounter a few complications during installation. I had to modify the length of my pedal base and add an extra 4040 profile at the end to fully mount the mBooster.
Be warned: the front and rear mounting points are too far apart for standard horizontal profile spacing, forcing compromises or a custom solution. I’m comfortable with this; my custom-built (Sim Dynamics) rig is intended exactly for this type of use case.
My Custom Solution
During installation, I found that there are two threaded holes roughly in the centre of the chassis. While these holes are designed for mounting from the underneath (using Moza’s pedal plate) you can also use them to mount from the top, if you can find a pair of M5 hex grub screws.
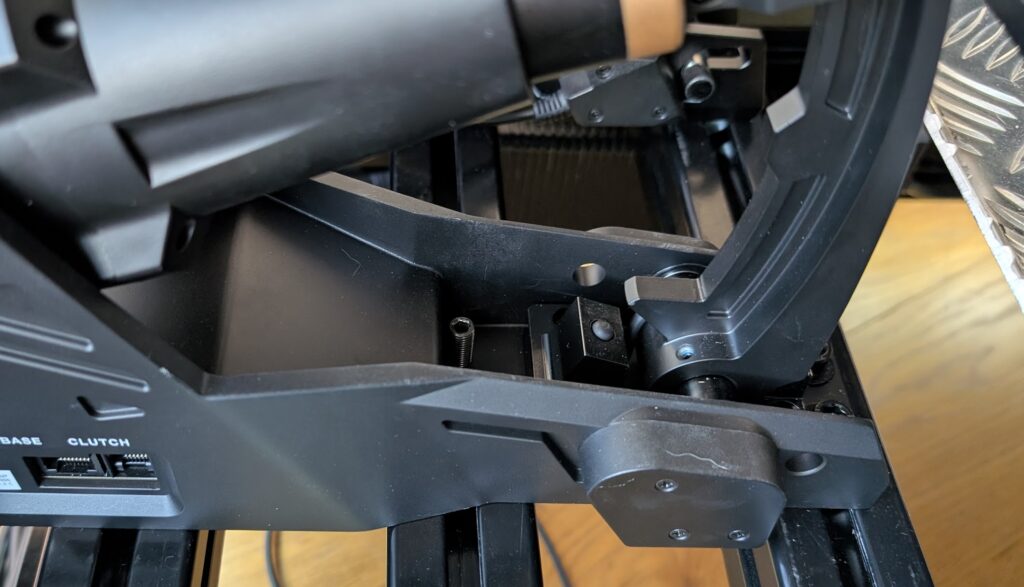
In my opinion, the mBooster needs a very stiff pedal base for the higher frequency feedback. Too much flex would be unacceptable, so in my opinion, mounting to profile or a custom steel plate (remember how thick the original Heusinkveld pedal plate was?) I used a 4040 profile and made significant modifications to my rig pedal “plate” at the rear to accommodate the lengthy brake body chassis. It’s rock solid now, though!
Initial Setup and Calibration
Once physically mounted, the mBooster setup process is straightforward:
- Connect the pedal to power and USB
- Install/update MOZA Pit House
- Apply firmware updates when prompted
- Run the automated calibration processes
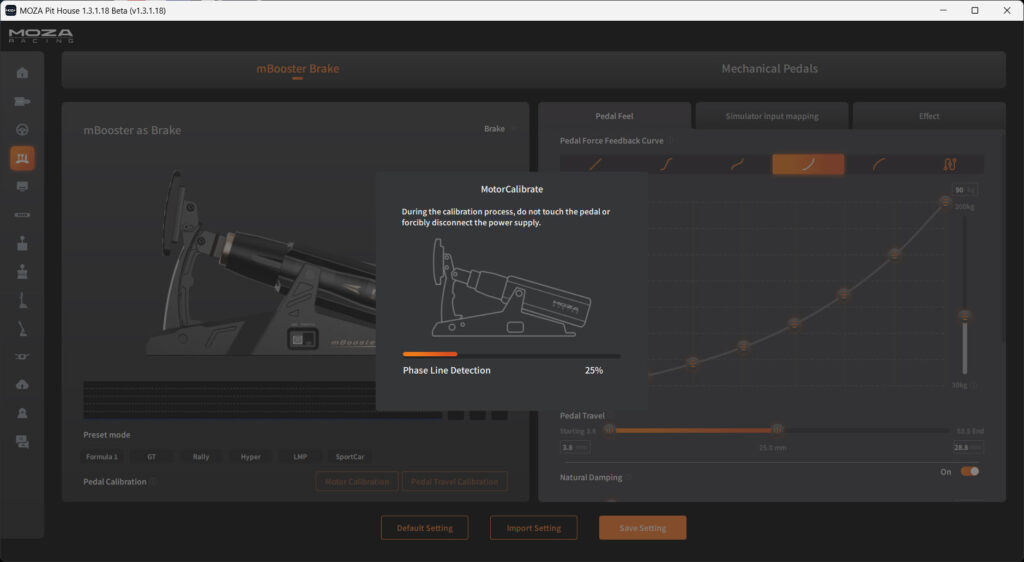
The mBooster requires two calibration steps: pedal travel and motor calibration. The latter requires you to avoid touching the pedal during the process. I think, as a general rule, calibration is just as simple as a typical brake pedal. As these calibrations complete and you begin experimenting with settings in Pit House, the pedal starts to feel progressively more refined.
While the physical mounting presents challenges, the software side of installation is incredibly easy!
Technical Specifications
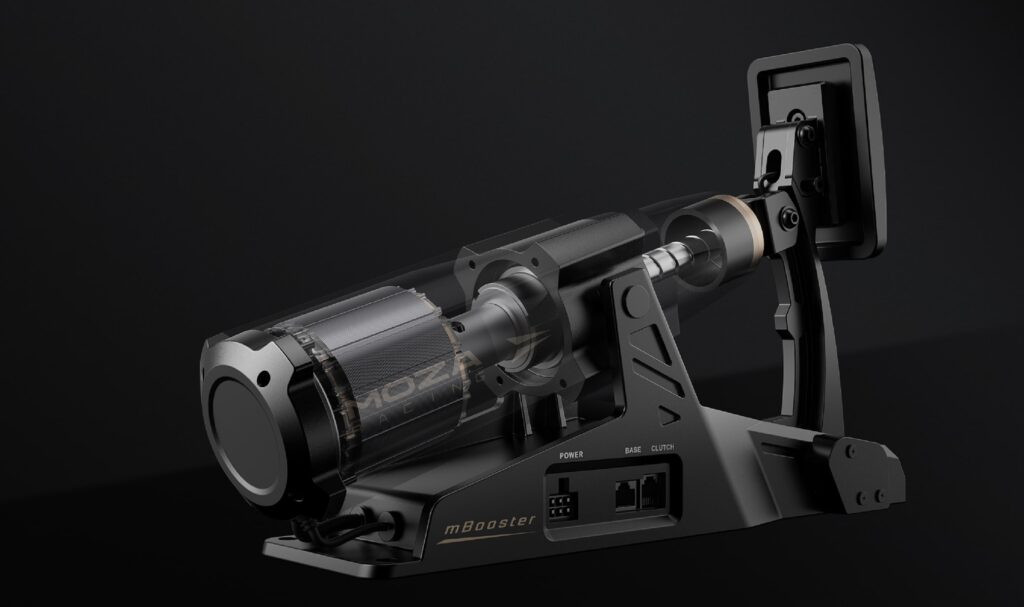
Let’s start with my favourite bit, the technical stuff. The MOZA mBooster employs a direct-drive system with a high-precision ball screw connected to a segmented servo motor. This arrangement transmits force directly to the pedal face while measuring input with exceptional accuracy.
mBooster Key technical specifications:
- Pedal body: CNC-machined aluminium alloy with gold (paint) accents
- Force range: 0-200kg (50kg higher than Simucube’s maximum)
- Load cells: Dual 200kg load cell sensors behind the pedal plate
- Angle sensor: 15-bit angle sensor (32768 PPR) for precise position measurement
- Peak power: 270W
- Input voltage: 110V-220V AC to 48V DC (external power brick supplied)
- Pedal travel adjustment: 0-25° (software configurable)
- Pedal face angle adjustment: 0-15° (physically adjustable)
According to the manufacturer, the closed rail-free design reduces operational friction, creating a smooth feel. Unlike conventional load cell pedals that use elastomers or springs, the mBooster’s resistance is entirely controlled by the motor system.
You might feel a tiny sense of “graininess” because of the motor. I found that disabling the engine vibration helped to reduce that down to pretty much nothing. Play with the settings!
mBooster vs Simucube ActivePedal
While both systems employ direct-drive servo motors, there are notable differences.
The mBooster features:
- Higher maximum resistance (200kg vs Simucube’s 150kg ceiling)
- Dual load cell implementation to maintain consistent input regardless of foot position
- the mBooster occupies more space (382.5mm length vs Simucube’s more compact design)
- Integrated USB controller (vs Simucube’s separate Link Hub requirement)
- Direct compatibility with MOZA CRP/CRP2 pedals
You can use the mBooster as a single USB device, meaning you can, if you like, use a different throttle, provided they have independent USB support. My setup is the CRP2 throttle pedal and, of course, the mBooster. Just be gentle with those little RJ11 plugs on the throttle and brake – they can be a bit fragile.
Software and Configurability in Pit House
Pit House provides three core configuration areas: Pedal Feel, Simulator Input Mapping, and Effects.
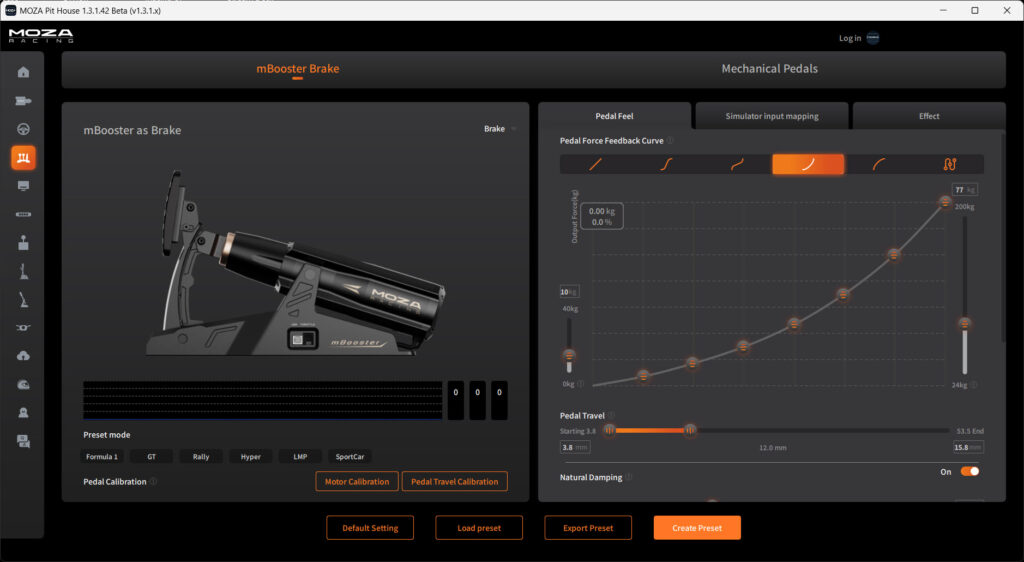
Under Pedal Feel, you can define force curves by adjusting multiple points on the graph, which determines exactly how the pedal feels throughout its travel. This allows for creating progressive resistance that mimics real race car brakes – light initially, with a firm threshold point at around 80% travel. In my opinion this is a pretty advanced feature on its own, and thoroughly depends on the car you’re driving.
You can also set maximum force (up to 200kg), preload (0-40kg), and pedal travel limits (4.3-32.1mm). The settings in the screenshot above are where I ended up, 10 kg pre-load and about 12mm travel.
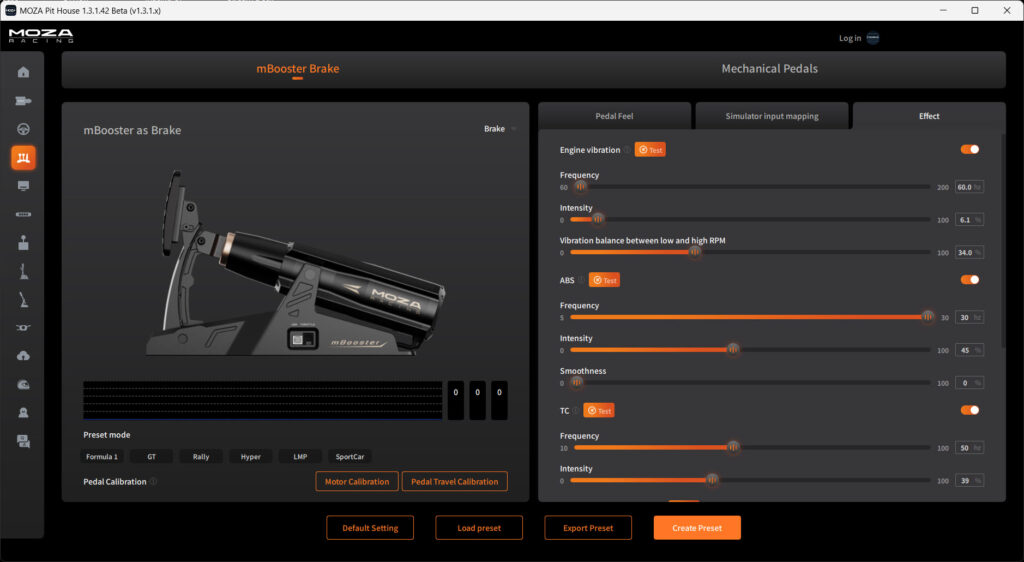
The Effects tab offers five distinct feedback types:
- ABS: Provides pulsation when braking at the limit
- TC: Vibrates when traction control activates
- Engine Vibration: Simulates powertrain feel
- Brake Threshold: Creates vibration at a specific brake pressure point
- Wheel Lockup: Feedback when tyres exceed grip limits
Each effect can be independently configured with adjustable frequency, intensity, and smoothness parameters. This is where I spent most of my time working with a setup I liked.
My mBooster effects settings:
| Effect | Parameter | Value |
|---|---|---|
| Engine Vibration | Frequency | 60 Hz |
| Intensity | 6.1% | |
| RPM Balance | 34.0% | |
| ABS | Frequency | 30 Hz |
| Intensity | 45% | |
| Smoothness | 0% | |
| TC | Frequency | 50 Hz |
| Intensity | 39% | |
| Brake Threshold | Trigger Level | 50% |
| Frequency | 59 Hz | |
| Intensity | 100% | |
| Vibration Decay | 75% | |
| Wheel Lockup | Frequency | 30 Hz |
| Intensity | 100% |
The mBooster has both position and pressure sensors. The “sensor output ratio” setting lets you choose which one controls your in-game braking input. This is controlled in the simulator output mapping section:
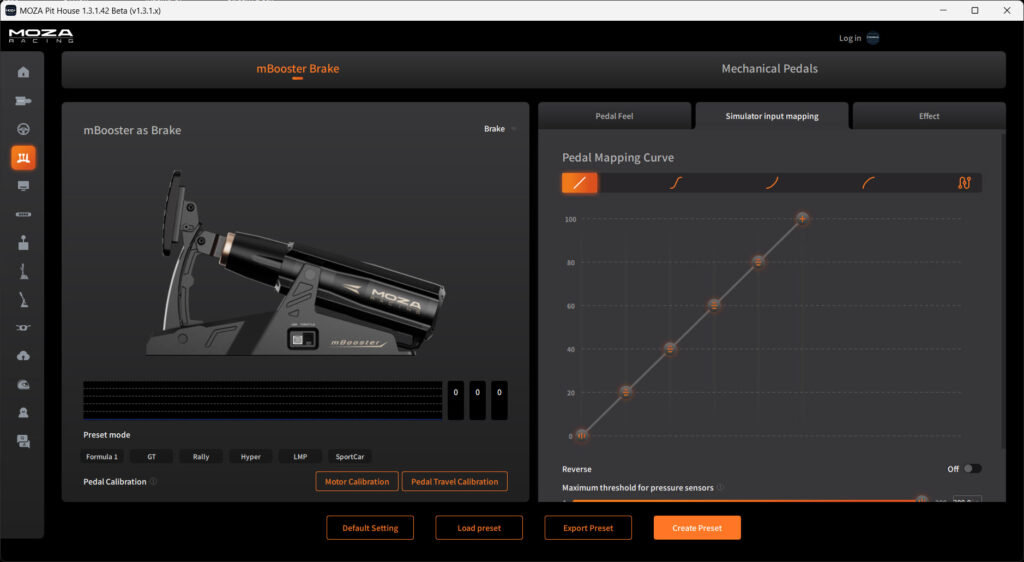
This matters because ABS feedback physically moves the pedal. If you’re using only position sensing, these movements would cause unwanted fluctuations in your braking input. By shifting toward load cell (pressure) sensing, you feel the realistic ABS pulsation without it affecting your actual braking performance in the game.
In simpler terms: this setting lets you enjoy the physical feedback without it compromising your braking consistency or setting up any weird feedback situations where you lose control of the car!
The preset profiles provide sensible starting points, though I found myself creating custom setups immediately. Making changes to a pedal set like this is the only way to learn! As an aside, Pit House supports exporting and importing profiles, making it easy to share your settings with other drivers.
Overall Notes / Conclusion
The first thing to say (and I hope this is telling!) is that the mBooster pedal will be staying on my setup, replacing my previous favourite, the Conspit CPP.Lite brake.
I had already modified the built-in haptics on those Conspit pedals to run with my SIM3D pedal rumble kit, and there was genuinely nothing wrong with that setup. It’s just that the mBooster is a far more convenient equivalent of what I was trying to achieve. Put simply, the mBooster makes previous hobbyist pedal rumble motor projects completely obsolete.
As a driver, what matters most to me is brake feel. You can’t perfectly simulate the feel of an under-rotating tyre at the threshold. In real life, you develop an instinctive feel for the point where more braking will lock the tyres. Particularly in a Radical SR3 – probably because of its massive grip window on slicks.
There’s no way to precisely simulate this sensation. But the the “threshold” setting gives you a strong hint that you’re at the limit of your brakes. This setting is in my opinion particularly important to get right.
The haptics are superior compared to my old setup. Being able to work with threshold braking has been extremely helpful to my driving. Knowing when you’re locking your wheels is one thing, but having a little “buzz” when the tyres are braking at their maximum available grip is powerful indeed. These little signals are useful information for my driving.
It takes a little time to adjust to the pedal’s information/feedback or “language” as I like to put it, but adapting to this should only take 30 minutes and a keen focus on the settings you’re changing to learn.
Once you’re up to speed, you’ll find you’re getting so much more information about your brake performance.
For the price, what Moza has achieved here is exceptional – go and take a look here.
Related Articles
Topic: Sim Racing Pedals