
I’m a sim racer and amateur racer with a passion for Motorsport, good racecraft and the technical and setup aspect of sim racing.
Dashboard Display Units (DDUs) are what push sim racing cockpits from gaming setups into proper race-spec environments. Whether you’re after a ready-made DDU with motorsports-grade construction or building your own with a tablet and SimHub, the right dashboard makes race-critical data instantly readable without looking away from the track.
Quick Navigation
Jump directly to what you’re looking for:
The software (SimHub) |
Display tech |
Budget screens |
Mid-range DDUs |
Premium displays |
Corsair Xeneon Edge |
DIY tablet dash |
Stream Deck as a dash |
Mounting |
Which to choose
I’ve run a fair few dashboard setups over the years, from a DIY tablet propped behind the wheel to premium units like the Grid DDU5 that I can read straight through my OMP GT Pro rim. The gap between budget and premium isn’t really screen quality. It’s brightness, mounting compatibility, and whether you’d rather spend a weekend building one than spend the extra £200.
This is a guide to dash screens – dedicated DDUs, the new touchscreen units, and the DIY tablet route – not button boxes (that’s a separate guide). One piece of software ties almost all of it together: SimHub. It pulls telemetry out of the game and pushes it to whatever screen you mount, so I’ll start there, then work through the current hardware – including the big 2026 arrival, the Fanatec-sold Corsair Xeneon Edge – and how to mount it.
Understanding DDU Software and Compatibility
SimHub isn’t just display software, it’s the underlying platform that makes nearly all DDUs work, regardless of manufacturer. Whether you’re running a £10 DIY engine start button or a £600 Porsche Cup replica, SimHub handles the telemetry data from your sim and pushes it to the display hardware.
The free version works for basic testing, but you’ll want the licensed edition (£10-15) for full functionality. This unlocks the web server mode that lets you use tablets as displays, removes watermarks, and gives you access to community-created profiles. What I’ve read on r/simracing is that TWF dashboards are currently the most popular profile choice, with polished graphics matching real race car displays.
For web server mode on tablets, SimHub creates a local connection (default port 8888) with 20-50ms latency via WiFi or 10-20ms via USB tethering. Commercial DDUs guarantee under 5ms latency through direct USB. This difference doesn’t sound huge, but wireless drops during online races destroy immersion in ways that cost savings can’t justify for serious racing.
Which sims it works with
Compatibility spans virtually every sim title: iRacing, Assetto Corsa Competizione, rFactor2, RaceRoom, Automobilista 2, F1 series, and more. The software handles telemetry extraction automatically once you’ve selected your game in the settings panel. If you’re not super familiar with SimHub, take a look at my guide to SimHub to get started with the installation and initial configuration.
Display Technology Explained
Higher resolution doesn’t always mean better readability at racing distances. Your typical viewing distance is 60-80cm from screen to eyeball, and what matters most at that range is brightness and contrast rather than pixel density.
The Grid DDU5 uses a Vocore LCD panel with 854×480 resolution and strong backlit brightness. The screen clearly beats many 1080p displays that struggle in bright rooms, and the difference is immediately obvious with window-facing rigs. Budget IPS panels wash out in direct sunlight whilst the DDU5’s screen maintains perfect visibility. What I’ve found through testing is that screen brightness matters more than resolution for quick data acquisition during racing.
OLED displays provide cinema-grade contrast with perfect blacks, but they cost 2-3x more and carry potential burn-in risk with static elements like gear indicators or lap timers. For dark room setups or VR users who want ambient lighting, OLED makes sense. For bright rooms, prioritise brightness specifications – look for 400+ nits minimum, ideally 500+ nits.
Resolution and viewing angles
Resolution sweet spots for 5-inch displays at racing distance are 480p to 1080p. Going beyond 1080p provides diminishing returns because your eyes can’t resolve additional detail whilst scanning for apex speed or fuel remaining. The 854×480 panel in the DDU5 delivers crisp text and graphics without the GPU overhead or cost of 4K panels.
Viewing angles matter when mounting displays above or beside your wheelbase. IPS technology offers wide viewing angles (typically 170°) whilst cheaper TN panels lose contrast and colour accuracy beyond 30° off-centre. For through-the-wheel-rim mounting like I use with the DDU5, viewing angle becomes critical because you’re looking at the display at 20-30° off-axis.
Budget-Friendly Options (Under £100)
You don’t need to spend much to get a real screen onto the rig. At the bottom end there are two routes: a flag/LED display that shows the essentials, or the DIY tablet approach I cover further down. Both lean on SimHub.
Entry-Level Flag Indicators
Flag displays represent the entry point into purpose-built dashboard hardware. The RaceFlag LED Display from Racebox Sim Racing (£68) combines an 8×8 RGB LED matrix with five functional buttons in a compact 125x87x42mm unit. Black anodised aluminium housing and carbon fiber textured panels provide surprising build quality at this price point.
What I’ve been reading on RaceDepartment is that flag awareness dramatically improves race craft, particularly in iRacing where penalties for ignoring yellows are severe. The RaceFlag’s bright LED matrix remains visible in direct sunlight, and the integrated button box (2 push buttons plus 1 rotary encoder with push function) gives you 5 in-game inputs without additional hardware.
Installation involves M5 threaded inserts pre-installed on the unit, accepting the included 50x50mm angle bracket for vertical or horizontal mounting. SimHub licensed edition is recommended for full profile functionality, particularly the custom dynamic flag animations that make the display properly useful rather than just decorative.
The Race Flag Pro steps up with CNC anodised aluminium construction and carbon fiber mounting plate. This isn’t just a flag indicator, it’s an all-in-one system providing real-time flags, spotter signals, gear indicators, and critical redline warnings. The motorsports-grade build quality justifies the £12 premium over the RaceFlag.
Apex supplies downloadable SimHub profiles for single and dual kit configurations, removing the profile-hunting hassle. The USB connection appears as an Arduino device in SimHub’s hardware detection, and the RGB Matrix tab handles LED configuration. Installation requires basic hex tools (included) and about 20 minutes for mounting and USB routing.
For first-time DDU buyers, commercial units like the Race Flag Pro make sense over DIY builds. What I’ve found through my own DIY attempts is that hidden costs (USB hubs, quality cables, replacement components after mistakes) quickly narrow the price gap. The Race Flag Pro arrives ready to mount with proven reliability.
Mid-Range Complete DDUs (£300-500)
This price bracket delivers proper displays with professional build quality and comprehensive mounting solutions. The difference between £100 flag indicators and £400 DDUs is massive – you’re getting larger screens, higher resolutions, superior brightness, and motorsports-grade enclosures.
Apex GT3R DDU V2
The GT3R (£320-395) represents the entry point into serious display territory. This 5-inch colour LCD unit features CNC machined enclosure with multiple mounting bracket options sold separately – factor in £25-35 for Fanatec, Simucube, or universal brackets when budgeting.
SimHub compatibility includes pre-configured profiles, though community profiles from TWF Dashboards often provide better visual polish and additional game support. The colour-vibrant display handles direct sunlight reasonably well, though it can’t match the Grid DDU5’s backlit brightness output.
Mounting flexibility is the GT3R’s strength. Apex offers bracket solutions for nearly every wheelbase and cockpit configuration: Simucube pattern (70mm horizontal spacing, M5 threaded holes), Fanatec pattern (50mm spacing), and VESA 75×75 universal mounts. This adaptability matters when you upgrade wheelbases or cockpits – the DDU moves with you.
Grid DDU5 by Sim-Lab
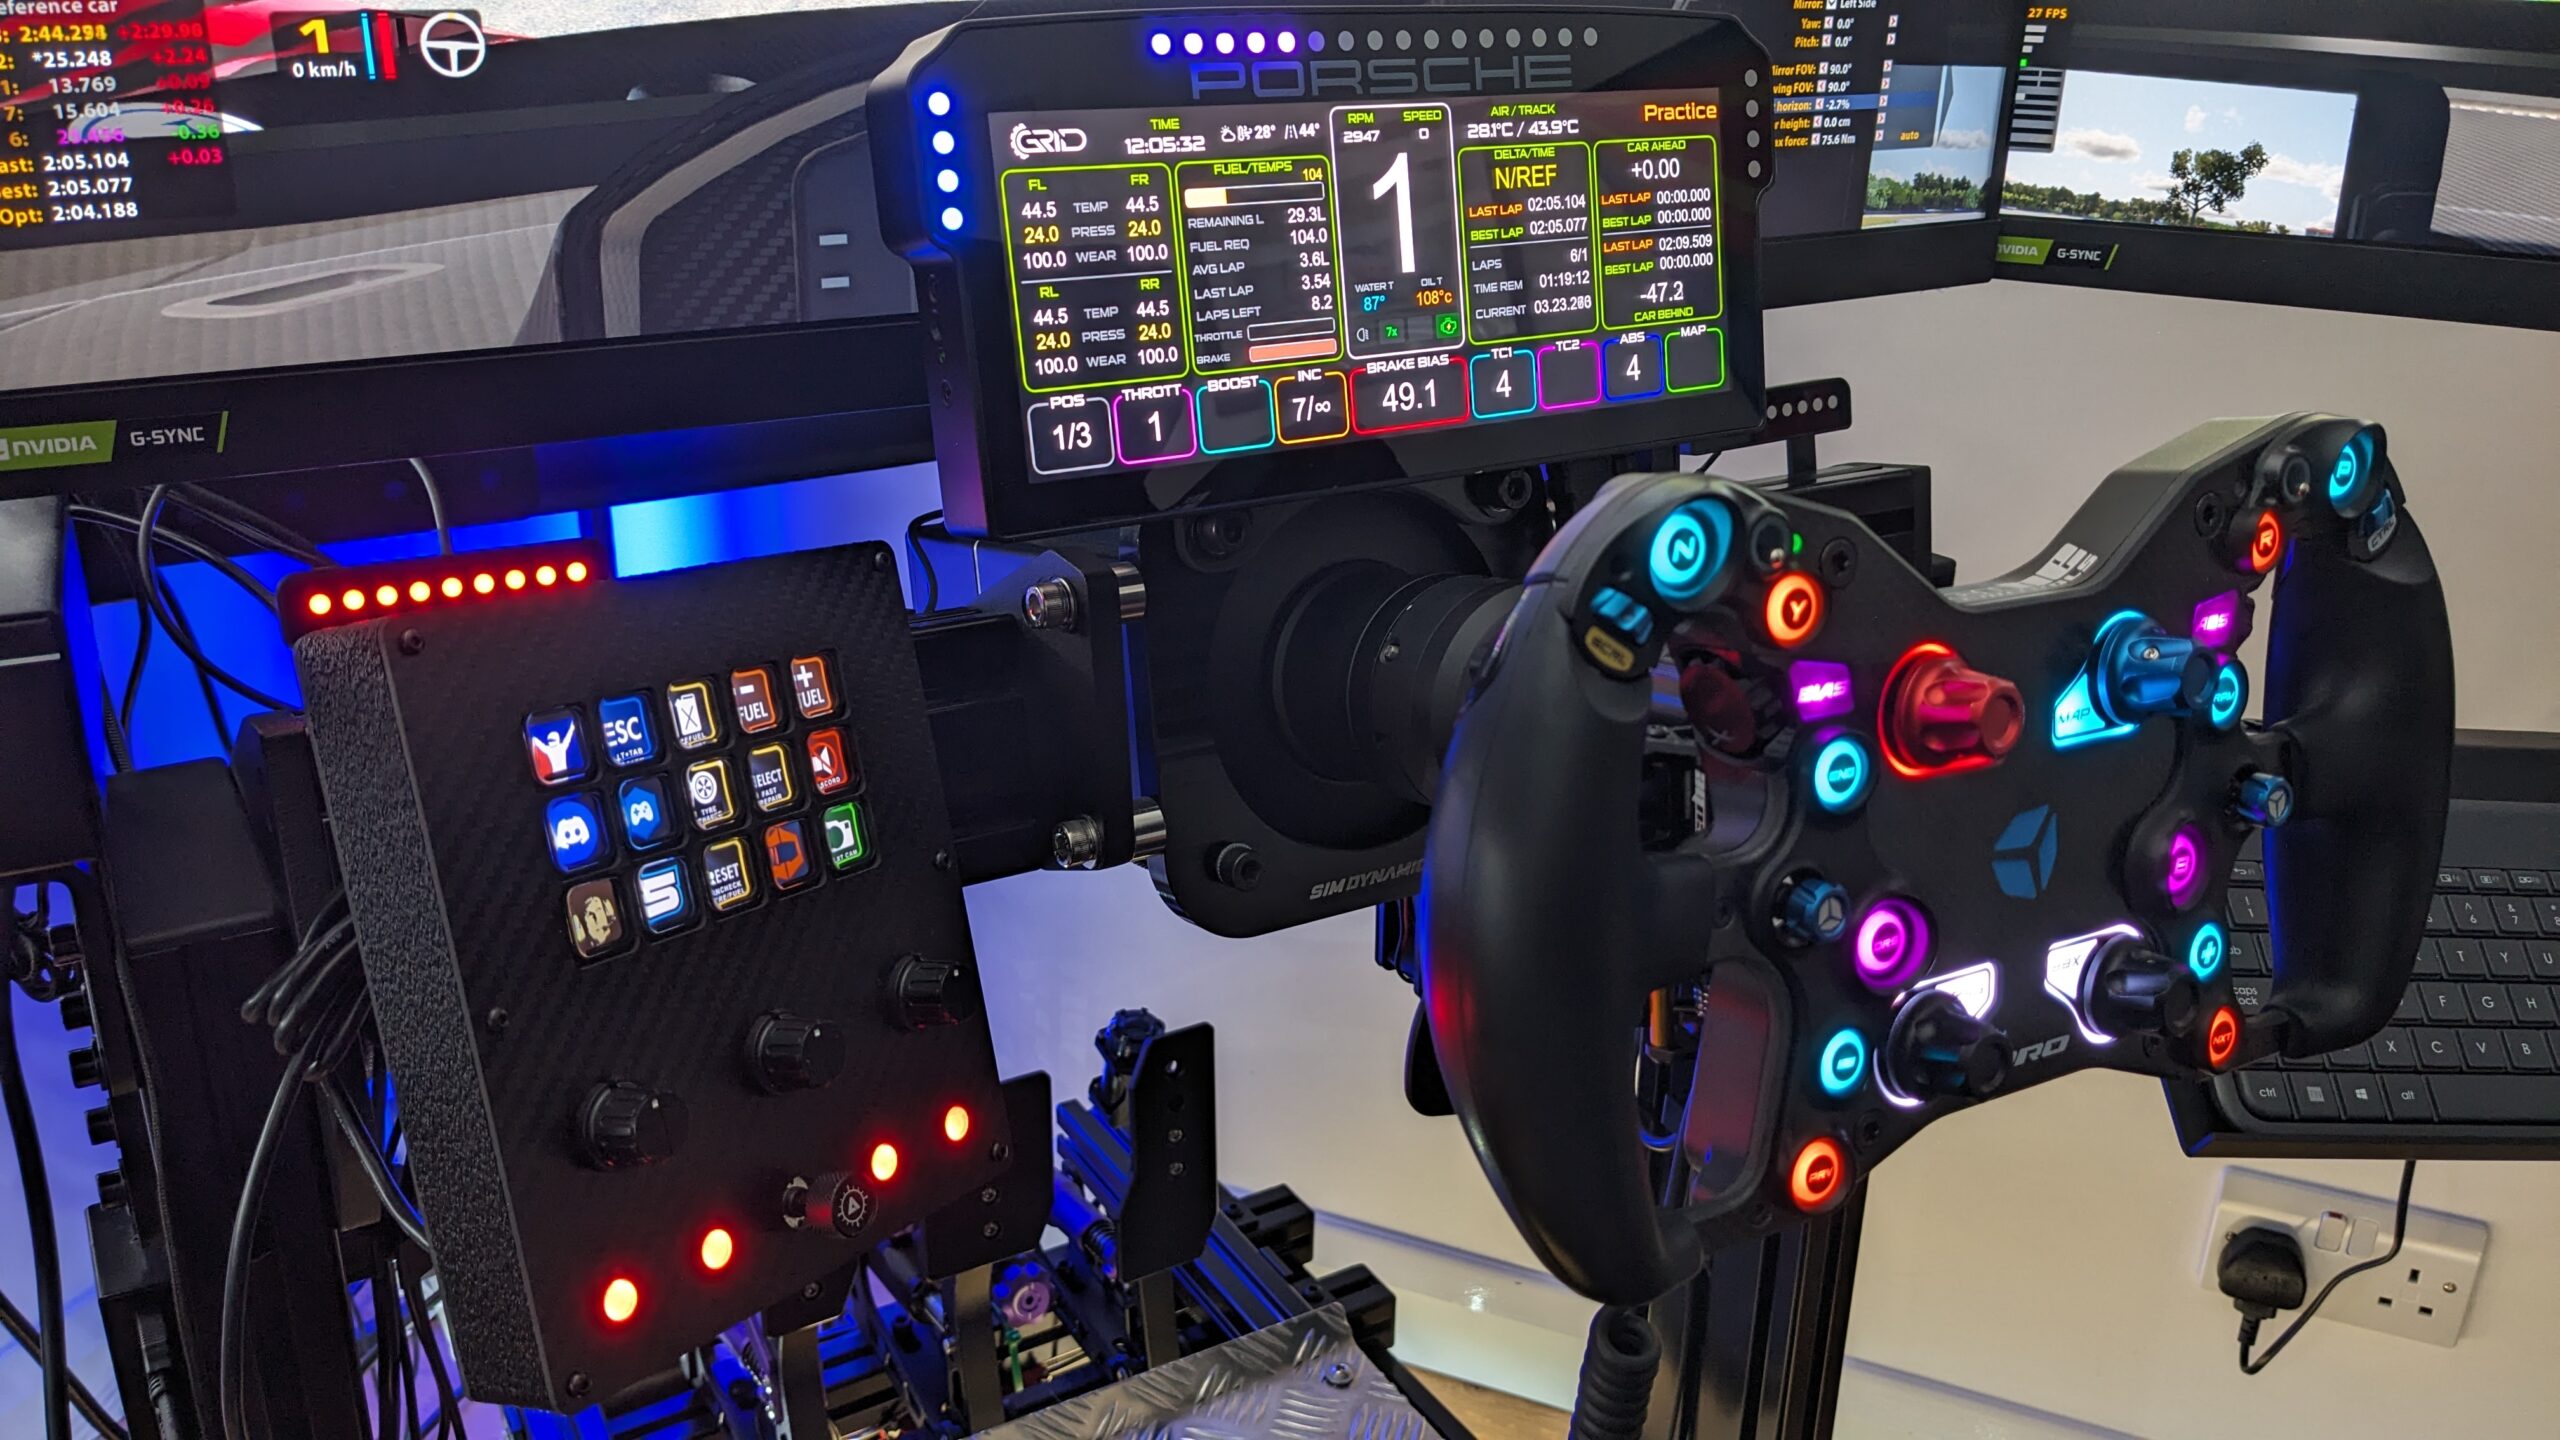
The DDU5 (£299-380) sits at the top of mid-range territory with exceptional value for money. The 5-inch Vocore LCD panel (854×480 resolution) delivers excellent brightness that maintains perfect visibility in direct sunlight. I’ve been testing the DDU5 in our office where windows face south, and the screen never washes out even at peak afternoon sun.
The DDU will instantly make your rig feel more lifelike, and I love this little dashboard as I can see straight through my OMP GT Pro wheel rim. The unit features a motorsports-grade aluminium enclosure, anodised with an industrial coating, which houses that vibrant LCD screen and 20 configurable RGB LEDs.

Mounting to your sim racing cockpit is very easy, with two different carbon brackets supplied. If you own a Simucube 2 Pro or any MiGE-based direct drive wheels, mounting is very simple as the brackets are compatible with the Simucube mounting holes. All mounting bolts and washers are supplied too.
The DDU5 is really colour-vibrant with a Vocore screen that is SimHub compatible. The photos I’ve included feature TWF dashboard software which is by far my favourite display dashboard software of choice. The combination of hardware quality and TWF profiles creates an experience matching £1000+ professional sim racing setups.

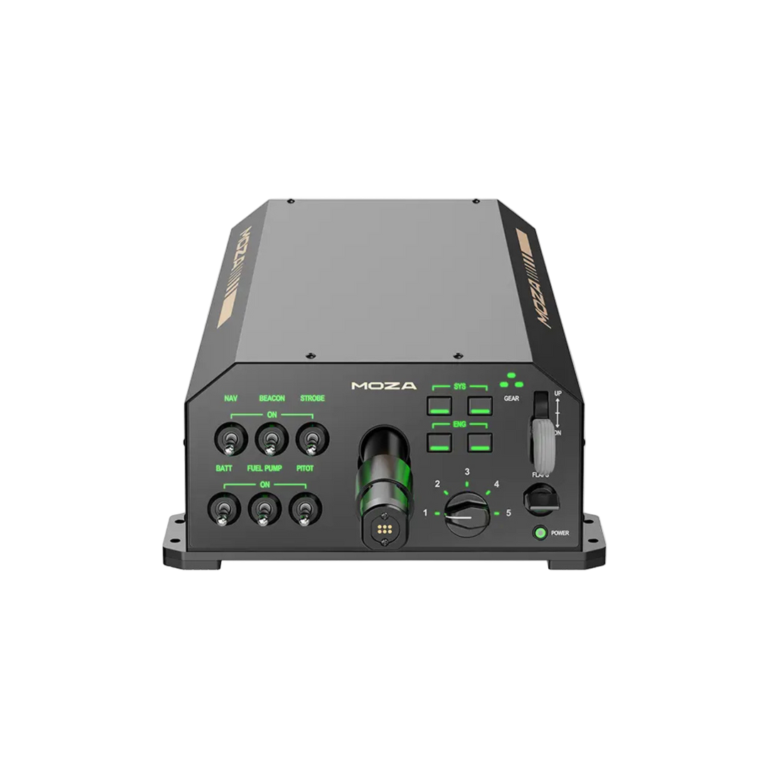
Moza CM2 HD Digital Dash
The one I’d point most people at now is the Moza CM2 (around $199). It’s a 5-inch 720p touchscreen with 10 RGB shift LEDs and flag LEDs built in, and the clever part is the connection: it plugs into a Moza base over RJ11, but it also takes a direct USB-C lead straight to the PC. That makes it brand-agnostic, so Fanatec, Simucube or Asetek owners can run it just as happily. It works through Moza’s Pit House software or SimHub, your choice.
Bavarian SimTec DDU5
A step up in fit and finish, the Bavarian SimTec DDU5 (around $300+) wraps a bright 5-inch 60Hz panel in a CNC-machined aluminium housing and mounts on an articulating arm rather than a fixed plate. It’s SimHub-driven and aimed at people who want the screen to look as serious as the rest of the rig. Worth knowing Bavarian also do a larger Control Center button-dash if you later want physical switches alongside.
Premium Displays (£500+)
Premium territory brings replica racing displays and ecosystem-specific solutions. These units justify their cost through authentic motorsports construction, advanced features, and immersion levels that put your rig firmly in proper simulator territory rather than gaming setup.
Porsche 911 GT3 Cup DDU
The Porsche Cup DDU (£500-600) recreates the actual display from Porsche Cup racing cars. This isn’t an approximation – it’s an authentic replica with data layouts matching real race car configurations. For GT3 and endurance racers, particularly Porsche enthusiasts, the immersion benefit outweighs the premium pricing.

The clamp-based mounting system works with any wheel deck configuration without drilling holes in your cockpit. This flexibility matters for rental properties or cockpits where permanent modifications aren’t acceptable. SimHub profiles specific to Porsche layouts are available from multiple community sources, with TWF Dashboards offering the most polished implementation.

The 2026 arrival: Corsair Xeneon Edge
The most interesting new thing in this category is the Corsair Xeneon Edge, and it’s worth knowing Corsair now owns Fanatec, so Fanatec sells it through their own store with a dedicated mounting bracket. It’s a 14.5-inch ultrawide touchscreen (2560×720, 60Hz) that bolts to the front of a Fanatec base or any 80/20 rig. Around $220 for the screen, $300 for the screen-plus-bracket bundle.
What makes it different from a normal DDU is that it’s both a dash and a touch surface. You can fill it with SimHub widgets through Corsair’s iCUE integration (which neatly sidesteps the usual faff of Windows treating a dash as a second monitor), and because it’s a touchscreen you can drop on-screen buttons next to your telemetry. It’s pricey for what is, fundamentally, a 60Hz screen, and if you already live in SimHub you can do most of this on a cheap panel. But it’s the cleanest off-the-shelf version of the idea, and the Fanatec mounting integration is nicely done.
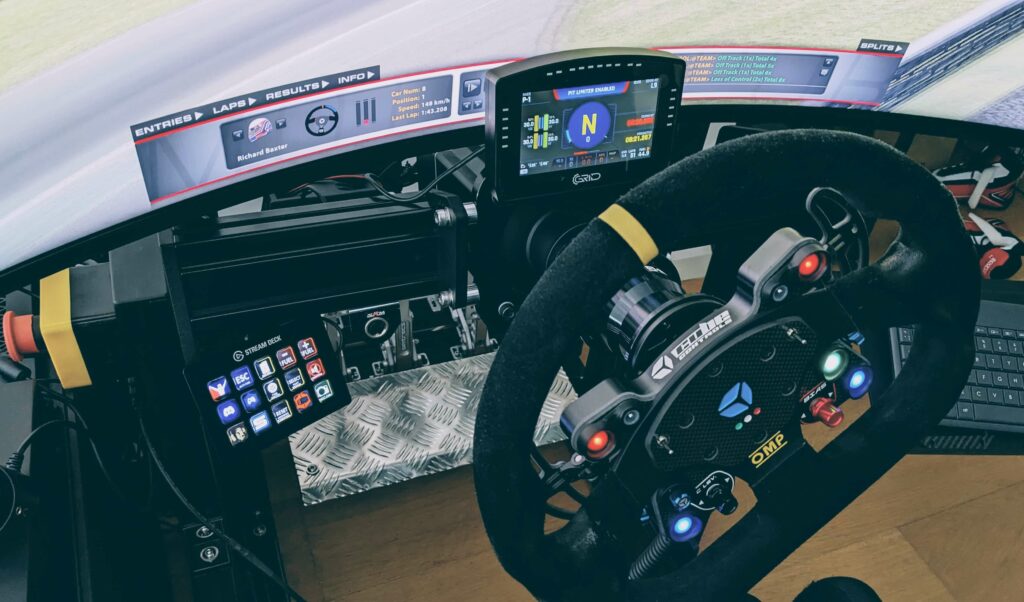
DIY Dash Display
To make a sim racing dashboard using a smartphone or tablet, you need SimHub software running on your PC with the web server function enabled. This creates a local network connection that pushes telemetry data to your device’s browser in real-time.
Tablets can outperform budget displays for screen quality, but they introduce latency and stability concerns that commercial hardware eliminates. An iPad or Android tablet delivers 2048×1536+ resolution (£150-300 used market) with retina-quality graphics and unlimited profile customisation. SimHub’s web server adds 20-50ms latency via WiFi or 10-20ms via USB tethering, compared to under 5ms for commercial DDUs through direct USB.
What I’ve found in testing is that tablet solutions work brilliantly for static testing and practice sessions, but wireless drops during online races destroy immersion in ways that ruin competitive racing. USB-tethered tablets nearly match commercial DDU performance whilst maintaining the screen quality advantage. For casual racers or multi-purpose device users, tablets make perfect sense. Serious competitors should invest in dedicated hardware to eliminate latency and stability variables.
SimHub Setup for Tablets
First, download SimHub from https://www.simhubdash.com/ and install it on your PC. Once installed, launch SimHub and navigate to the “Dash Studio” section where you’ll find pre-made dashboard layouts for various racing styles.
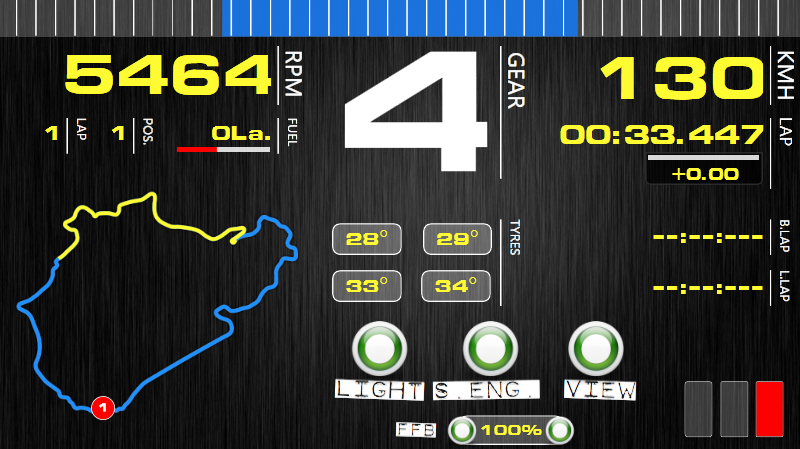
SimHub’s dash studio provides hundreds of community-created layouts. Browse through the options and select one that matches your racing discipline – Formula layouts for single-seater racing, GT3 styles for endurance, rally layouts with pace notes integration. The photos above feature TWF dashboard which is by far my favourite display dashboard software of choice.

Enable the web server function in SimHub settings. The software will display an IP address and port number (typically 192.168.x.x:8888). This is the address you’ll enter into your tablet’s web browser to connect to the dashboard feed.

Windows Firewall Configuration
Windows Defender Firewall blocks SimHub’s web server by default. You’ll need to create an exception to allow tablet connections. Navigate to Windows Security settings, then Firewall & Network Protection, then Allow an app through firewall.

Find SimHub in the application list and enable both Private and Public network access. If SimHub doesn’t appear in the list, use “Allow another app” to browse to the SimHub executable file (typically C:\Program Files (x86)\SimHub\SimHub.exe).

For older Windows versions, the firewall interface looks slightly different but the process remains identical. Navigate to Control Panel, System and Security, Windows Defender Firewall, then Advanced Settings. Create an inbound rule for SimHub allowing TCP connections on port 8888.

Connecting Your Tablet
On your tablet, open any web browser (Chrome, Safari, Edge) and enter the IP address and port number displayed in SimHub. For example: http://192.168.1.100:8888. If it does work you’ll see a screen like this:

From here, just select your dash and make the dashboard fullscreen with the options that appear at the top of the window. The tablet now functions as a live telemetry display updating in real-time as you drive. Mount the tablet using a generic tablet holder (£15-25 from Amazon) with adjustable arm for positioning flexibility.
For improved stability, consider USB tethering instead of WiFi. Connect your tablet to the PC via USB cable, enable USB tethering in the tablet’s settings, and SimHub will automatically detect the wired connection. This reduces latency from 20-50ms down to 10-20ms and eliminates wireless dropout risks.
Using a Stream Deck as a dash
Worth a mention because people ask: an Elgato Stream Deck can show live telemetry too, via the SimHub Stream Deck plugin, so a key can display fuel or tyre temps rather than just firing a macro. It’s not a substitute for a proper dash screen – the keys are small and you’ll want them for controls – but if you already run one, a couple of its keys can double as a glanceable readout. I cover that fully in the Stream Deck for sim racing guide.
Mounting to Your Cockpit
Universal mounts often require additional spacing hardware, whilst manufacturer-specific brackets provide cleaner integration. The Simucube/MiGE mounting pattern (70mm horizontal spacing, M5 threaded holes) has become the de facto standard for mid-to-high tier DDUs.
Grid DDU5 includes Simucube-direct brackets in the box, allowing bolt-on installation without adapters or spacing washers. Apex GT3R requires separate bracket purchase (£25-35), but this approach provides flexibility for non-Simucube wheelbases. Fanatec users need 50mm spacing brackets with custom mounting solutions.
VESA 75×75 and 100×100 mounting patterns offer maximum versatility. Monitor arms (£20-30) provide adjustability that fixed brackets can’t match – six degrees of freedom for positioning, easy removal for cockpit reconfiguration, and tool-free adjustment during racing sessions. What I’ve been reading on RaceDepartment forums is that monitor arm mounts often provide more adjustability than manufacturer brackets, especially for non-standard cockpit configurations.
Direct brackets vs monitor arms
The trade-off comes in rigidity. Direct-mount brackets eliminate flex and vibration but lock you into fixed positioning. Monitor arms introduce potential vibration points, particularly with heavier DDUs or aggressive force feedback settings. For wheelbases above 15Nm peak torque, verify monitor arm load ratings (typically 2-8kg maximum).
Wheel deck mounting places DDUs behind the steering wheel for through-the-rim visibility. This requires displays under 6 inches diagonal and careful positioning to avoid obstructing wheel buttons or paddles. My DDU5 mounts 8cm behind the wheel plane, visible through the 28cm diameter OMP rim with minimal head movement required.
Side mounting positions DDUs to the left or right of the wheelbase, useful for cockpits with limited vertical space or users preferring peripheral vision data display. This placement works brilliantly for flag indicators and secondary information but feels unnatural for primary data like speed and gear position.
Cable management
Cable management determines how professional your installation looks. Use spiral wrap or cable sleeves for USB and power cables, routing them along cockpit extrusion channels where possible. Leave 20-30cm service loops near connections for maintenance access without complete disassembly. Velcro cable ties allow repositioning during setup without zip tie waste.
Choosing the Right Dashboard for Your Setup
Your wheelbase and cockpit combination determines which dashboards mount cleanly versus requiring adapter brackets. Simucube 2 Pro and MiGE-based systems work perfectly with Grid DDU5, Apex GT3R (with bracket), and most premium displays using the 70mm mounting standard. Fanatec Podium wheelbases benefit from Fanatec-specific dashboards that integrate with the existing mounting points.
Budget allocation should prioritise brightness over resolution if you’re racing in bright rooms. The Grid DDU5 with its high-brightness Vocore panel provides better visibility than £600+ displays with higher resolution but dim 250-nit screens. For dark room setups or VR users adding ambient lighting, prioritise resolution and consider OLED options.
Time investment matters more than most buyers anticipate. DIY builds save £200-300 but consume 10-15 hours including research, ordering, assembly, troubleshooting, and profile configuration. Commercial units arrive ready to mount with proven reliability and warranty support. For first-time DDU buyers, commercial makes sense. For electronics enthusiasts who enjoy Arduino projects and 3D printing, DIY provides rewarding learning experiences.
Software and future-proofing
Software ecosystem matters long-term. SimHub’s monthly updates introduce new features and game support, but commercial DDUs ship with outdated profiles. Budget time for profile exploration via RaceDepartment forums, TWF Dashboards, or SimHub’s official Discord. The gap between manufacturer defaults and community creations is substantial – TWF profiles alone justify SimHub’s £10-15 licensed edition cost.
Future-proofing comes through mounting flexibility and USB connectivity. VESA-compatible displays move between cockpits and wheelbase upgrades without replacing mounting hardware. Direct USB connection ensures compatibility with future SimHub versions and Windows updates. Proprietary wireless protocols or manufacturer-specific software create upgrade barriers when you eventually replace other rig components.
That’s the comprehensive breakdown of sim racing dashboards and DDUs. Whether you’re starting with £10 DIY buttons or investing in a £600 replica racing display, the right dashboard pulls your cockpit well out of gaming setup territory and into proper simulator. SimHub ties the ecosystem together, brightness trumps resolution for racing visibility, and commercial solutions increasingly make financial sense when factoring time investment against DIY savings.
Related Articles
Best Joystick for Flight Simulators 2026

Racing Cockpits Buyer’s Guide
Best VR Headsets for Flight Simulation
Fanatec ClubSport Steering Wheel GT3 for Xbox Review
Simagic Sim Racing: The Complete Buyer’s Guide (2026)