

I’m a sim racer and amateur racer with a passion for Motorsport, good racecraft and the technical and setup aspect of sim racing.
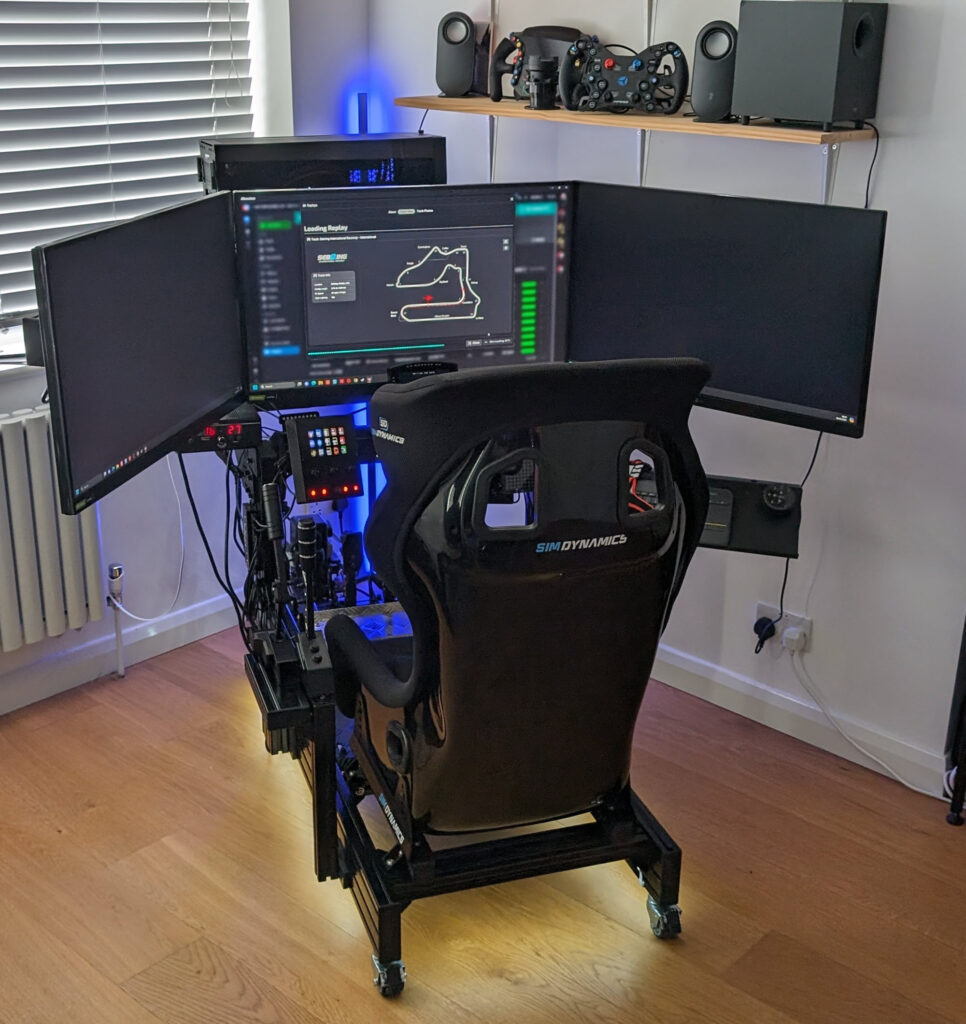
I use a Trak Racer triple monitor mount that’s bolted to the two wheelbase uprights on my cockpit – and it’s taken me years of messing about with different stands and brackets to get here. If you’re racing at a desk, monitor mounting isn’t something you’ll ever think about. But stick a standalone cockpit in your room and suddenly you need something to hold your screens – right height, right distance, right angle. Everything worth buying is in this guide – cheap Amazon stuff from about £80 up to the premium aluminium mounts that’ll probably outlast your actual cockpit.
What’s in here: freestanding vs cockpit-integrated (the big decision), VESA patterns explained without jargon, monitor positioning tips from my own rig, and picks at every budget. No filler, no sponsored opinions – just stuff I’ve learned from building rigs and bolting monitors to things for the past few years.
The monitor mount market has changed quite a bit since I first put this guide together. Fanatec now sell two freestanding stands – the CSL Cockpit Monitor Stand and the newer GT Cockpit Monitor Stand with its built-in overhead screen mount. Advanced SimRacing covers everything from singles right through to massive 65-inch triple stands, Playseat have jumped in with a four-product TV Stand range, and Amazon’s been flooded with budget options from brands like SimFab and Marada that simply didn’t exist two years ago. The old reliables – Trak Racer, Sim-Lab, GT Omega – are all still here too, with updated products and sharper pricing.
Single ultrawide or full triples – doesn’t matter which you’ve got. I spent £600 on a monitor once and bolted it to a cheap bracket from Amazon. The thing wobbled every time I clipped a kerb at Monza. I learned the hard way that a rubbish mount makes even the best screen look worse – wobble on every kerb hit, slight droop after a few weeks, the lot.
Skip ahead
Know what you’re after? Jump straight to it:
How to Choose |
Freestanding vs Integrated |
VESA Standards |
Monitor Position |
Freestanding Stands |
Cockpit-Integrated Mounts |
Accessories |
Monitor Mounts Compared
What’s new in monitor mounts for 2026
Since I last updated this article, Asetek added a monitor mount to their Initium line – the Initium Monitor Mount, a cockpit-integrated single mount in powder-coated steel that bolts to the Initium 2-in-1 cockpit. It’s a single-screen mount rather than a triple stand, and at around £40 it’s priced to round out the Initium ecosystem rather than compete with the premium aluminium stands. Worth a look if you’re already running an Asetek Initium setup. Second, Sim-Lab’s GT1 Integrated Vario monitor mount has matured into the cockpit-integrated option I’d point most P1-X / GT1 Evo owners at over the older Trak Racer mount – it’s stiffer at the joint and the cable management routing is properly thought through. Detail on both below.
How Do I Choose a Monitor Mount for Sim Racing?
The first question is dead simple: freestanding or cockpit-integrated? Freestanding stands sit on the floor and straddle your rig from above – they’re independent of your cockpit, so vibrations from your wheelbase don’t transfer to your screens. Cockpit-integrated mounts bolt directly to your rig’s aluminium profile uprights, which means they’re more rigid and take up less space, but any vibration from the wheel deck can travel up to the monitors. I’ve always preferred mounting directly to the cockpit, but plenty of people swear by freestanding. (I’ll get into the details further down.)
After that, it’s about three things: your monitor size and count (single, triple, or ultrawide), your VESA pattern, and your budget. You can grab a basic single stand on Amazon for $100-130 from brands like Dardoo or SimFab. Freestanding triples from Trak Racer sit around $300-400. And if you want the premium aluminium stuff from Advanced SimRacing, you’re looking at $800+.
The jump from a cheap Amazon stand to a proper Trak Racer or Sim-Lab mount is one of those upgrades you feel immediately. But for people starting out, or anyone running a single monitor on a budget rig, some Amazon options do a perfectly adequate job. SimFab is the one I’d pick – they’re a proper sim racing brand (not a generic Amazon seller) and they back everything with a lifetime warranty, which I’ve never seen at this price from anyone else.
All Monitor Mounts Sorted by Price
Freestanding vs Cockpit-Integrated Mounts – The Big Decision
Every sim racer hits this fork in the road sooner or later. When I was building my Trak Racer rig in 2023, I spent weeks going back and forth before committing to cockpit-integrated. Freestanding gives you flexibility, integrated gives you rigidity – and which one matters more depends entirely on your space and your rig. Neither is objectively better; they each solve different problems.
Freestanding floor stands work independently of your cockpit, so vibration from the wheelbase doesn’t transfer to the screens. They’ll bolt onto any rig – profile or not – and you can reposition them without dismantling anything. If you swap or upgrade your cockpit down the line, the stand just stays put. The downsides: they eat more floor space because the legs splay outward, they can feel less rigid than something bolted directly to profile, and once assembled they’re heavy enough that you won’t be casually shoving them aside.
Cockpit-integrated mounts bolt to your aluminium profile uprights and give you rock-solid rigidity with a smaller footprint – everything’s part of the rig itself. They’re generally cheaper than freestanding equivalents and you can slide the mount up or down the uprights for height adjustment. The trade-offs are real though: wheelbase vibration can travel up to the monitors, your height adjustment gets limited if you’ve crammed accessories (PC tray, button boxes) onto the same uprights, and the mount’s tied to your specific cockpit – doesn’t transfer easily if you change rigs.
Here’s what I’ve noticed over the years. Vibration transfer sounds terrible on paper, but my Trak Racer cockpit-integrated mount barely moves with a belt-driven base running 5-6Nm of torque – I really can’t see the monitors budge during a race. Crank a Simucube or VRS up past 15Nm and yeah, you’ll catch some wobble when you properly clip a kerb – but even then, a decent cockpit-integrated mount copes better than most freestanding stands at that force level.
Profile-mounted stands are somewhat height adjustable too, provided you haven’t crammed too many other accessories on the same uprights. My PC tray on the rear uprights, for instance, limits how far down the monitor crossbar can go – I had to shuffle things around when I first set up my G9. Five minutes with a tape measure before you order anything will save you an afternoon of swearing.
Years of messing about with monitor positions taught me one thing: the screen doesn’t make or break it. What counts is whether your mount lets you nudge the angle and distance by 5mm at a time – the Vario does, most budget brackets don’t.
My honest take: if you’ve got a profile cockpit (Trak Racer, Sim-Lab, GT Omega, or similar 8020 aluminium), go cockpit-integrated and don’t look back. I did, and the rigidity alone justified it. The footprint is smaller too, and you get infinite height adjustment along those uprights. If you’ve got a non-profile rig like a Playseat or Next Level Racing GT Lite, or you share the space and need to move things around regularly, freestanding is your only realistic option.
What VESA Standards Mean (and Why You Should Care)
Turn your monitor around and you’ll see four holes drilled into the back in a square pattern – that’s your VESA mount. The numbers just tell you how far apart those holes are, measured in millimetres. So VESA 100×100 means the holes form a 100mm square. VESA 200×200 means a 200mm square – about the width of a paperback book. I had to Google this myself when I bought my first mount, so don’t feel bad if it’s new to you.
The common patterns you’ll encounter in sim racing:
VESA 75×75 and 100×100 – Found on most monitors up to about 32 inches. My old BenQ 27-inch was 100×100, and the Asus VG27AQ I had before that was 100×100 too. Pretty much every 27-inch gaming monitor uses one of these two patterns, and every sim racing mount I’ve come across handles both without needing adapters.
VESA 200×200 – Common on larger monitors and smaller TVs (40-49 inches). My Samsung G9 uses 200×200, and most ultrawides in that size range do too.
VESA 200×100 – An oddball pattern that crops up on some ultrawides. Worth checking if you’ve got a 34-inch curved monitor – some of them use this instead of 200×200.
VESA 400×400 and above – TV territory. If you’re wall-mounting a 55-inch LG C4 or Samsung QN90C for sim racing? You’ll need 400×400 support, and some of the cheaper stands from Amazon max out at 200×200 – they physically won’t fit a big telly. I’ve seen people order a mount, get excited, unbox it, and then realise the holes don’t line up. Measure first.
Two gotchas I see constantly on Reddit: first, not every monitor has VESA holes. Some of the cheaper Acer and AOC gaming monitors skip them entirely, which is infuriating when you’ve already bought a mount. Second, weight matters as much as the bolt pattern. I’ve seen mounts rated for VESA 400×400 that are only good for 15kg – fine on paper until you bolt a Samsung 55-inch at 20kg to it and wonder why the screen slowly droops overnight like a wilting flower.
Universal VESA brackets (like the Trak Racer Universal VESA Bracket at around $30) can bridge the gap between non-standard patterns and standard mounts. They’re cheap insurance if you’re not completely sure about your monitor’s mounting pattern.
Getting Your Monitor Position Right
This is the section I care about most, because getting monitor position right transformed my own sim experience more than any hardware upgrade I’ve ever made. Distance, height, and angle all feed into your field of view (FOV) – and once I dialled my FOV in properly using a calculator, I couldn’t believe I’d been driving with the wrong settings for two years.

I have my G9 85cms away from my eyes, which gives enormous scope for a good FOV despite it “only” being a 49-inch monitor rather than a triple configuration. That distance is closer than most people think is comfortable – but once you’ve tried it, going back to having the screen further away feels like racing through a letterbox.
For triples, the centre monitor wants to be roughly the same distance – 70-90cm from your eyes works for most people I’ve spoken to. Angle the side panels inward somewhere between 45 and 60 degrees. The exact angle depends on your screen size and how wide your rig is, but start at 50 degrees and adjust from there – that’s what most of the triple setups on r/simracing seem to land on.
Height: Centre of the screen should sit at roughly eye level, or a touch below. I had mine too high for the first few months and my neck was killing me after 90-minute stints on iRacing. Too low and iRacing’s virtual dashboard looks daft – the in-game steering wheel floats above your actual wheel, which is properly distracting on long stints. Most adjustable mounts give you 200-400mm of vertical travel, which is more than enough to get it right.
Angle: Tilt the screen down very slightly – I’ve got mine at about 7 degrees, and most people on the sim racing forums seem to land somewhere between 5 and 10. This is where mount adjustability really earns its keep. Nudging the tilt by just a couple of degrees makes a surprisingly big difference to how natural the cockpit view looks. Cheap mounts with fixed angles force you to bodge it with in-game camera settings instead, which never quite looks right.
My G9 is absurdly close to my face – I grabbed a tape measure one evening out of curiosity and it read 85cm on the nose from my eyeballs to the panel. That closeness is why I get a proper FOV from just a single ultrawide. Shove the screen back to 120cm and you’re wasting half the panel.
Grab a free FOV calculator – I use the one on Monitor Distance Calculator but there are loads of them. Chuck in your screen size and distance, and it’ll tell you exactly what FOV number to type into iRacing, ACC, or whatever you’re driving. I tried eyeballing it for about six months before I finally bothered with a calculator, and the difference was embarrassing. Once you’ve driven with a mathematically correct FOV, everything else looks wrong – and you can’t un-notice it.
Best Freestanding Monitor Stands for Sim Racing
Freestanding stands sit on the floor and straddle your rig from above – completely independent of the cockpit itself. They’ll work with anything from a Playseat Challenge to a full 8020 aluminium rig. The trade-off is they eat more floor space (the legs splay outward) and they’re sometimes less rigid than something bolted directly to profile. Playseat have also jumped in recently – they’ve got four TV Stands now, from $299 to $599, built to sit alongside their Trophy and Evolution cockpits. I haven’t tested any of them yet, but 4.9 stars across the board is hard to wave away. I’ve split the picks below by price, cheapest first.
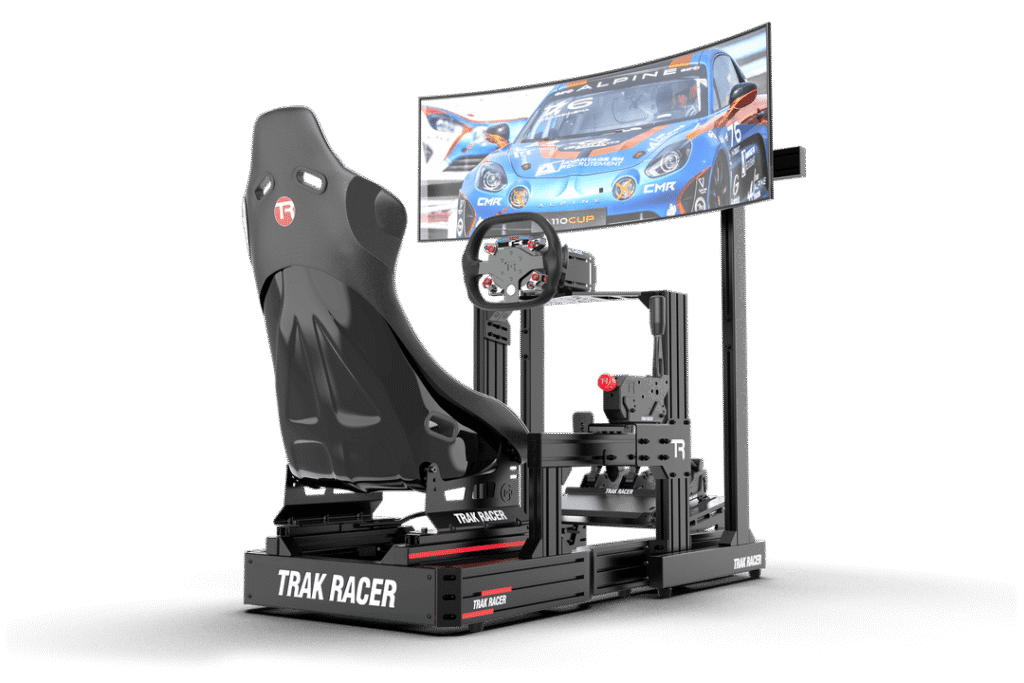
Trak Racer Large Freestanding Triple Monitor Stand
The Trak Racer freestanding triple is probably the most popular freestanding triple mount in the sim racing community right now, and 89 reviews averaging 4.7 stars at $359 backs that up. The 2-inch steel tube frame handles monitors from 30 to 45 inches with an 80kg total weight capacity. I measured the 1200mm crossbar against three 32-inch Asus panels and had about 40mm to spare on each side – tight, but workable.
I’ve tested both the standard version and the one with the additional leg supports ($159 extra), and whilst the standard version is solid, those extra leg supports on the premium model completely eliminate any hint of sag on the side monitors. Running 32-inch or bigger panels? Get the leg supports – I wish someone had told me that before my first build. Without them, the crossbar flexes slightly at the edges when you’re hammering the FFB – not enough to ruin anything, but once you notice it you can’t un-notice it.
Fair warning though: this thing weighs a ton. My wife ended up holding the crossbar while I threaded the bolts because the thing’s just too awkward to manage solo. Once it’s assembled and in position, it’s basically furniture – you’re not casually sliding it out of the way for a hoover. That weight is partly what makes it so stable, mind you.
Fanatec CSL Cockpit Monitor Stand
Nobody expected Fanatec to start making monitor stands, but here we are. The CSL Cockpit Monitor Stand at $299.99 handles monitors up to 60 inches (or 57-inch ultrawides like the G9), covers VESA 100×100, 200×100, and 200×200 patterns, and comes with proper cable management built into the uprights – something most competitors just ignore. Assembled weight is 16.9kg – hefty for a single stand – and Fanatec backs it with their 3-year warranty, which beats the 1-year you get from most competitors.
I keep banging on about the cable management whenever someone asks me about this stand, because it’s the first freestanding mount I’ve used where my HDMI and power cables don’t look like spaghetti. I’ve zip-tied cables to every other freestanding stand I’ve owned, and it always looks naff. Fanatec’s built routing channels directly into the uprights so your HDMI and power cables tuck away cleanly. If you’re already running Fanatec gear – CSL DD, CSL pedals, that sort of thing – the stand pairs naturally with the CSL cockpit. But it works perfectly well as a standalone stand with any rig, Fanatec setup or not.
The obvious limitation is that it’s singles only – no triple support, no add-on arms, no upgrade path. Planning triples eventually? Don’t buy this – you’ll end up replacing the whole thing and wishing you’d just gone straight to a Trak Racer freestanding triple.
Fanatec GT Cockpit Monitor Stand
Fanatec’s other monitor stand – the GT – is built for their ClubSport GT Cockpit, and it’s a completely different animal to the CSL. At $349.99, the GT Cockpit Monitor Stand uses 50mm steel tubing rather than aluminium, handles single screens from 32 to 65 inches, and – here’s the interesting bit – has a built-in overhead mounting point for a second screen up to 34 inches (it becomes a fourth if you add Fanatec’s separate triple expansion kit). I haven’t seen another freestanding stand with an integrated overhead mount at this price. Streamers and telemetry obsessives will be all over that.
There’s T-channel rails running up both uprights – dead handy for clipping on cameras, lights, and streaming gear – and Fanatec have even tucked in holders for power bricks. Little things, but they tell me someone who races on one of these had a say in the design. You can get it in matte black or white, too. The 50mm steel tubing makes it heavier than the CSL stand but noticeably more rigid – I’d expect zero flex even with a heavy 55-inch TV bolted to it.
Same limitation as the CSL though: singles only, no triple expansion. If triples are on your radar, skip both Fanatec stands and look at Trak Racer or Advanced SimRacing instead.
Advanced SimRacing Freestanding Range
Advanced SimRacing is the premium option in the freestanding world, and the prices reflect it. Three products cover the range: the Freestanding Single HD ($309.99), the Freestanding Triple for 45-inch panels ($839.99), and the big boy – a Freestanding Triple for 65-inch TVs at $989.99. All three are aluminium rather than the steel tube you get from Trak Racer, with VESA support from 75mm all the way up to 600mm. That 600mm figure is wider than pretty much anything else I’ve found.
The single stand handles TVs up to 65 inches or 57-inch ultrawides, and those 3×1.5-inch aluminium beams are properly chunky – the kind of thing you’d expect on industrial equipment rather than a monitor stand. The triple stands use four vertical supports instead of the usual two, which spreads the weight across more points and virtually eliminates the crossbar sag that I’ve seen on cheaper two-post designs from Trak Racer and others.
I’d only really consider Advanced SimRacing if you’re running three 45-inch or larger displays, or heavy TVs where you need that VESA 600mm support. Three 27-inch panels? Just grab the Trak Racer triple at $359 – less than half the money, and I’ve had one holding my screens perfectly for years. Where Advanced SimRacing earns its price is on the big, heavy stuff – bolt three 50-inch Samsung TVs to one of these and it won’t even flex. That’s really the only reason to go Advanced SimRacing over Trak Racer, if I’m being blunt.
Best Cockpit-Integrated Monitor Mounts for Sim Racing
If you’ve got an aluminium profile cockpit – Trak Racer, Sim-Lab, GT Omega, or any 8020 extrusion rig – a cockpit-integrated mount is what I’d go with every time. They bolt directly to your uprights using T-slot hardware, they’re more rigid than freestanding stands because there’s no flex in the connection, and they don’t eat any extra floor space. The downside is they’re married to your specific rig, and you need to make sure the profile dimensions are compatible – most 40x40mm and 40x80mm rigs use the same slot size, but check.
Trak Racer Entry-Level Cockpit-Mounted Single Monitor Stand
$129 and 222 reviews averaging 4.7 stars – this is comfortably the best-selling cockpit-integrated monitor mount in sim racing, and having used one myself I can see why it’s popular. VESA from 75mm up to 400mm, monitors up to 60 inches, 40x40mm aluminium profile crossbar at 580mm wide. That crossbar width is enough for any single screen or ultrawide – my Samsung G9 at 49 inches sits on it with room to spare on either side.
Because the mount uses aluminium profile for the crossbar, it’s compatible with any cockpit that has two vertical profile sections for the wheel deck – so Trak Racer, Sim-Lab, GT Omega, and basically every other 8020 rig out there. You bolt it to the uprights, slide it to your preferred height, and tighten everything down. I had mine fitted in about 20 minutes, and that included faffing about trying to find an Allen key.
At $129, I really can’t think of a reason to spend more on a single cockpit-integrated mount unless you specifically want the CNC-machined precision of the Racingcockpits range. The aluminium is rigid, the VESA compatibility covers everything from a 27-inch monitor to a 55-inch TV, and 222 reviews at 4.7 stars from other sim racers isn’t something you can fake.
Racingcockpits PRO Series Triple Monitor Mount
At $385 with a 4.8-star rating, the Racingcockpits PRO Series Triple is the most precisely engineered cockpit-integrated mount I’ve come across. Everything is CNC-machined aluminium – not stamped sheet metal, not laser-cut flat stock. Five axes of adjustment per monitor is a lot of fiddling, but it means each panel can be positioned independently – height, tilt, angle, distance, rotation. The smart pivot plates on the side arms are the best bit – they let you tweak how far inward the side monitors angle without throwing out the tilt or height you’ve already spent ages setting up. Anyone who’s ever loosened one bolt and had everything else shift will appreciate that.
It handles monitors up to 36 inches flat or 34 inches curved in a triple configuration, and the 4.8-star average from buyers on the Racingcockpits site tells you people are properly happy with them – not just “fine”, properly impressed.
My one gripe with Racingcockpits is that they can never seem to keep anything in stock. They’ve been patchy on stock for as long as I’ve been following them – I once waited six weeks for a SPORT Series mount that never came back into stock, and ended up going with Trak Racer instead. I looked in February 2026 and the PRO Triple was literally the only Racingcockpits mount I could add to a basket. Their SPORT Series ($149-$295) is cheaper but good luck buying one. Have a look at what’s available on racingcockpits.com before you get your heart set on anything.
Sim-Lab Monitor Mounts
Sim-Lab is the gold standard for 8020 profile cockpits, and their monitor mounts are built to the same standard. The two main options are the Sim-Lab Integrated Monitor Mount and the Vario Vesa Monitor Mount. The Vario is the one that gets talked about most on forums and Reddit – Jeffrey Decker’s setup video shows exactly why. Watching him spend ten minutes micro-adjusting the angle on his Vario makes it obvious how much more precision the Sim-Lab design gives you compared to a budget bracket where your only real options are “sort of straight” and “slightly wonky”.
The flip side: Sim-Lab ships from Eindhoven in the Netherlands, and mates in Australia have told me they waited three weeks for delivery. The Vario mount is also fiddly to set up the first time – lots of loosening, nudging 2mm, re-tightening, checking, loosening again. Once it’s dialled in it stays put beautifully, but that first session took a mate of mine over an hour. Budget accordingly.
Good news since I first wrote this: Sim-Lab’s Vario and Integrated monitor mounts are in our live product database now, so here’s the current range and pricing:
GT Omega Monitor Mounts
GT Omega’s mounts are the budget-friendly counterpart to Sim-Lab in the 8020 cockpit world. Karl Gosling did a detailed teardown on YouTube and the numbers are reassuring: 10mm thick arms, 3mm steel brackets, and 5mm steel on the triple brackets. Gosling reckons the 50kg limit is conservative, and he’s probably right – three 32-inch monitors like the LG 32GR93U weigh roughly 15-18kg total, so you’d need to hang something properly ridiculous off the thing before it became a concern.
GT Omega uses steel where Sim-Lab uses aluminium, and you feel the extra weight during assembly – wrestling a steel crossbar overhead while trying to thread a bolt one-handed is not my idea of fun. Once bolted on, the weight’s irrelevant. The 50kg weight ceiling is the real thing to keep in mind – three 32-inch monitors weigh maybe 15-18kg total, so you’re miles under, but three Samsung 43-inch TVs (about 9kg each before you add VESA plates and bolts) gets you uncomfortably close.
Like Sim-Lab, GT Omega monitor mounts aren’t in our affiliate product database, so check the GT Omega website for current options and pricing.
Sabelt Sim Racing Monitor Mounts
At $479 for the Galaxy Grey model (or $379 for the newer Black Moon colour), Sabelt is properly expensive – but it looks and feels the part. The anodised finish is gorgeous on both colours, the nicest-looking mount I’ve handled by some margin. And the laser-aligned pre-drilled holes make installation a doddle – no guesswork, no measuring, no discovering that your bolt holes are 2mm off after you’ve tightened everything else. Just bolt it together and it’s square first time.
Sabelt’s been making seats and harnesses for actual racing cars since the 1970s – they supply F1 teams. This isn’t a gaming brand slapping a racing badge on Chinese hardware. Functionally, a Trak Racer at a third of the price does the same job of holding your monitors still. But the Sabelt feels noticeably nicer to assemble and live with – the tolerances are tighter, the bolts thread in smoother, and the whole thing just looks more expensive. The Sabelt tax is pure fit-and-finish – if you care about that (and I do, a bit), it’s lovely. If that sort of thing leaves you cold, save your money and grab the Trak Racer – you won’t notice any difference in how it holds your screens.
Only two units were showing as available when I last looked, and Sabelt stuff doesn’t tend to get restocked quickly. If you fancy one, move quickly – Sabelt’s sim racing gear sells out fast and restocks are unpredictable.
Essential Mounting Accessories
Three accessories keep popping up in every Reddit thread and forum post I read about monitor mounts, and I’ve used two of the three myself.
Trak Racer 980mm Triple Monitor Add-on Arms ($179) – If you already own a Trak Racer single mount, these arms bolt onto the existing crossbar and convert it to a triple setup – so you keep your original stand and just add the side arms. They use 80x40mm aluminium profile, support VESA 75-400mm, and the 170kg combined weight capacity is frankly absurd – you’d need to bolt three 55-inch TVs on there to even approach it.
Trak Racer Additional Leg Supports ($159) – These bolt to the freestanding triple stand and prop up the outer edges of the crossbar. With 27-inch panels you can skip these – the crossbar holds fine on its own. Go 32-inch or bigger and you’ll notice the crossbar edges droop about 5mm without the supports – subtle, but it bugged me. I noticed it with my own setup – a subtle droop on the side monitors that bugged me until I added the supports.
Universal VESA Brackets (~$30) – A cheap adapter plate that bridges between non-standard and standard VESA patterns. The Trak Racer one handles most of the common conversions. I keep one in my spares box because I’ve been caught out twice now – bought a new monitor, discovered it had a weird VESA pattern, and this little plate sorted it in ten minutes.
Monitor Mounts Compared – What Should You Buy?
Right, enough specs and waffle. I asked myself what I’d rebuy if someone nicked all my gear tomorrow, and the answers came surprisingly quickly.
Best budget single (cockpit-integrated): Trak Racer Entry-Level Cockpit Single at $129. It’s what I used before upgrading to their triple mount, and 222 reviews at 4.7 stars tells you I’m not the only one who rates it. I’ve compared it against everything in that £100-ish bracket and nothing else has 222 reviews averaging 4.7 stars – the numbers speak for themselves.
Best budget single (freestanding): SimFab Floor Stand LD from Amazon at roughly $150-200. SimFab’s lifetime warranty is the clincher – the Dardoo (~$100-150) is cheaper, sure, but SimFab stands behind their product if something snaps or bends. If you’ve got a bit more to spend and want the cable management sorted from day one, the Fanatec CSL at $299.99 or the newer GT stand at $349.99 are both cracking options – the GT especially if you want that built-in overhead screen mount for telemetry.
Best freestanding triple: Trak Racer Large Freestanding Triple at $359. Spend the extra $159 on the leg supports if you’re running 32-inch panels or bigger – trust me on that one. The Marada Triple on Amazon (~$200-300) is tempting on price but doesn’t have the review history yet.
Best cockpit-integrated triple: Racingcockpits PRO Series Triple at $385, assuming they’ve got it in stock when you’re reading this. The 5-axis adjustability and CNC machining put it a clear tier above everything else at this price. Sim-Lab’s Vario mount is the other top-tier option, though mates in the US have told me the shipping from the Netherlands can stretch to three weeks.
If money’s not the issue: Advanced SimRacing’s freestanding range runs from $310 to $990. Full aluminium construction, VESA up to 600mm, and the sort of build quality where you bolt your monitors on and properly forget the stand exists – which is really the whole point.
The jump from a cheap Amazon stand to a proper Trak Racer or Sim-Lab mount is one of those upgrades you feel immediately – not because the cheap one was terrible, but because the good one simply disappears. You stop thinking about it entirely.
My own setup hasn’t changed in three years: Trak Racer triple monitor mount bolted to the wheelbase uprights on my cockpit, holding a single Samsung G9 ultrawide 85cm from my face. The mount is rigid, adjustable enough that I got the G9 into the exact position I wanted on my first proper attempt, and after three years of daily use nothing has loosened or sagged. I haven’t thought about replacing it once, which is the best endorsement I can give any piece of sim racing gear.
Whatever you end up choosing – get your VESA pattern right, weigh your actual monitors (not the ones you’re fantasising about buying next year), and pay attention to how much adjustment the mount gives you. Being able to nudge the screen 10mm forward and tilt it 2 degrees down – that’s what separates a setup you tolerate from one you actually love. At 85cm from my face, I can feel the difference when I shift the G9 forward even 10mm – everything in the peripheral vision tightens up.
Related Articles
Still building your rig? These might help:
- Best Monitors for Sim Racing – What to actually mount on these stands
- Best Sim Racing Cockpits – The rig your mount attaches to
- Trak Racer Brand Guide – Everything from the brand behind several top picks here
Topic: Sim Racing Monitors