
I’m a sim racer and amateur racer with a passion for Motorsport, good racecraft and the technical and setup aspect of sim racing.
If you’re going to spend money on adding physical feedback to your sim racing rig, the cheapest thing you can do is also the highest-impact thing you can do. A £200 ButtKicker Gamer 2 strapped to the underside of your seat will give you more useful feedback – ABS pulsing, kerb strikes, engine RPM, wheel-lock under braking, gear shifts – than a £2,000 budget motion platform that’s been badly mounted to a flexy rig. Almost every reviewer who’s tested both at length agrees on this point, and almost every veteran motion-rig owner will tell you the same thing in less polite language: get tactile first. Then think about motion.
This is the beginner’s guide to the tactile-feedback category: bass shakers, transducers, ButtKickers, and the active belt tensioners that sit between tactile and full motion. I have a ButtKicker on my own rig, and I’ve sat in friends’ four-corner builds enough to know the perceptual jump that happens between mono and stereo tactile.
Quick Navigation
Jump directly to what you’re looking for:
Why tactile is the highest-ROI upgrade |
How bass shakers work |
ButtKicker vs Dayton vs the alternatives |
The ButtKicker lineup explained |
Where to mount them on your rig |
The SimHub setup, in plain English |
The four-corner upgrade |
Active belt tensioners – the next tier |
The budget ladder, £150 to £1,500 |
Where to buy
Why tactile is the highest-ROI upgrade
The argument for tactile feedback starts with what your wheel and seat are already doing. A direct drive wheelbase gives you force at the steering rack – load up, slip, the unloading you feel when the front tyres start to wash out. A good seat braces you in place. What neither of them give you is information about what’s happening at the four contact patches with the road. ABS modulation, wheel lock under heavy braking, the tyre breakaway frequency as the rear steps out, the slap of a kerb under the front wheels, the bass note of an engine at peak torque – all of that is happening in the car you’re driving virtually, and none of it is reaching your body through the wheel or the seat alone.
That’s the gap tactile feedback fills. A transducer is a magnetic vibration unit – essentially a speaker driver designed to push physical movement instead of air – bolted to your seat, your pedal tray, or the aluminium profile of your rig. A piece of telemetry software (SimHub is the universal answer) reads the data the sim is exporting and turns each useful signal into a specific frequency. ABS activation becomes a 30-50Hz buzz at the brake. Tyre slip becomes a different frequency at the rear. The engine sits as a low-Hz rumble whose pitch tracks RPM. Hit a kerb and you feel it as a sharp percussive thud, not as a notification on screen.

The reason this matters more than motion for actual driving is that the information is actionable. Knowing the rear is starting to break loose – because you can feel the tyre frequency change behind you – lets you catch the slide a tenth of a second earlier than the visual cue would. Knowing your ABS is cycling under braking lets you ease pressure slightly without staring at a brake-pressure trace. These are the small instinctive adjustments that consistency lives in. Motion gives you the body-language of weight transfer; tactile gives you the diagnostic of what the contact patches are doing. For lap times specifically, the diagnostic is more useful than the body-language.
How bass shakers work, briefly
A tactile transducer is mechanically simple. It’s a magnet and a coil, the same architecture as a loudspeaker, but where a speaker uses that arrangement to push a paper cone (and therefore air), a transducer is built to push a mounting plate (and therefore whatever it’s bolted to). When SimHub sends a signal through an amplifier and into the transducer, the unit vibrates the surface it’s attached to at the frequency of the signal. Mount it to a seat and the seat vibrates. Mount it to a rig and the rig vibrates. The bass-shaker name is literal: these are subwoofers for your body, tuned for tactile transmission rather than audio.
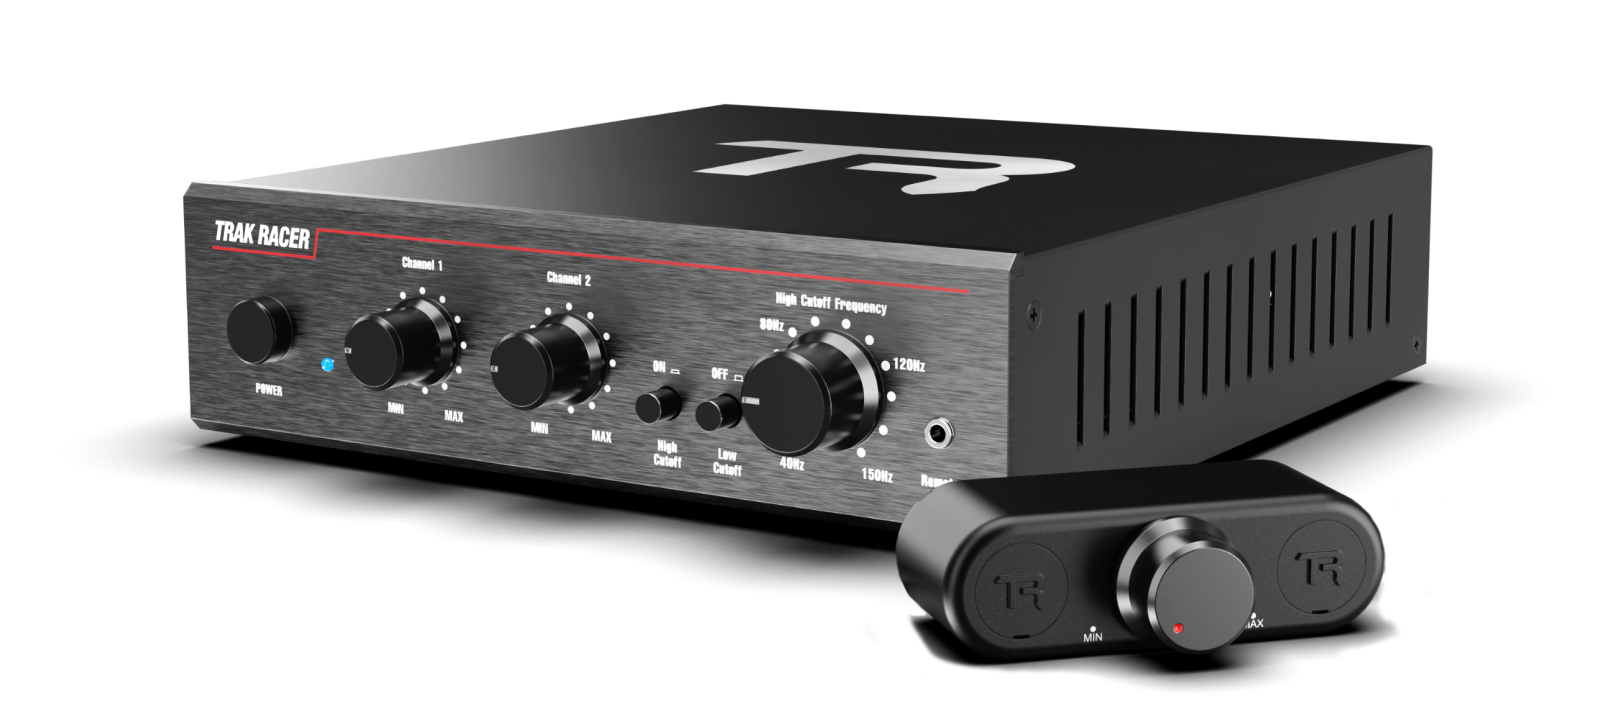
You need three things to make tactile work properly: the transducer itself (the vibrating unit), an amplifier that’s rated to drive it (a regular hi-fi amp will not last – tactile transducers draw constant low-frequency power that burns out consumer audio amps fast), and a software bridge that maps sim telemetry to specific tactile effects (SimHub is the answer for almost everybody). Some products bundle all three. ButtKicker’s Gamer 2 ships with both the transducer and the dedicated BKA-130-C amplifier, which is part of why it’s the most-recommended entry point.
ButtKicker vs Dayton vs the alternatives
Three brands dominate the conversation. ButtKicker is the most recognisable name in the sim racing space – they make the Gamer 2, Gamer Plus, Gamer Pro, the LFE for heavy-rig deep-bass installations, and the Advance for high-end builds. Their products ship as kits with the right amplifier paired to the transducer, which removes one of the bigger entry-point headaches. Pricing in the UK runs roughly £170 for an entry Gamer 2 kit through to about £350 for the Gamer Pro.
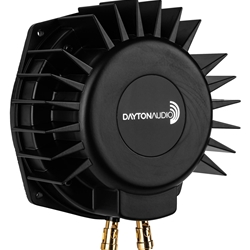
Dayton Audio’s BST-300EX is the DIY-route alternative most experienced builders run when they’re going past one shaker. It’s a larger, heavier transducer designed for low-Hz extension – the deep rumble of an engine at full chat, or the percussive bottom-end of a kerb strike – and is typically paired with a Nobsound or similar two-channel amplifier sourced separately. The DIY route is more work to set up but lands you with more capability per pound once you’ve passed the entry tier. Four Dayton BST-300EX units with a 400W stereo amp will outperform four ButtKicker Gamer 2 units at a similar total cost, with the trade being two hours of mounting and wiring work.
Trak Racer’s house-brand 100W TR-BSA100 bass shaker and the matching V2 Pro 200W Class-D amplifier + shaker bundle sit between those two routes. It’s a complete kit at lower entry than ButtKicker’s Gamer Pro tier, with a 2-channel low-pass-filtered amp engineered specifically for sim-rig tactile rather than repurposed home audio. The kit ships with the universal mounting plate, which is the bit DIY builders usually have to fabricate themselves on the Dayton route. For Trak Racer rig owners specifically this is the easiest path – the mounting brackets are dimensioned for 8020 profile and the shaker plays nicely with the rig’s existing structural geometry.
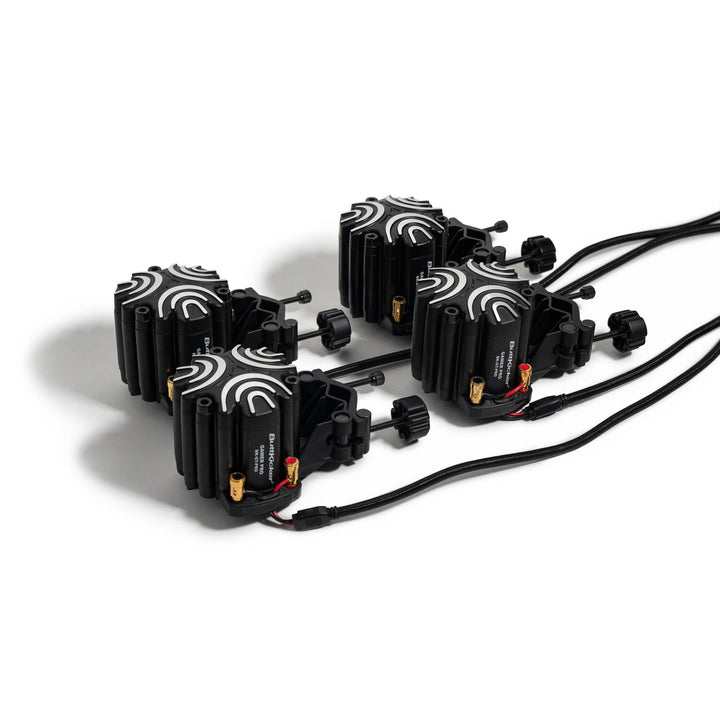
The fourth route is the smaller Aura, Pearl and Earthquake bass shakers – lighter units typically used in pairs or quads under specific surfaces (the underside of the seat shell, the pedal tray, the wheel deck) to add localised feedback to a setup that already has a primary ButtKicker or Dayton handling the main signal. These are less essential as a first purchase and more of a tuning addition once you understand what frequencies you want where. Skip them until you’ve lived with a primary transducer for a few months and can name what’s missing.
The ButtKicker lineup explained
The ButtKicker family is wider than most newcomers realise, and the marketing names don’t make the hierarchy obvious. Here’s the practical map.
| Model | Tier | What it does best | Who it’s for |
|---|---|---|---|
| Gamer 2 | Entry kit | Single-transducer-plus-amp kit. Mounts under the seat. Delivers engine, ABS, kerbs, gear shifts in mono. | First-time tactile buyers. The “should I bother” answer. The kit-with-everything-in-the-box buy. |
| Gamer Plus | Step-up single + 4-corner kit option | Slightly more powerful transducer than Gamer 2. The 4-Corners variant gives you stereo tactile at every wheel position. | Buyers who’ve decided tactile matters and want to skip the upgrade-from-2 step. |
| Gamer Pro | Top of the Gamer line | Higher-output transducer with better low-frequency extension. Available as single or 4-corner kit. Most felt-detail per unit at the consumer tier. | Serious sim racers who want the best ButtKicker experience without going to the LFE. |
| Advance | Premium standalone transducer | Larger unit with more authority through the low-mid range. Often used in pairs at the seat-back and pedal-tray positions in high-end multi-transducer builds. | Multi-transducer builds where felt resolution matters more than budget. |
| LFE (Low Frequency Effects) | Large-scale deep bass | Big, heavy transducer designed to shake the entire aluminium-profile rig at low frequencies. Engine V8 rumble, deep kerb thuds, suspension-bottom impacts. | Full-size aluminium-profile rigs where the rig itself is the speaker. Overkill for a steel-tube rig or a folding cockpit. |
The honest version: most sim racers should buy a Gamer 2 or Gamer Plus first, live with it for two or three months, and then decide whether they want to expand to a 4-corner Plus or Pro kit. The LFE and Advance are for people who already know they want them – they’re not the right first purchase for almost anybody. The 4-corner kits are where the experience starts to feel like a sim and not a vibrating seat – the difference between mono and four-channel tactile is roughly the same as the difference between a TV speaker and a 5.1 surround setup. Once you’ve heard the rear tyres breaking loose specifically at the rear of your seat, you don’t want to go back to mono.

Where to mount them on your rig
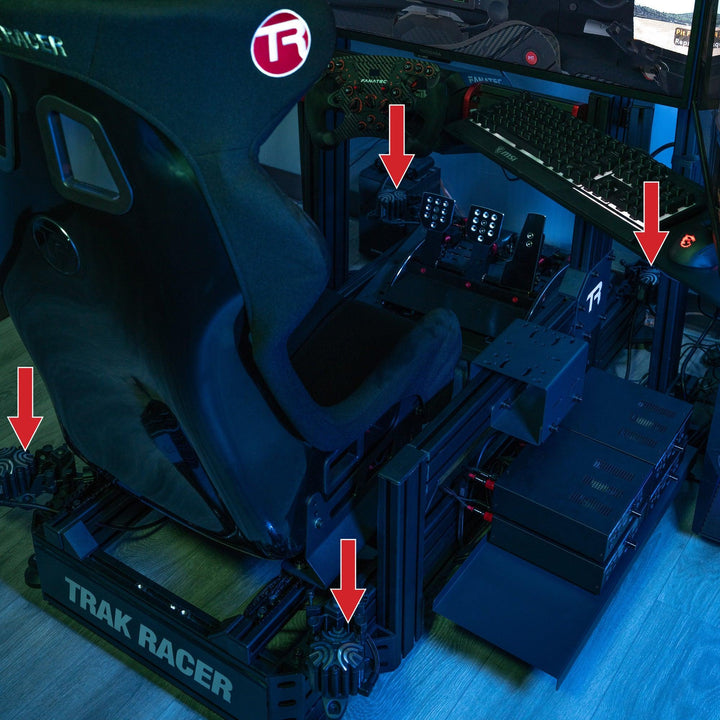
Mounting position matters more than most newcomers think. The default ButtKicker Gamer 2 install is a single transducer bolted to the underside of the seat shell, somewhere between the seat pan and the back rest. This is the right answer for the first install because it transmits the felt feedback through the largest contact area (your back and bum) and isolates it from the rest of the rig (which means you can feel the signal without the whole cockpit becoming a resonance chamber). If you have a fibreglass or carbon shell seat, mount through a thick washer to spread the load; if you have a vinyl-over-foam seat, you may need a small mounting plate to give the bolt something rigid to pull against.
For a 4-corner build, the standard layout is one transducer under the seat at the rear (this gives you the tyre-breakaway feedback specifically from the rear axle), one under the seat at the front or at the wheel deck (front-axle and steering feedback), and the remaining pair attached to the pedal tray or to the rig’s aluminium profile at the foot end (so you feel ABS and pedal-related effects through the foot, which is where they would happen in a real car). Some builders run all four under the seat in a stereo configuration; others go for the geographical mapping. The geographical mapping wins for diagnostic precision. The under-seat-only mapping wins for raw thump.
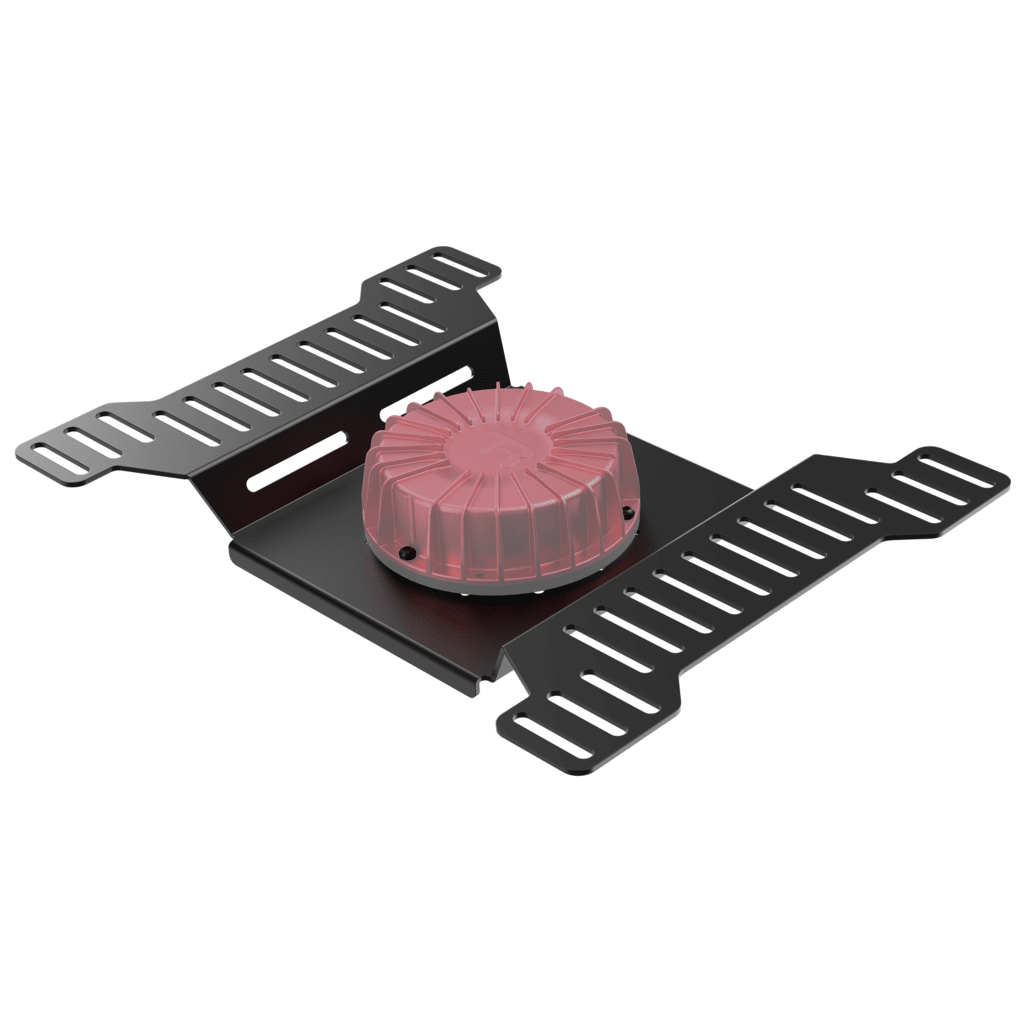
One mistake almost everyone makes the first time: do not bolt a transducer directly to the seat-rail frame. The metal-on-metal contact transmits a high-frequency rattle that masks the actual tactile signal and that the whole rig amplifies into noise. Always mount through a layer of dense rubber, a Sorbothane pad, or the thick washer technique. The same applies if you’re mounting to the aluminium profile of the rig itself – rubber-isolate the bolt or you’ll hear it as much as feel it. Tactile is supposed to be felt through the body, not heard through the room.
The SimHub setup, in plain English
SimHub is the universal bridge between your sim and your tactile hardware, and the universal answer to the “what software do I run” question. It’s a single Windows application that reads telemetry from every major sim (iRacing, AC, ACC, Le Mans Ultimate, F1 25, Automobilista 2, BeamNG and the rest), processes that data through configurable effects (ABS, slip, RPM, gear shifts, road texture, kerbs, suspension travel), and outputs a signal to your audio interface. You connect your transducer’s amplifier to whichever audio output channel SimHub is configured to send the tactile signal down, and the magic happens automatically once it’s tuned.
The setup process, roughly: install SimHub (it is free, donationware), set your audio interface output, and load one of the community profiles for your specific sim. The ShakeIt tactile-effects engine is built into the base install, so there is nothing extra to buy to get the vibration effects running. The default profiles are tuned for general-purpose use and feel “loud” out of the box – the most common new-owner mistake is leaving every effect maxed out, which produces an overwhelming wall of vibration rather than the diagnostic feedback you came in for. Tune down. Turn off the effects you don’t care about. Find the two or three that genuinely help (ABS, rear slip, kerbs are the canonical trio for sim racing) and leave the rest at low intensity.

The four-corner upgrade
The four-corner build is where tactile stops being a louder version of mono and starts being a different category of feedback. One transducer under the seat tells you something is happening. Four transducers, one at each corner, tell you what’s happening specifically where – and that “where” is the upgrade. The rear-right tyre breaking loose lands at the back-right of the seat. The rear-left lands at the back-left. ABS pulsing at the front pair of contact patches comes through the front-mounted transducers; engine and chassis bass comes through the rear. You stop interpreting a single buzz and start reading a spatial map of what the car is doing. That spatial map is the “diagnostic” quality reviewers use the word for – the difference between “the car is doing something” and “the rear-left tyre is letting go”.
The cheapest credible 4-corner build in the UK runs roughly £600-£800 if you buy ButtKicker’s Gamer Plus 4-Corners Kit or assemble four Dayton BST-300EX units with a dedicated amplifier. The mid-tier build using ButtKicker Gamer Pro 4-Corners is around £1,000-£1,200. Above that, you’re either adding an active belt tensioner (next section) or you’re starting to look at full motion. The 4-corner build is the natural stopping point for tactile-only – past this configuration, the diminishing returns get steep and the money is better spent on belt tensioners or motion.
Active belt tensioners – the next tier up
Sitting between full tactile and full motion is a small but growing category of products: active belt tensioners. These are motorised seat harnesses that tighten in proportion to the G-forces being generated in the simulation. Brake hard and the harness pulls firm against your chest; corner hard and the inside-shoulder belt loosens while the outside tightens. The reason this works perceptually is the bit that gets missed when people compare them against motion platforms: a motion platform can tilt you, but it cannot physically press you backwards into your seat the way real-world deceleration does. A belt tensioner does. The brain is significantly better at reading chest-pressure as braking-G than it is at reading seat-tilt-pitch as braking-G, which is why the felt sensation of a tensioner under heavy braking lands closer to the real thing than a tilting motion platform doing the same job.
The Qubic System QS-BT1 is the current standout. It’s the one reviewers keep flagging as the device that finally makes G-force feel like G-force in a home setup – a “game changer” framing that gets used more often than it should but in this case lands because it’s structurally true. The QS-BT1 sits around the £1,150-£1,400 mark in the UK (roughly $1,799 in the US) depending on configuration, which is not cheap, but the maths is worth running honestly: a £400 ButtKicker setup plus the belt tensioner gives you a more convincing physical experience than a £3,000 budget motion platform, at comparable or lower combined cost. The chest-pressure feedback is the missing piece that pure tactile and budget motion both leave on the table.

Vero Motion’s RIVAL GTR and a handful of other belt tensioners cover the same space. They all share the same core proposition: chest-pressure as a substitute for the G-force that chassis-movers cannot physically reproduce. If you’re tactile-deep and the next purchase question is “more tactile or step up to motion”, the right answer for most sim racers is neither – it’s a belt tensioner. It complements your tactile (handles a different frequency band entirely) rather than duplicating it, slots into the same SimHub or proprietary software pipeline, and costs less than half of what a credible motion platform does.
The budget ladder, £150 to £1,500
| Budget | What it gets you | The community read |
|---|---|---|
| £150-£200 | ButtKicker Gamer 2 single-transducer kit (transducer + BKA-130-C amp + cables). Plus a free SimHub install. | The cheapest credible tactile setup. Almost every reviewer says this is where you start. |
| £250-£350 | ButtKicker Gamer Plus or Gamer Pro single kit, or a DIY Dayton BST-300EX with a Nobsound amp. | The step-up if you’ve already decided tactile matters. Gamer Pro is the better felt-detail buy if you can find it; the DIY Dayton route is better value if you’re comfortable wiring an amp. |
| £600-£800 | ButtKicker Gamer Plus 4-Corners Kit or four Dayton BST-300EX units with a stereo amp. | The structural upgrade from mono tactile. This is where most experienced tactile owners settle. |
| £1,000-£1,200 | ButtKicker Gamer Pro 4-Corners Kit, or 4-corner Dayton with a higher-output amp. | The top of the pure-tactile budget. Going higher means belt tensioners or motion, not more transducers. |
| £1,800-£2,600 | Tactile 4-corner setup plus a Qubic QS-BT1 active belt tensioner (the tensioner alone is roughly £1,150-£1,400). Or tactile plus the LFE for deep-bass on a heavy rig. | The “tactile plus” tier. Gets you most of the perceptual benefit of motion at well under motion’s price. |
The line every reviewer agrees on: do not skip the entry tier just because the 4-corner tier looks more impressive. A single ButtKicker Gamer 2 tells you whether you’re going to enjoy tactile feedback at all. Some sim racers love it instantly; others are surprised to find they barely notice it. The £200 entry purchase is the cheapest possible “do I respond to physical feedback” test, and the answer informs everything you’d spend at higher tiers.

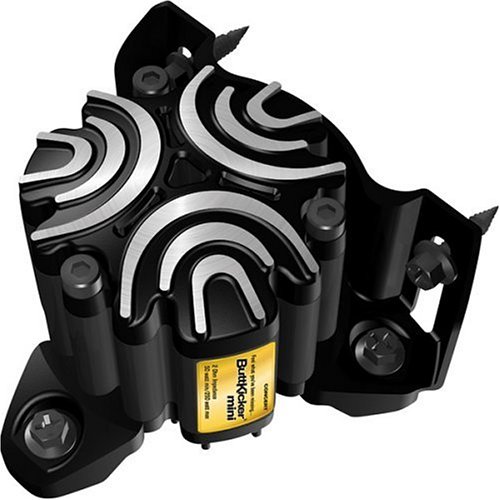
ButtKicker Mini LFE – the cheapest “do I respond to tactile” test
- Single-serving tactile – mounts directly under any seat shell
- Patented magnetically-suspended piston design for lower frequency response than most transducers
- Nearly indestructible build with thermal cutoff switch
- The £100-ish entry point into the ButtKicker family – if this doesn’t land for you, no other tactile will either
Where to buy
ButtKicker products are widely stocked. The cleanest UK route is direct from thebuttkicker.com (they ship internationally) or via Amazon for the standard Gamer 2 kit (you get next-day delivery for the price of slightly less customer support if anything goes wrong). Velocity Pro Sims stocks the full UK-targeted lineup for the Gamer 2 / Plus / Pro range. Dayton BST-300EX units are typically sourced via European retailers like Simline.eu or Etsy custom-mount shops; in the UK, smaller specialist audio retailers will often order them in. The Qubic QS-BT1 belt tensioner is available through Qubic’s distributor network – their distributor map shows the current UK options.
If you’re starting from scratch and want a single sensible recommendation: the ButtKicker Gamer 2 kit is the right first purchase for almost everyone. £170-£200, mounts under your seat in about thirty minutes, runs off the included amplifier, and will tell you within an hour whether you’re the kind of sim racer who responds to tactile feedback. If you love it, the 4-corner upgrade path is open and well-documented. If you don’t, you’ve spent less than a tank of petrol on the experiment.
ButtKicker BK-mini-CT – the studio-engineer-favoured tactile shaker
- Patented magnetic suspension – more powerful and durable than voice-coil-driven transducers
- Smaller, lighter format suits secondary 4-corner positions (pedal tray, wheel deck)
- Pairs well with a primary ButtKicker or Dayton for spatial tactile
- The “I want one of these at every corner” answer when you’ve outgrown a single Mini LFE
Sister content and where to read next
This article is one of three connected hubs on motion in sim racing. Our main page on sim racing motion platforms covers the full chassis-moving category – DOF Reality, Next Level Racing Motion Plus, Qubic System QS-220, SimXperience and the rest – for sim racers who’ve already done tactile and are looking at the next tier. The third hub focuses on D-Box specifically – the FIA-supplier haptic system that sits in its own category between tactile and full motion. Tactile feedback is the foundation that makes both of those upgrades worth the spend; read in order if you’re new to physical feedback in sim racing.
For the wider upgrade ladder, the SimRacingCockpit hubs on direct drive wheels, sim racing pedals, VR headsets and sim racing cockpits cover what the community consensus puts above tactile in the priority order. The honest order: stiff rig first, then load-cell pedals, then direct drive, then triples or VR, then tactile, then motion. Tactile is high-ROI but it’s the fifth thing on the ladder, not the first.

Best Pimax VR Settings for F1 25 in 2026: A Damage-Control Guide
Best Pimax VR Settings for Le Mans Ultimate in 2026

Best Pimax VR Settings for Automobilista 2 in 2026
Best Pimax VR Settings for Assetto Corsa in 2026

Best Pimax VR Settings for Assetto Corsa Evo (v0.6, May 2026)

Sol for Assetto Corsa in 2026: Still Worth Installing, or Switch to Pure?
Topic: Sim Racing Motion Platform