
I’m a sim racer and amateur racer with a passion for Motorsport, good racecraft and the technical and setup aspect of sim racing.
Two lines through every corner, both with their own defenders, and the right one depends on what’s after the apex more than what’s at it.
The racing line is the fastest arc through a corner. The maths textbook says one thing – take the biggest, smoothest curve you can, apex the geometric middle of the inside kerb, exit gently. The racing driver says something else – turn in later, apex past the middle, sacrifice mid-corner speed to straighten the exit. Both are defensible. Only one wins lap time on most corners, and a good driver knows which is which.
The TL;DR for anyone who only wants the headline: late apex on slow corners with long straights after them, geometric line on fast corners where the car has nothing left to accelerate to. The middle of the racing-line literature is sorting out the corners in between. This article walks the choice corner by corner, with three diagrams. The wider understeer-vs-oversteer hub covers how a car’s balance dictates which line it can actually drive.
Quick Navigation
Jump to what you need:
What the racing line is |
The geometric line |
The late apex |
Why fast drivers prefer the late apex |
When the geometric line wins |
The geometric line, drawn |
The overlay |
Finding the apex on a new track |
The compromise line |
How car balance changes the line |
How to drill the line |
Sources
What “racing line” actually means
The racing line is the optimal arc through a corner – the path that gets the car from braking zone to the next straight in the least amount of time. Scott Mansell at Driver61 frames it cleanly in his racing-line tutorial: “the racing line is the fastest line or arc through a corner on a race circuit. The trajectory of the racing line depends on the severity of the corner, how long the following straight is and what kind of car is being driven.” Three variables, one answer per corner. The answer is not always the prettiest curve.
Through a direct drive wheel, finding the line is a sensory exercise as much as a geometric one – the rim loads up as the front bites at turn-in, unloads as the car rolls through the apex, and reloads in the opposite direction as the steering opens for the exit. The terminology that goes with the arc is standard, and worth learning before reading the rest. Four points: the braking point (where the foot goes down), the turn-in point (where the hands move), the apex or clipping point (where the car kisses the inside of the corner), and the exit point (where the car returns to the outside of the track). Every conversation about racing lines is, at heart, a conversation about where to put the apex and where to turn in to get there.
The geometric line – the maths-textbook answer
The geometric line is the largest possible arc through a corner. It uses every inch of the circuit’s width, apexes at the geometric centre of the inside kerb, and – if a driver were to drive it perfectly – the radius stays constant from turn-in to exit. Mansell puts it in proper-textbook terms: “the geometric line is the perfect line through a corner, the mathematical best line through a corner if there’s nothing else influencing that corner.” The phrase if there’s nothing else influencing that corner is doing serious work in that sentence.
The case for the geometric line is the case for minimum-radius-equals-maximum-speed. A wider arc means a less aggressive turn, which means more lateral grip available, which means a higher speed all the way through the corner. The British authority on the subject, Drivingfast.net, frames the same point – the geometric apex sits at the central point on the inside of a constant-radius corner, and on any corner that lives in isolation, the geometric line is the fastest. The problem is that almost no corners live in isolation. Real circuits are concatenations of corners and straights, and the straight after the corner has a vote in where the apex should sit.
The late apex – the racing-driver’s answer
The late apex is the geometric line’s noisy younger sibling. Turn in later. Sacrifice the wide entry arc. Clip the inside past the corner’s geometric midpoint. Straighten the line dramatically for the exit so the throttle can open earlier and stay open longer down the next straight. It’s the line every racing driver actually drives most of the time, and it’s the one most coaching content quietly recommends without quite saying so out loud.
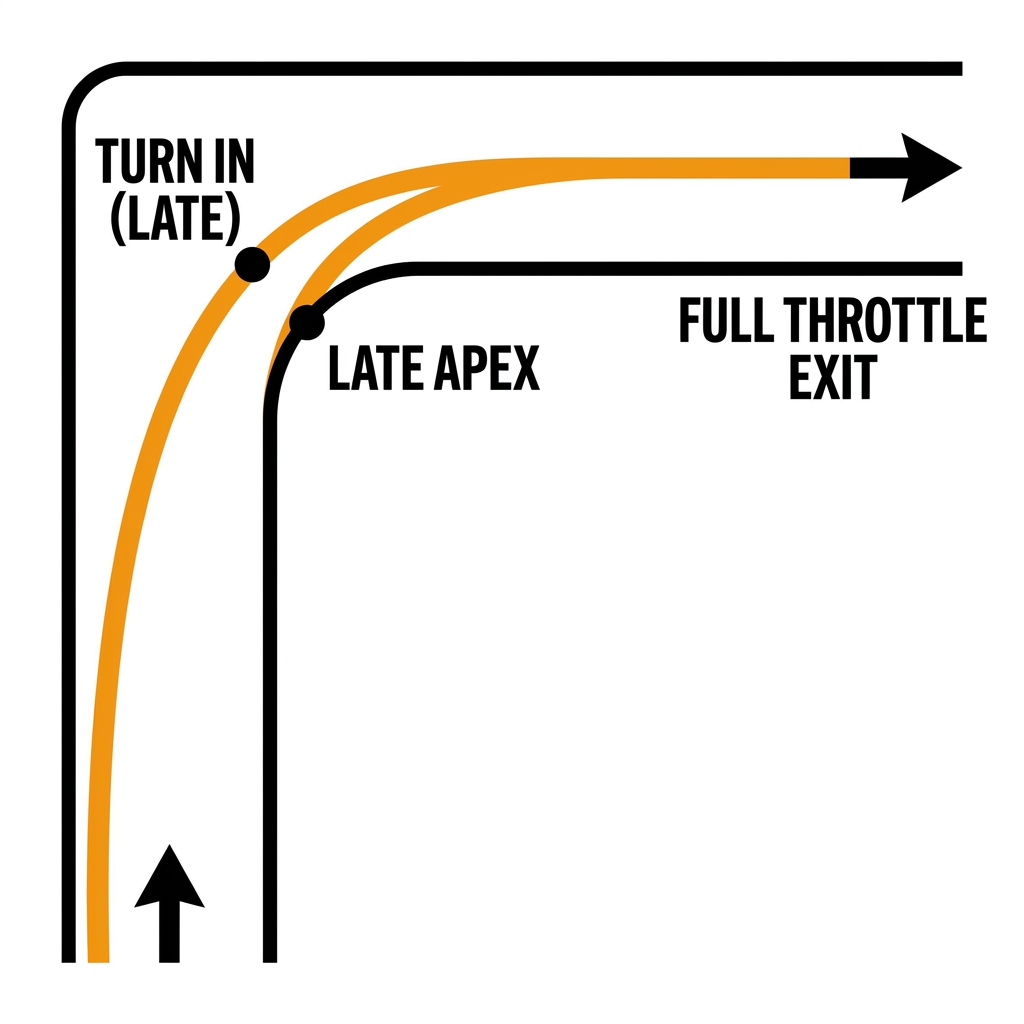
The trade is straightforward to articulate and quite a bit harder to commit to. Mansell again: “if you carry one mph more on the corner exit, you continue to carry that speed all the way down the next straight – and this comes to a big reduction in lap time.” One mph on exit, multiplied by a few hundred metres of straight, beats two or three mph of mid-corner pace that gets bled off the moment the next braking point arrives. The maths is convincing the first time it’s drawn on a whiteboard and convincing again the first time a driver actually drills the comparison.
Why most fast drivers prefer the late apex
The argument for the late apex sits on three pillars, all of which Mansell lays out in the Driver61 racing-line tutorial. First, less time turning the car – the car can go fastest in a straight line, so any time spent on lock is time spent slower than the car can otherwise go. Second, earlier and harder throttle application – the straighter the exit, the sooner the right pedal can come down without breaking the rear loose. Third, a slightly later braking point – because turn-in is later, the brakes can stay on a fraction longer, which buys a tiny gain on entry as well.
Visit Our Sponsors
The cost is a lower minimum speed somewhere around the apex. The line is tighter from turn-in to apex than the geometric line is, which means the car can’t carry quite as much lateral g through that section. Mansell concedes the point cheerfully: “this slight loss in time is easily outweighed by the positives mentioned above.” Most drivers, watching the speed trace afterwards, are surprised by how much exit speed they’re giving up by chasing entry speed – the trap that Mansell calls out specifically. “Most drivers are impatient and will try to make too big of a gain on corner entry, thereby destroying their exit speed.” Patience is what’s actually being learned when a driver learns the late apex. The geometry is the diagram; the temperament is the drill.
When the geometric line wins
The geometric line is the right answer in three scenarios, all of which exist on real circuits and most of which sim racers will meet within a season. First, very fast corners where the car can’t accelerate much more after the corner anyway – the flat-out fifth-gear sweepers where the apex speed is already 80% of the next-straight speed. Mansell’s framing of this is the cleanest: “the faster the corner, the closer to the geometric line will be, and the slower the corner, the further away we will be from the geometric line.” A 110mph apex into a 150mph straight wants the geometric line. A 30mph hairpin into the same 150mph straight wants the late apex with attitude.
Second, corners followed immediately by another corner – any section where there is no straight to capitalise on. If T1 feeds into T2 with no breathing room, the late apex of T1 may compromise the entry to T2. The compromise line (covered below) is the right answer in those cases. Third, cold-tyre qualifying laps and out-laps where the geometric line keeps lateral load lower and the car more predictable – some drivers prefer it on the formation lap simply because the rim is doing less work and the brain has more bandwidth for everything else. None of these is the textbook case. All of them are real.
The geometric line, drawn
Here’s the same corner with the geometric line drawn over it. Turn-in earlier, arc symmetrical, apex bang at the geometric midpoint, and an exit that doesn’t straight-line because it can’t – the radius has stayed constant the whole way.
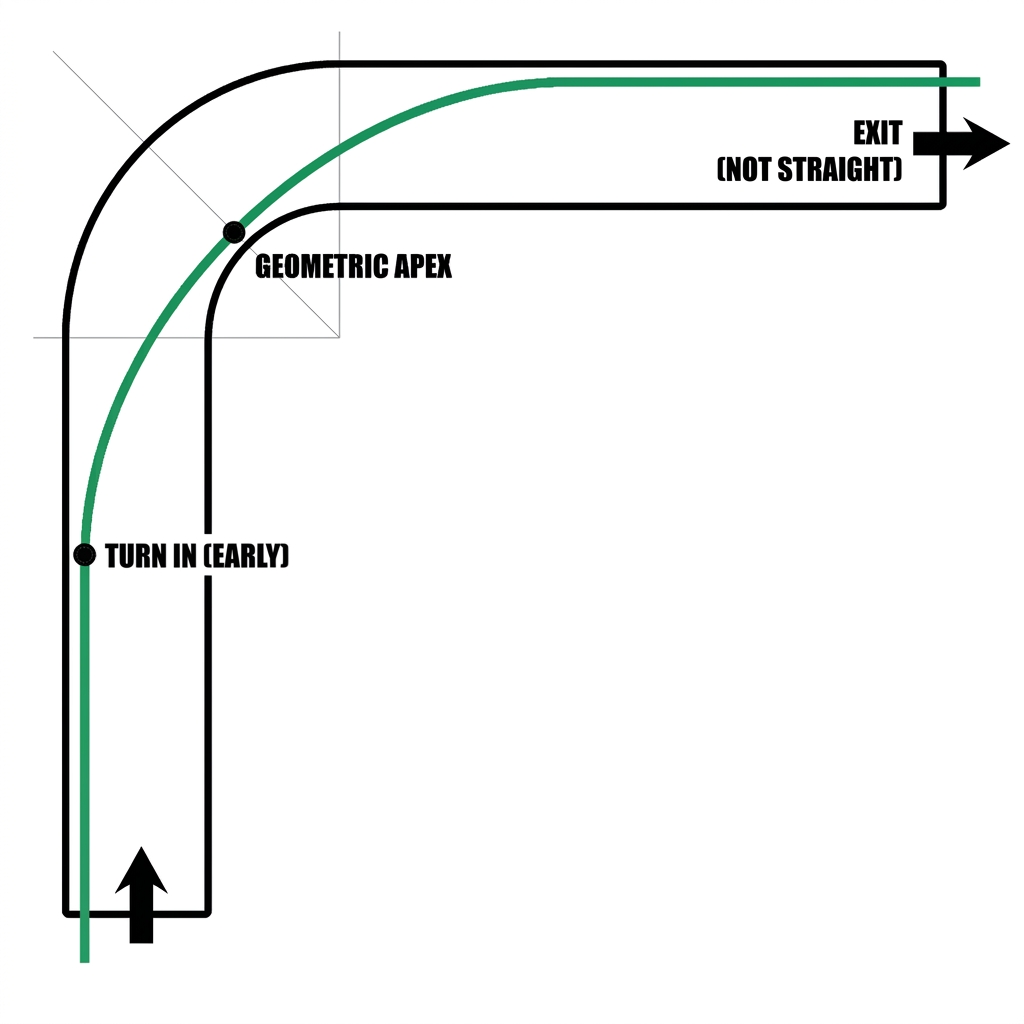
The geometric line is genuinely faster through the corner itself – higher minimum speed, less aggressive demand on the front tyres at any one point. Where it loses lap time is the section that doesn’t appear in the diagram: the next straight. The line that maximises corner speed and the line that maximises lap time are two different lines, and for most corners on most circuits they’re not the same. That’s the whole argument in one sentence.
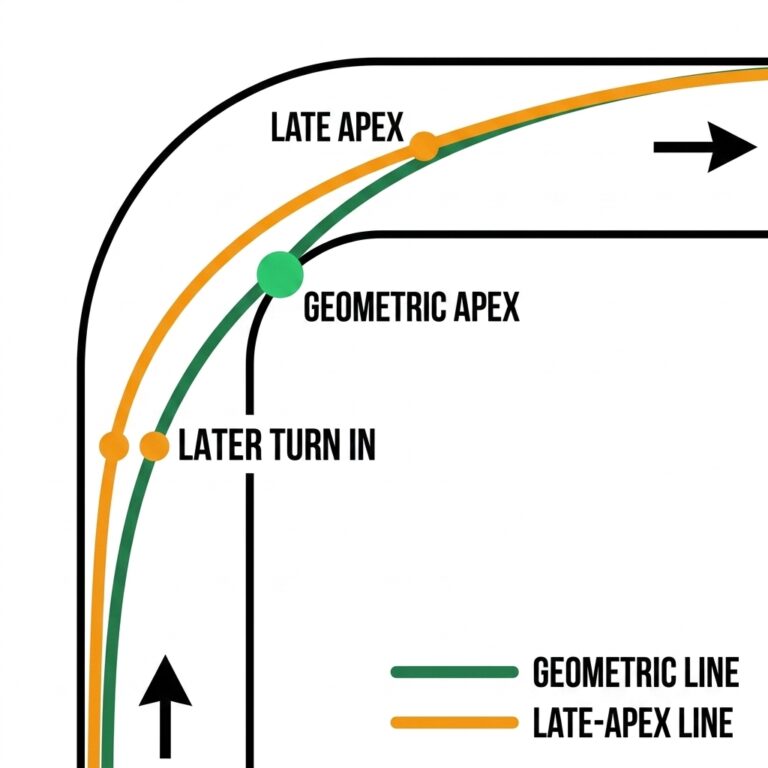
The overlay – both lines, side by side
The picture that makes the choice obvious is the overlay. Same corner, both lines on it, the crossover visible:

If a driver had to internalise one rule from the racing-line literature, this would be it: the corner is not the whole problem. The corner plus the straight afterwards is the whole problem. The late apex is what falls out of that framing when the maths is run honestly. The geometric line is what falls out of treating the corner as a closed system, which – on a race circuit – it almost never is.
Finding the apex of a corner you’ve never driven
Mansell’s six-step process for taking the line is the framework most sim racers learn early and keep using forever, because it works. From the Driver61 racing-line page:
- Brake to maximum capacity at your braking point
- Move your vision to the apex point
- Turn-in your car at the turn-in point
- Make the apex of the ideal racing line
- Begin to introduce the accelerator
- Open up steering to the corner’s exit point
The practical version for a corner the driver has never seen is to work the corner backwards. Walk the exit first – where does the car want to be at the moment the corner runs out? Outside, almost certainly, hard on the kerb if there is one. Then ask: where does the apex have to be for the line to arrive at that exit naturally, without needing more steering correction on the way out? The apex is the point that joins a clean exit to a smooth entry, and on most corners it sits later than instinct suggests. Then walk back from the apex to find the turn-in – the point where the hands first move, and where the brake pressure is bleeding off into trail braking. Three points define the line, and the order to find them is exit, apex, turn-in. Most beginners start at the turn-in and end up wherever the geometry sends them.
The corner that teaches this best in a sim is a tight third-gear hairpin onto a long straight – Druids at Brands Hatch is the textbook British example, La Source at Spa the Belgian one. The geometric line at Druids will have a driver pointing the wrong way at the exit and rolling onto Graham Hill straight with the car still rotating. The late apex puts the car straight before the throttle goes down. The difference at the next braking point is several tenths.
The compromise line
The compromise line is what happens when the corner before constrains how the corner after can be taken, or when two corners are linked so tightly that there is no good line through both in isolation. The Esses at Suzuka, the Maggotts-Becketts-Chapel complex at Silverstone, the Senna-S at Interlagos – all are sequences where the line through one corner is dictated by what the next corner needs from the car. The classic compromise is sacrificing the exit of T1 to set up the entry into T2.
For sim racers, the compromise line is the point where data-overlay tools earn their keep. Driving a clean lap on the natural late-apex line, then loading up an alien aid or a known fast lap and watching where the actual line crossed the racing surface compared to the textbook line, is often the only way to see the compromise the fast driver is making. Sometimes the compromise looks wrong from inside the cockpit and only makes sense when the lap time across the sector lands. That’s the moment most drivers stop trusting the geometry and start trusting the watch.
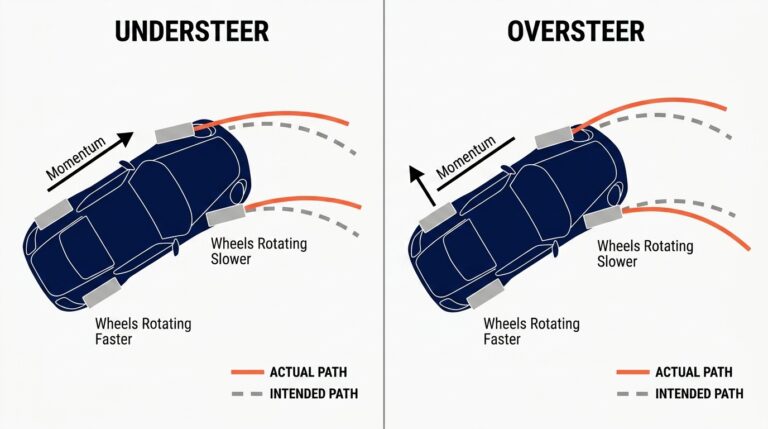
How car balance changes the line
The same corner, driven by two cars with different balance, wants two different lines. A front-biased setup – one with mid-corner understeer – wants a wider entry to give the front tyres time to bite, a clearly late apex so the exit is straight before the throttle opens, and patience with power. The car will run wide on the exit if any of that is rushed. A rear-biased setup – one that wants to rotate, the pointy-front camp’s preferred car – can use a tighter entry, an earlier apex, and a more aggressive throttle application once the car is pointing at the exit. The same line that maximises the front-biased car’s exit will make the rear-biased car snap into oversteer on entry. There isn’t one universal racing line. There’s one that fits the car the driver is in.
The F1-level version of this split is covered in detail in the understeer-vs-oversteer hub – it’s the same question Alonso and Verstappen are answering differently with the same car. Alonso lives with a hint of mid-corner push so the rear stays planted under trail braking; Verstappen wants the pointy front and adapts his lines to keep the rear honest. Both win races. Neither line would suit the other driver. Which is the rather quiet observation behind the entire racing-line conversation: there isn’t a textbook answer, only the answer that fits the car, the corner, and the driver in front of it.
How to drill the line in the sim
The drill that works best for racing-line practice is back-to-back stints in the same car at the same corner, with one variable changed between them. A GT3 or GT4 at Brands Hatch is the British default – Paddock Hill is the late-apex teaching corner (downhill entry into a fast right where exit speed onto Hailwood Hill makes or breaks the lap), and Druids is the slow-corner version (180-degree hairpin where the late apex onto Graham Hill straight is worth several tenths). Run ten clean laps trying to drive the geometric line at one of them – apex the centre of the inside kerb, accept the gentle exit. Then run ten clean laps trying the late apex – delay turn-in, clip the inside past the kerb’s midpoint, straighten the exit. Compare lap times and sector times. The late apex will almost always win, but the size of the gap surprises drivers who haven’t drilled it deliberately.
The same isolated-variable principle drives the track-learning methodology and the understeer drill from earlier in this cluster – change one thing, drive ten laps, change one more thing, drive ten more. The compounding gain from drilling racing lines this way is significant. Most casual sim racers never do it because it’s boring and the laps don’t feel fast. The lap times after a session of it always do. Trail braking and threshold braking are the two techniques that magnify the line’s benefit – the line gets the car to the apex, the brakes decide whether the car arrives at the apex still pointing in the right direction.
A closing observation
The racing line is the first piece of theory most sim racers learn and the last piece they fully internalise. The geometric line is the elegant answer; the late apex is the right answer. The art is knowing the few corners where elegance wins and driving the rest with the patience to sacrifice mid-corner speed for the half-second the next straight will hand back.
Sources & where to go next
- Driver61 – How to Drive the Perfect Racing Line – Scott Mansell’s canonical racing-line article and accompanying video tutorial. The six-step racing-line process, the geometric-vs-ideal framing, and the slow-corner-vs-fast-corner argument all originate here.
- Driver61 – The Racing Line tutorial video – the video companion. The “one mph more on the corner exit” framing and the hairpin-vs-fast-kink comparison both live in the video specifically.
- Driver61 – The 6 Phases of a Corner – the corner-phase framework used in the “how to find the apex” section.
- Drivingfast.net – Driving the racing line – the British 1-pager authority on the subject. The geometric apex definition (“the central point on the inside of a constant radius corner”) is theirs.
- Wikipedia – Racing line – the formal definition for anyone who wants the textbook framing.
On SimRacingCockpit, the related deep-dives are the understeer-vs-oversteer hub article, what is understeer, trail braking in the simulator, threshold braking, learning a new track, and on the kit side, direct drive wheelbases, which are the platform difference that makes any of the rim feedback in this article legible.
Related Posts
What Is Oversteer? The Sim Racer’s Plain-English Guide
Racing Line Explained: Late vs Geometric Apex (with diagrams)
What Is Understeer? The Sim Racer’s Plain-English Guide
Understeer vs Oversteer: What’s Actually Happening (and Why F1 Drivers Set Up for Each)
How to Learn a New Track Faster in Sim Racing

The Science of Tyre Warming in iRacing: Testing Shows Braking Beats Weaving
Topic: racing line